ASSEMBLY INSTRUCTIONS

FOR HEADQUATERS TENT:

Component List: 1 Tent Body

4

Poles

1

Carry Bag,

1

Stake Bag / Stakes


2

Hood Rods,

1

Tent Fly

1

Fly Rod

1

Pole Bag

ASSEMBLY

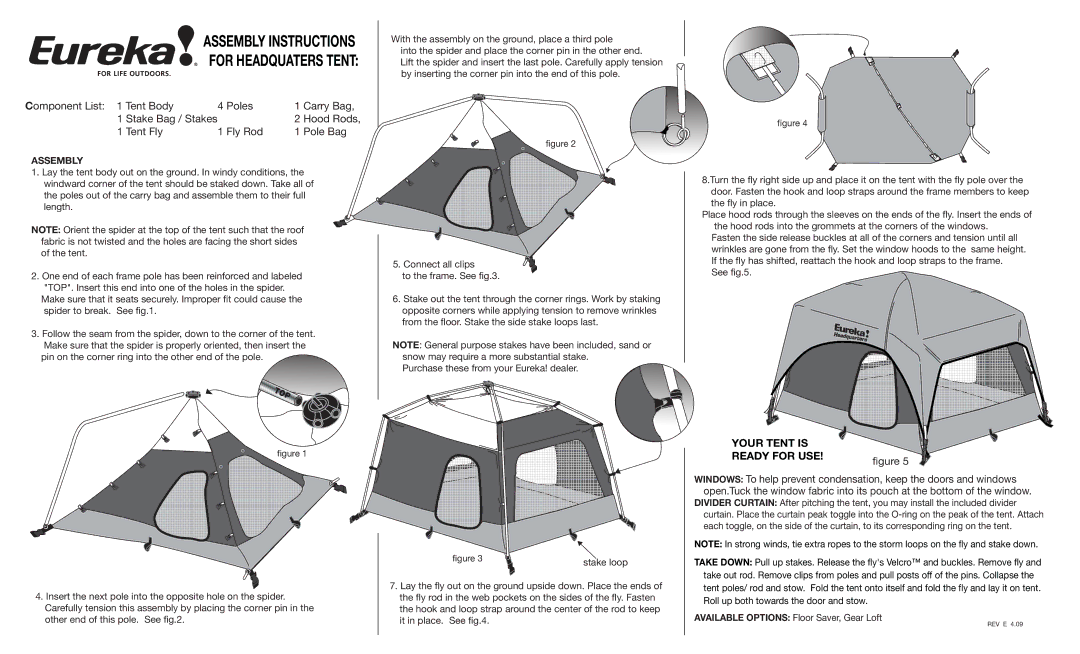
1.Lay the tent body out on the ground. In windy conditions, the windward corner of the tent should be staked down. Take all of the poles out of the carry bag and assemble them to their full length.

NOTE: Orient the spider at the top of the tent such that the roof fabric is not twisted and the holes are facing the short sides of the tent.

2.One end of each frame pole has been reinforced and labeled "TOP". Insert this end into one of the holes in the spider.

Make sure that it seats securely. Improper fit could cause the spider to break. See fig.1.

3.Follow the seam from the spider, down to the corner of the tent. Make sure that the spider is properly oriented, then insert the

pin on the corner ring into the other end of the pole.

figure 1

With the assembly on the ground, place a third pole

into the spider and place the corner pin in the other end.

Lift the spider and insert the last pole. Carefully apply tension by inserting the corner pin into the end of this pole.

figure 2

5. Connect all clips

to the frame. See fig.3.

6.Stake out the tent through the corner rings. Work by staking opposite corners while applying tension to remove wrinkles from the floor. Stake the side stake loops last.

NOTE: General purpose stakes have been included, sand or snow may require a more substantial stake.

Purchase these from your Eureka! dealer.

figure 4

8.Turn the fly right side up and place it on the tent with the fly pole over the door. Fasten the hook and loop straps around the frame members to keep the fly in place.

Place hood rods through the sleeves on the ends of the fly. Insert the ends of the hood rods into the grommets at the corners of the windows.

Fasten the side release buckles at all of the corners and tension until all wrinkles are gone from the fly. Set the window hoods to the same height. If the fly has shifted, reattach the hook and loop straps to the frame.

See fig.5.

YOUR TENT IS


READY FOR USE!

figure 5


WINDOWS: To help prevent condensation, keep the doors and windows open.Tuck the window fabric into its pouch at the bottom of the window.

DIVIDER CURTAIN: After pitching the tent, you may install the included divider curtain. Place the curtain peak toggle into the O-ring on the peak of the tent. Attach each toggle, on the side of the curtain, to its corresponding ring on the tent.

NOTE: In strong winds, tie extra ropes to the storm loops on the fly and stake down.

4.Insert the next pole into the opposite hole on the spider. Carefully tension this assembly by placing the corner pin in the other end of this pole. See fig.2.

figure 3

stake loop


7.Lay the fly out on the ground upside down. Place the ends of the fly rod in the web pockets on the sides of the fly. Fasten the hook and loop strap around the center of the rod to keep it in place. See fig.4.

TAKE DOWN: Pull up stakes. Release the fly's Velcro™ and buckles. Remove fly and take out rod. Remove clips from poles and pull posts off of the pins. Collapse the tent poles/ rod and stow. Fold the tent onto itself and fold the fly and lay it on tent. Roll up both towards the door and stow.

AVAILABLE OPTIONS: Floor Saver, Gear Loft

REV E 4.09

Page 1
Image 1
Eureka! Tents Headquarters manual For Headquaters Tent

Headquarters specifications

Eureka! Tents Headquarters is a renowned establishment in the outdoor recreation industry, specializing in the design and manufacturing of high-quality camping tents and outdoor shelters. With a commitment to innovation, performance, and sustainability, Eureka! has become a trusted brand among outdoor enthusiasts, campers, and adventurers.

One of the standout features of Eureka! Tents is their focus on functional design. Each tent is crafted with the user experience in mind, ensuring that setup and takedown are simple and efficient. Many models boast color-coded poles and easy-pitch systems, allowing campers to quickly assemble their shelters without frustration. This attention to detail makes Eureka! tents a favorite among both novice and seasoned campers.

Incorporating advanced technologies, Eureka! Tents pride themselves on using premium materials and construction methods. Their tents often feature weather-resistant fabrics, such as Durable Water Repellent (DWR) coatings and silicone-impregnated nylon, which enhance waterproof capabilities and improve durability. Additionally, Eureka! employs seam-sealed construction to prevent water leaks during torrential downpours, ensuring a dry and comfortable shelter.

Eureka! also focuses on ventilation, a crucial aspect for camping comfort. Many of their tents are designed with multiple doors and windows, providing excellent airflow and reducing condensation inside the tent. This thoughtful design helps create a pleasant camping experience, even in humid conditions.

Sustainability is another core principle at Eureka! Tents Headquarters. The brand is committed to reducing its environmental impact by utilizing eco-friendly materials and sustainable manufacturing practices. This initiative ensures that outdoor lovers can enjoy nature while preserving it for future generations.

Eureka! offers a wide range of tent types, catering to different camping needs. From lightweight backpacking tents ideal for solo adventurers to spacious family tents suited for group outings, there’s a tent for every type of camper. Their thoughtful selection of features, including vestibules for gear storage and reflective guy lines for visibility at night, enhance the overall camping experience.

In summary, Eureka! Tents Headquarters stands out as a leader in the outdoor industry due to its commitment to functional design, advanced materials, excellent ventilation, and sustainable practices. With a diverse range of tents built for performance, Eureka! continues to inspire outdoor enthusiasts to explore and connect with nature confidently.