ASSEMBLY INSTRUCTIONS
FOR THE K2-XT
Component List: 1 Tent Body 1 Fly 4 Poles
1 Vestibule Rod 1 Carry Bag 1 Pole Bag 1 Bag w/ Stakes
Assembly:
1Unpack the carry bag and separate the components. Unfold the tent body and lay it out with the floor on the ground and a grommeted web in each corner. Pull the tent into a rough hexagon. Do not stake down the tent just yet; but in windy conditions, stake down one corner that faces into the wind.
2Assemble the shockcorded tent poles and rod. Carefully seat each section. Try to keep the poles from snapping together as this can damage the ends. Set the shorter vestibule rod aside.
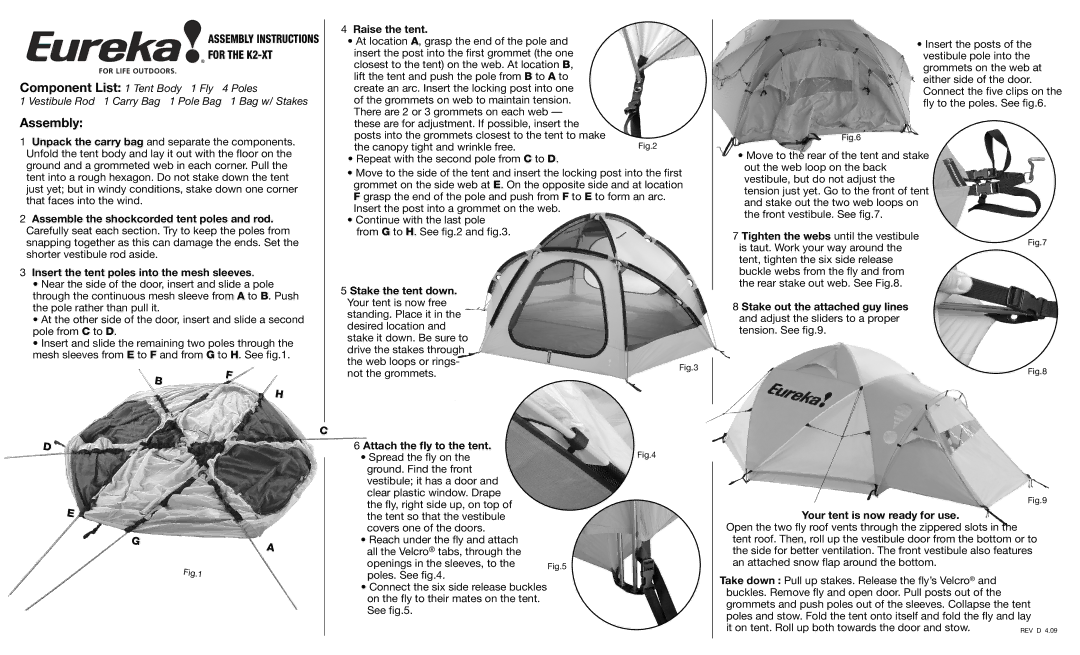
3Insert the tent poles into the mesh sleeves.
•Near the side of the door, insert and slide a pole through the continuous mesh sleeve from A to B. Push the pole rather than pull it.
•At the other side of the door, insert and slide a second pole from C to D.
•Insert and slide the remaining two poles through the mesh sleeves from E to F and from G to H. See fig.1.
B | F |
|
H
C D
E
G | A |
| |
| Fig.1 |
4Raise the tent.
•At location A, grasp the end of the pole and insert the post into the first grommet (the one closest to the tent) on the web. At location B, lift the tent and push the pole from B to A to create an arc. Insert the locking post into one of the grommets on web to maintain tension. There are 2 or 3 grommets on each web — these are for adjustment. If possible, insert the posts into the grommets closest to the tent to make
the canopy tight and wrinkle free. | Fig.2 |
•Repeat with the second pole from C to D.
•Move to the side of the tent and insert the locking post into the first grommet on the side web at E. On the opposite side and at location F grasp the end of the pole and push from F to E to form an arc.
Insert the post into a grommet on the web.
•Continue with the last pole from G to H. See fig.2 and fig.3.
5 Stake the tent down.
Your tent is now free |
| |
standing. Place it in the |
| |
desired location and |
| |
stake it down. Be sure to |
| |
drive the stakes through |
| |
the web loops or rings- | Fig.3 | |
not the grommets. | ||
|
6 Attach the fly to the tent. | Fig.4 |
• Spread the fly on the | |
ground. Find the front |
|
vestibule; it has a door and |
|
clear plastic window. Drape |
|
the fly, right side up, on top of |
|
the tent so that the vestibule |
|
covers one of the doors. |
|
•Reach under the fly and attach all the Velcro® tabs, through the
openings in the sleeves, to the | Fig.5 |
poles. See fig.4. |
|
•Connect the six side release buckles on the fly to their mates on the tent. See fig.5.
• Insert the posts of the vestibule pole into the grommets on the web at either side of the door. Connect the five clips on the fly to the poles. See fig.6.
Fig.6
•Move to the rear of the tent and stake out the web loop on the back vestibule, but do not adjust the tension just yet. Go to the front of tent and stake out the two web loops on the front vestibule. See fig.7.
7 Tighten the webs until the vestibule
is taut. Work your way around theFig.7 tent, tighten the six side release
buckle webs from the fly and from the rear stake out web. See Fig.8.
8 Stake out the attached guy lines and adjust the sliders to a proper tension. See fig.9.
Fig.8
Fig.9
Your tent is now ready for use.
Open the two fly roof vents through the zippered slots in the tent roof. Then, roll up the vestibule door from the bottom or to the side for better ventilation. The front vestibule also features an attached snow flap around the bottom.
Take down : Pull up stakes. Release the fly’s Velcro® and buckles. Remove fly and open door. Pull posts out of the grommets and push poles out of the sleeves. Collapse the tent poles and stow. Fold the tent onto itself and fold the fly and lay it on tent. Roll up both towards the door and stow.