Assembly Instructions for the Pine Lodge Tent
Component List:
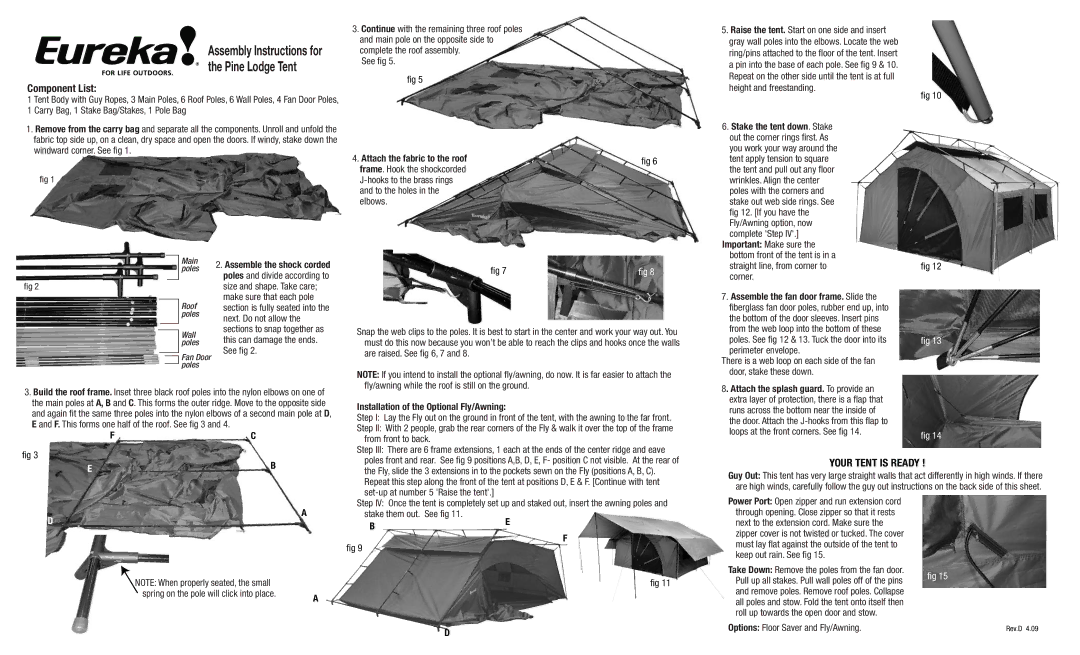
1 Tent Body with Guy Ropes, 3 Main Poles, 6 Roof Poles, 6 Wall Poles, 4 Fan Door Poles, 1 Carry Bag, 1 Stake Bag/Stakes, 1 Pole Bag
1.Remove from the carry bag and separate all the components. Unroll and unfold the fabric top side up, on a clean, dry space and open the doors. If windy, stake down the windward corner. See fig 1.
fig 1
3.Continue with the remaining three roof poles and main pole on the opposite side to complete the roof assembly.
See fig 5.
fig 5
4. Attach the fabric to the roof | fig 6 |
frame. Hook the shockcorded |
|
| |
and to the holes in the |
|
elbows. |
|
5.Raise the tent. Start on one side and insert gray wall poles into the elbows. Locate the web ring/pins attached to the floor of the tent. Insert a pin into the base of each pole. See fig 9 & 10. Repeat on the other side until the tent is at full height and freestanding.
6.Stake the tent down. Stake
out the corner rings first. As you work your way around the tent apply tension to square the tent and pull out any floor wrinkles. Align the center poles with the corners and stake out web side rings. See fig 12. [If you have the Fly/Awning option, now complete 'Step IV'.]
fig 10
Main poles
fig 2
Roof poles
Wall poles
![]() Fan Door poles
Fan Door poles
2.Assemble the shock corded poles and divide according to size and shape. Take care; make sure that each pole section is fully seated into the next. Do not allow the sections to snap together as this can damage the ends. See fig 2.
fig 7 | fig 8 |
Snap the web clips to the poles. It is best to start in the center and work your way out. You must do this now because you won’t be able to reach the clips and hooks once the walls are raised. See fig 6, 7 and 8.
Important: Make sure the bottom front of the tent is in a straight line, from corner to corner.
7.Assemble the fan door frame. Slide the fiberglass fan door poles, rubber end up, into the bottom of the door sleeves. Insert pins
from the web loop into the bottom of these poles. See fig 12 & 13. Tuck the door into its perimeter envelope.
There is a web loop on each side of the fan
fig 12
fig 13
fig 14
3.Build the roof frame. Inset three black roof poles into the nylon elbows on one of the main poles at A, B and C. This forms the outer ridge. Move to the opposite side and again fit the same three poles into the nylon elbows of a second main pole at D, E and F. This forms one half of the roof. See fig 3 and 4.
FC
NOTE: If you intend to install the optional fly/awning, do now. It is far easier to attach the fly/awning while the roof is still on the ground.
Installation of the Optional Fly/Awning:
Step I: Lay the Fly out on the ground in front of the tent, with the awning to the far front.
Step II: With 2 people, grab the rear corners of the Fly & walk it over the top of the frame from front to back.
door, stake these down.
8. Attach the splash guard. To provide an extra layer of protection, there is a flap that runs across the bottom near the inside of the door. Attach the
fig 14
fig 3
EB
Step III: There are 6 frame extensions, 1 each at the ends of the center ridge and eave poles front and rear. See fig 9 positions A,B, D, E, F- position C not visible. At the rear of the Fly, slide the 3 extensions in to the pockets sewn on the Fly (positions A, B, C). Repeat this step along the front of the tent at positions D, E & F. [Continue with tent
YOUR TENT IS READY !
Guy Out: This tent has very large straight walls that act differently in high winds. If there are high winds, carefully follow the guy out instructions on the back side of this sheet.
D
A
Step IV: Once the tent is completely set up and staked out, insert the awning poles and stake them out. See fig 11.
BE
F
fig 9
Power Port: Open zipper and run extension cord through opening. Close zipper so that it rests next to the extension cord. Make sure the zipper cover is not twisted or tucked. The cover must lay flat against the outside of the tent to keep out rain. See fig 15.
NOTE: When properly seated, the small |
|
spring on the pole will click into place. | A |
|
fig 11
D
Take Down: Remove the poles from the fan door. | fig 15 | |
Pull up all stakes. Pull wall poles off of the pins | ||
| ||
and remove poles. Remove roof poles. Collapse |
| |
all poles and stow. Fold the tent onto itself then |
| |
roll up towards the open door and stow. |
| |
Options: Floor Saver and Fly/Awning. | Rev.D 4.09 |