OPERATING INSTRUCTIONS cont.

PRECAUTIONARY MEASURES

Cleaning & Changing the HEPA Dust Cup Filter (cont.)

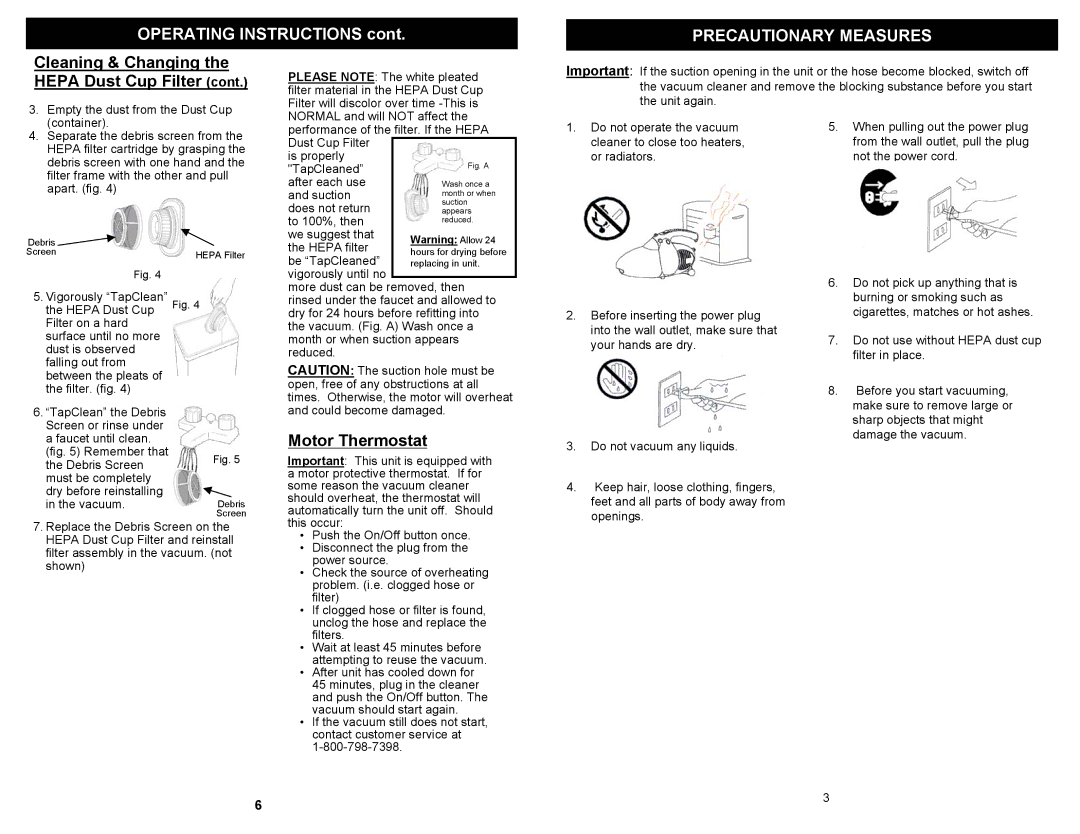
3.Empty the dust from the Dust Cup (container).

4.Separate the debris screen from the HEPA filter cartridge by grasping the debris screen with one hand and the filter frame with the other and pull apart. (fig. 4)

PLEASE NOTE: The white pleated filter material in the HEPA Dust Cup Filter will discolor over time -This is NORMAL and will NOT affect the performance of the filter. If the HEPA

Dust Cup Filter


is properly

Fig. A

"TapCleaned”

after each use

Wash once a

and suction

month or when

does not return

suction

appears

to 100%, then

reduced.

we suggest that


Important: If the suction opening in the unit or the hose become blocked, switch off the vacuum cleaner and remove the blocking substance before you start the unit again.

1. Do not operate the vacuum

5. When pulling out the power plug

cleaner to close too heaters,

from the wall outlet, pull the plug

or radiators.

not the power cord.

Debris


Screen

HEPA Filter


Fig. 4


5. Vigorously “TapClean”

Fig. 4

the HEPA Dust Cup


Filter on a hard


surface until no more


dust is observed


falling out from


between the pleats of


the filter. (fig. 4)


6.“TapClean” the Debris Screen or rinse under

a faucet until clean.


(fig. 5) Remember that

Fig. 5

the Debris Screen


must be completely


dry before reinstalling


in the vacuum.

Debris


Screen

7.Replace the Debris Screen on the HEPA Dust Cup Filter and reinstall filter assembly in the vacuum. (not shown)

the HEPA filter

Warning: Allow 24

hours for drying before

be “TapCleaned”

replacing in unit.

vigorously until no


more dust can be removed, then rinsed under the faucet and allowed to dry for 24 hours before refitting into the vacuum. (Fig. A) Wash once a month or when suction appears reduced.

CAUTION: The suction hole must be open, free of any obstructions at all times. Otherwise, the motor will overheat and could become damaged.

Motor Thermostat

Important: This unit is equipped with a motor protective thermostat. If for some reason the vacuum cleaner should overheat, the thermostat will automatically turn the unit off. Should this occur:

Push the On/Off button once.

Disconnect the plug from the power source.

Check the source of overheating problem. (i.e. clogged hose or filter)

If clogged hose or filter is found, unclog the hose and replace the filters.

Wait at least 45 minutes before attempting to reuse the vacuum.

After unit has cooled down for

45 minutes, plug in the cleaner and push the On/Off button. The vacuum should start again.

If the vacuum still does not start, contact customer service at 1-800-798-7398.

2.Before inserting the power plug into the wall outlet, make sure that your hands are dry.

3.Do not vacuum any liquids.

4.Keep hair, loose clothing, fingers, feet and all parts of body away from openings.

6.Do not pick up anything that is burning or smoking such as cigarettes, matches or hot ashes.

7.Do not use without HEPA dust cup filter in place.

8.Before you start vacuuming, make sure to remove large or sharp objects that might damage the vacuum.

6

3

Page 5
Image 5
Euro-Pro EP035H3 owner manual Precautionary Measures, Cleaning & Changing the Hepa Dust Cup Filter, Motor Thermostat

EP035H3 specifications

The Euro-Pro EP035H3 is a versatile and user-friendly household appliance designed specifically to simplify meal preparation and enhance cooking experiences. Known for its efficiency and innovative features, this compact unit caters to a variety of cooking needs, making it an essential addition to any modern kitchen.

One of the standout features of the Euro-Pro EP035H3 is its multi-functionality. This appliance combines the functions of a pressure cooker, slow cooker, rice cooker, steamer, and sauté pan, allowing users to prepare a wide range of dishes with ease. Whether you want to cook tender meats, steaming vegetables, or whip up a delicious risotto, this unit can handle it all, saving both time and effort in the kitchen.

Another significant aspect of the Euro-Pro EP035H3 is its advanced cooking technologies. The appliance is equipped with a microprocessor-controlled system that ensures precise temperature and pressure control, resulting in consistently perfect cooking results. The programmable timer allows users to set cooking times in advance, so meals can be prepared to fit their schedules. This feature is particularly useful for busy individuals and families looking to streamline their meal prep.

Safety is a top priority with the Euro-Pro EP035H3, and it includes multiple safety features to protect users. The built-in locking mechanism prevents accidental opening during cooking, while the pressure release valve ensures that steam is safely released after cooking is complete. These safety measures provide peace of mind, allowing users to focus on creating delicious meals without worrying about risks.

The design of the Euro-Pro EP035H3 is also noteworthy. With its sleek and modern appearance, it complements a variety of kitchen decors and takes up minimal counter space. The non-stick cooking pot is easy to clean, and the removable components are dishwasher safe, simplifying post-cooking clean-up.

In summary, the Euro-Pro EP035H3 is an all-in-one cooking appliance that brings together functionality, safety, and convenience. Its advanced technologies, multi-functionality, and user-friendly design make it a fantastic choice for anyone looking to enhance their culinary skills while saving time in the kitchen. Whether you are a beginner cook or a seasoned chef, the Euro-Pro EP035H3 is designed to meet your cooking needs with ease and efficiency.