GETTING TO KNOW YOUR IRON
USER MAINTENANCE INSTRUCTIONS
Before using your 1600 Watt Pro Iron, remove any labels, stickers or tags that may be attached to the body or soleplate of the iron.
When turned on for the first time, your new iron may emit an odor for up to 10 minutes. This is due to the initial heating of the materials used in making the iron.
The odor is safe and should not reoccur after initial heating.
Also, before ironing with steam for the first time, allow iron to heat, hold in a horizontal position and hit the burst of steam button several times. The iron may emit some small particles from the steam holes. This is normal and will clear after pressing the burst of steam button several times.
EMPTYING THE IRON
1.Always empty iron after each use.
2.When finished using the iron, turn the variable steam control to“0” and the temperature control dial to "MIN".
3.Unplug the iron from the electrical outlet.
4.Set variable steam control to "MAX".
5.Turn the iron upside down over the sink with the tip pointing downward and allow the water to flow from the opening.
6.Set variable steam control to "0".
7.Allow iron to cool in an upright position before storing.
WARNING! Use caution when emptying the iron. Burns may occur from touching hot metal surfaces, hot water or steam.
ANTI-DRIP FEATURE
STORAGE
1. | Always turn the variable steam |
| control to “0” after you have |
| emptied the water tank. |
2. | Allow the iron to cool down. |
3. | Always store the iron in the upright |
12
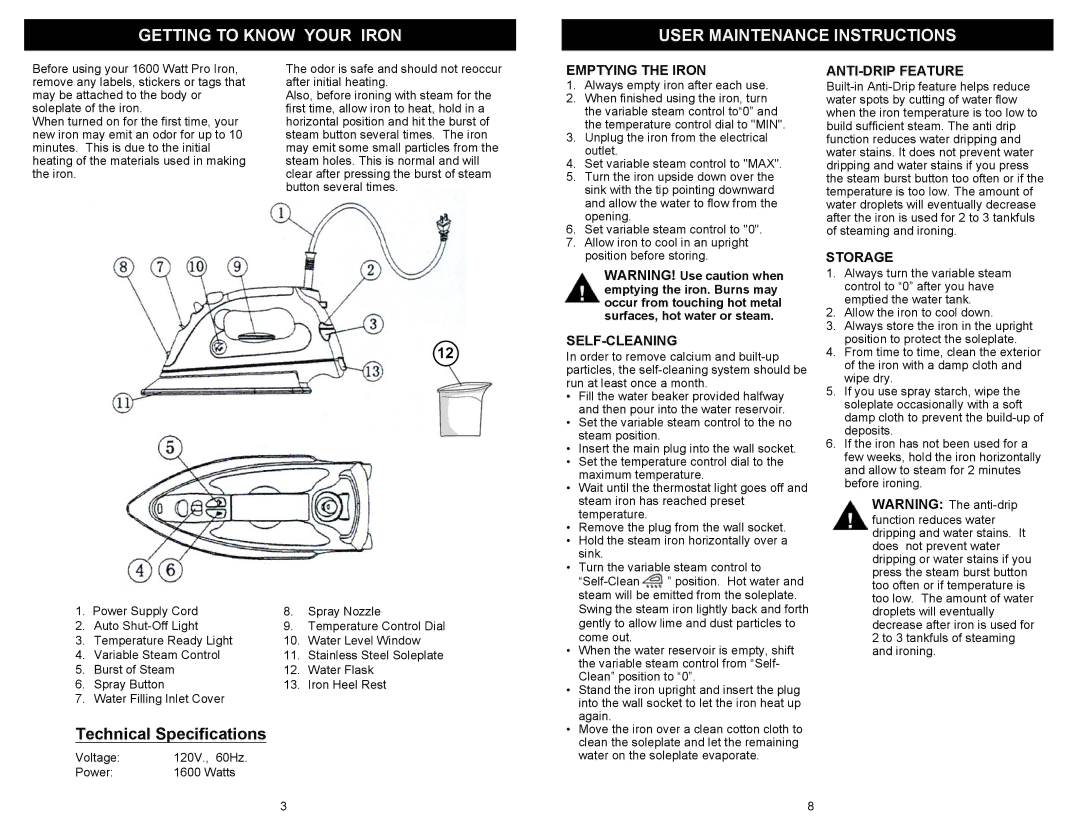
1. | Power Supply Cord | 8. | Spray Nozzle |
2. | Auto | 9. | Temperature Control Dial |
3. | Temperature Ready Light | 10. | Water Level Window |
4. | Variable Steam Control | 11. | Stainless Steel Soleplate |
5. | Burst of Steam | 12. | Water Flask |
6. | Spray Button | 13. | Iron Heel Rest |
7. | Water Filling Inlet Cover |
|
|
Technical Specifications
Voltage: | 120V., 60Hz. |
Power: | 1600 Watts |
SELF-CLEANING
In order to remove calcium and
•Fill the water beaker provided halfway and then pour into the water reservoir.
•Set the variable steam control to the no steam position.
•Insert the main plug into the wall socket.
•Set the temperature control dial to the maximum temperature.
•Wait until the thermostat light goes off and steam iron has reached preset temperature.
•Remove the plug from the wall socket.
•Hold the steam iron horizontally over a sink.
•Turn the variable steam control to
•When the water reservoir is empty, shift the variable steam control from “Self- Clean” position to “0”.
•Stand the iron upright and insert the plug into the wall socket to let the iron heat up again.
•Move the iron over a clean cotton cloth to clean the soleplate and let the remaining water on the soleplate evaporate.
| position to protect the soleplate. |
4. | From time to time, clean the exterior |
| of the iron with a damp cloth and |
| wipe dry. |
5. | If you use spray starch, wipe the |
| soleplate occasionally with a soft |
| damp cloth to prevent the |
| deposits. |
6. | If the iron has not been used for a |
| few weeks, hold the iron horizontally |
| and allow to steam for 2 minutes |
| before ironing. |
WARNING: The
3
8