
EP619 specifications
The Euro-Pro EP619 is a versatile and efficient home cleaning appliance designed to simplify household chores while delivering exceptional cleaning performance. As one of the leading products in its category, the EP619 combines advanced technologies with practical features, making it an essential tool for maintaining a clean and fresh living environment.At the heart of the Euro-Pro EP619 is its powerful motor that generates strong suction capabilities, enabling users to tackle dirt, dust, and debris with ease. This ensures thorough cleaning on a variety of surfaces, including carpets, hardwood floors, and upholstery. Additionally, the vacuum features a multi-cyclonic filtration system that efficiently separates dirt from airflow, preventing clogs and ensuring consistent suction power over extended use.
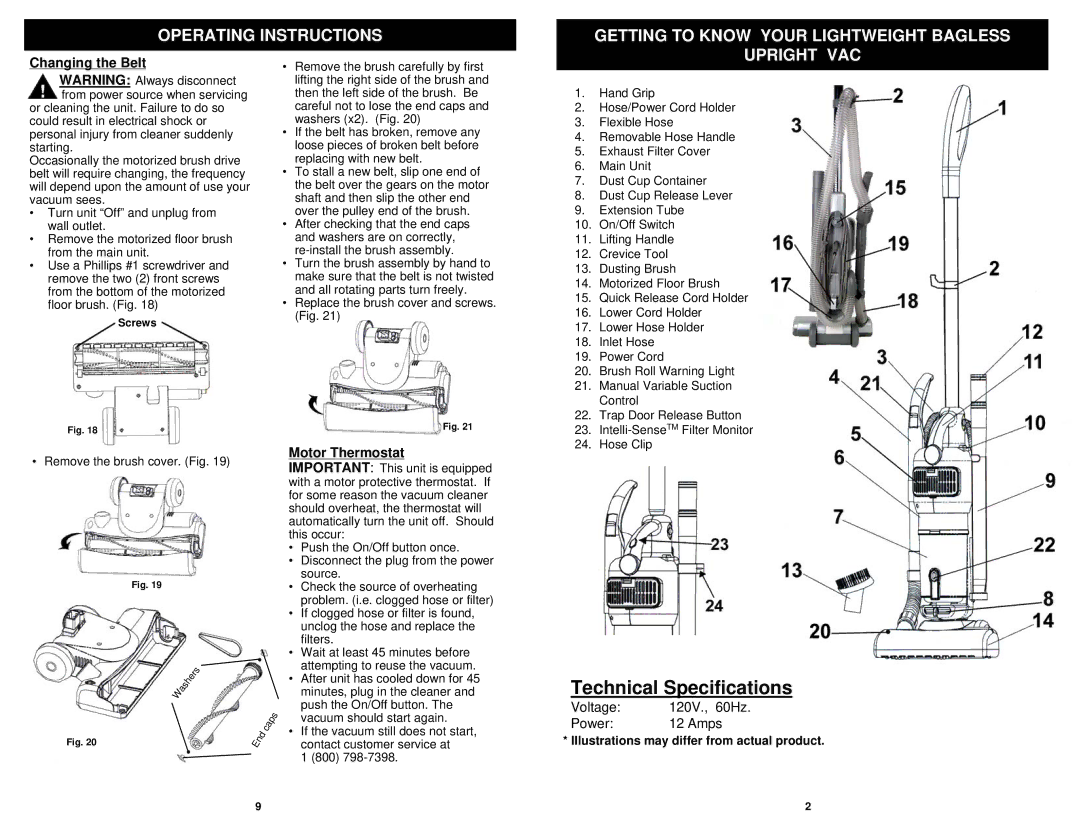
One of the standout features of the Euro-Pro EP619 is its lightweight and compact design. Weighing in at just under 10 pounds, this vacuum cleaner is easy to maneuver around the house, making it suitable for users of all ages. Its ergonomic handle allows for comfortable grip, reducing hand fatigue during extended cleaning sessions. Furthermore, the vacuum is designed with a low profile, enabling users to reach under furniture and into tight spaces effortlessly.
Another technological innovation in the Euro-Pro EP619 is its adjustable height setting. This feature allows users to customize the vacuum's brush height according to the type of floor they are cleaning. Whether it’s thick carpets or smooth hardwood, the EP619 adapts to provide the best cleaning performance, ensuring no surface is left untouched.
For those looking for convenience, the Euro-Pro EP619 comes equipped with a range of accessories, including a crevice tool, dusting brush, and upholstery nozzle. These attachments allow for specialized cleaning in corners, on delicate surfaces, and in hard-to-reach areas, making the vacuum a multi-functional solution for comprehensive home care.
Moreover, maintaining the Euro-Pro EP619 is straightforward, with a bagless design that allows users to empty the dust container easily and hygienically. This eliminates the need for costly replacement bags, contributing to the appliance's overall efficiency and eco-friendliness.
In conclusion, the Euro-Pro EP619 stands out as a powerful, user-friendly vacuum cleaner that combines advanced cleaning technologies with practical features. Its lightweight design, adjustable height settings, and versatile attachments make it an ideal choice for homeowners seeking an efficient solution to keep their living spaces clean and hygienic. Whether tackling everyday messes or deep cleaning sessions, the Euro-Pro EP619 promises to deliver impressive results with every use.