IRONING CHART
GETTING TO KNOW YOUR ELECTRONIC IRON
NOTE: Always refer to the garment care tag for ironing instructions. Before starting to iron delicate fabrics, it is best to first test the temperature of the iron on a hem or an inside seam.
DIRECTIONS |
|
|
|
| |
ON LABEL |
|
|
|
| |
| SYNTHETIC |
|
| Please | |
| FIBERS, e.g. | SILK | COTTON | ||
FABRIC | acrylic, nylon | ||||
| polyester | WOOL | LINEN | note | |
|
| ||||
|
|
|
| ||
|
|
|
| that | |
LED | MIN |
| MAX |
| |
DISPLAY |
|
| |||
• | • • • • • | onthe | |||
PANEL | |||||
| |||||
|
|
|
| label | |
STEAM | 0 | MINIMUM | MAXIMUM | means | |
CONTROL | STEAM | STEAM | |||
|
|
|
| ‘THIS | |
BURST OF |
|
|
| ARTICLE | |
STEAM |
|
|
| ||
|
|
| CANNOT | ||
|
|
|
| ||
|
|
|
| BE | |
SPRAY |
|
|
| IRONED!” | |
|
|
|
| ||
| 9 |
|
|
| |
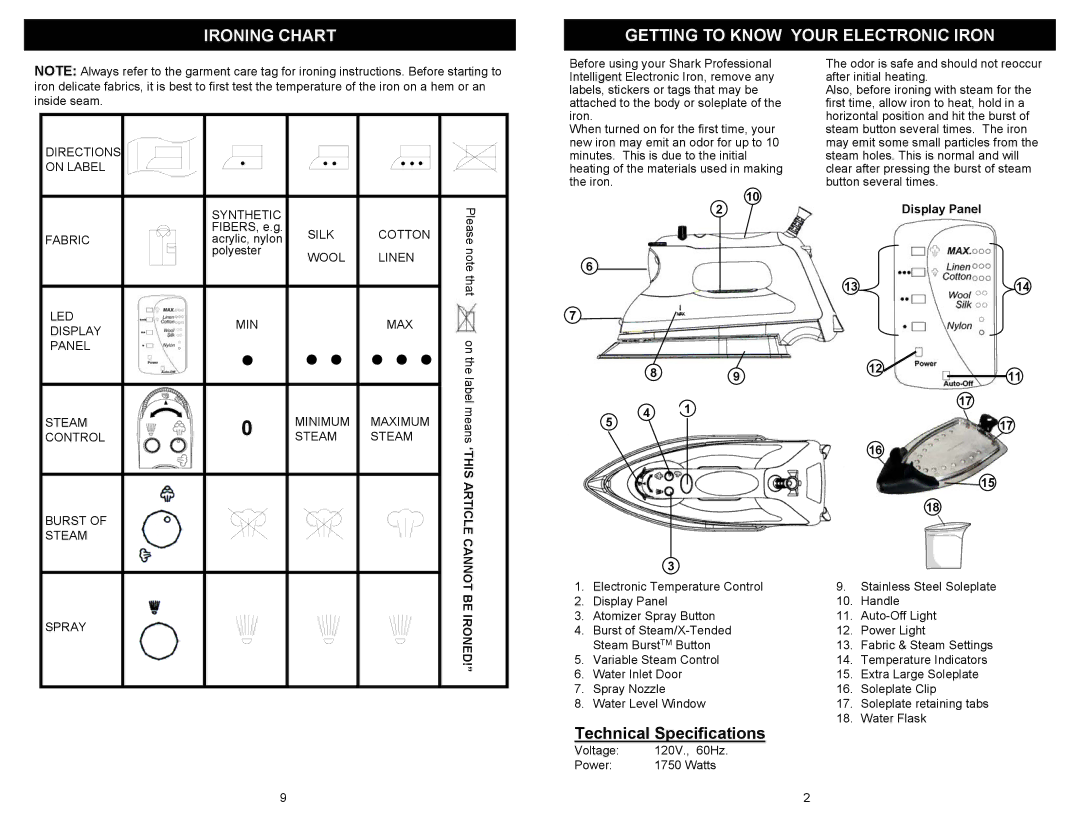
Before using your Shark Professional Intelligent Electronic Iron, remove any labels, stickers or tags that may be attached to the body or soleplate of the iron.
When turned on for the first time, your new iron may emit an odor for up to 10 minutes. This is due to the initial heating of the materials used in making the iron.
10
2
6
7
| 8 | 9 |
5 | 4 | 1 |
|
|
3
1.Electronic Temperature Control
2.Display Panel
3.Atomizer Spray Button
4.Burst of
5.Variable Steam Control
6.Water Inlet Door
7.Spray Nozzle
8.Water Level Window
Technical Specifications
Voltage: | 120V., 60Hz. |
Power: | 1750 Watts |
The odor is safe and should not reoccur after initial heating.
Also, before ironing with steam for the first time, allow iron to heat, hold in a horizontal position and hit the burst of steam button several times. The iron may emit some small particles from the steam holes. This is normal and will clear after pressing the burst of steam button several times.
Display Panel
13 | 14 |
1211
17
17
16
15
18
9.Stainless Steel Soleplate
10.Handle
11.
12.Power Light
13.Fabric & Steam Settings
14.Temperature Indicators
15.Extra Large Soleplate
16.Soleplate Clip
17.Soleplate retaining tabs
18.Water Flask
2