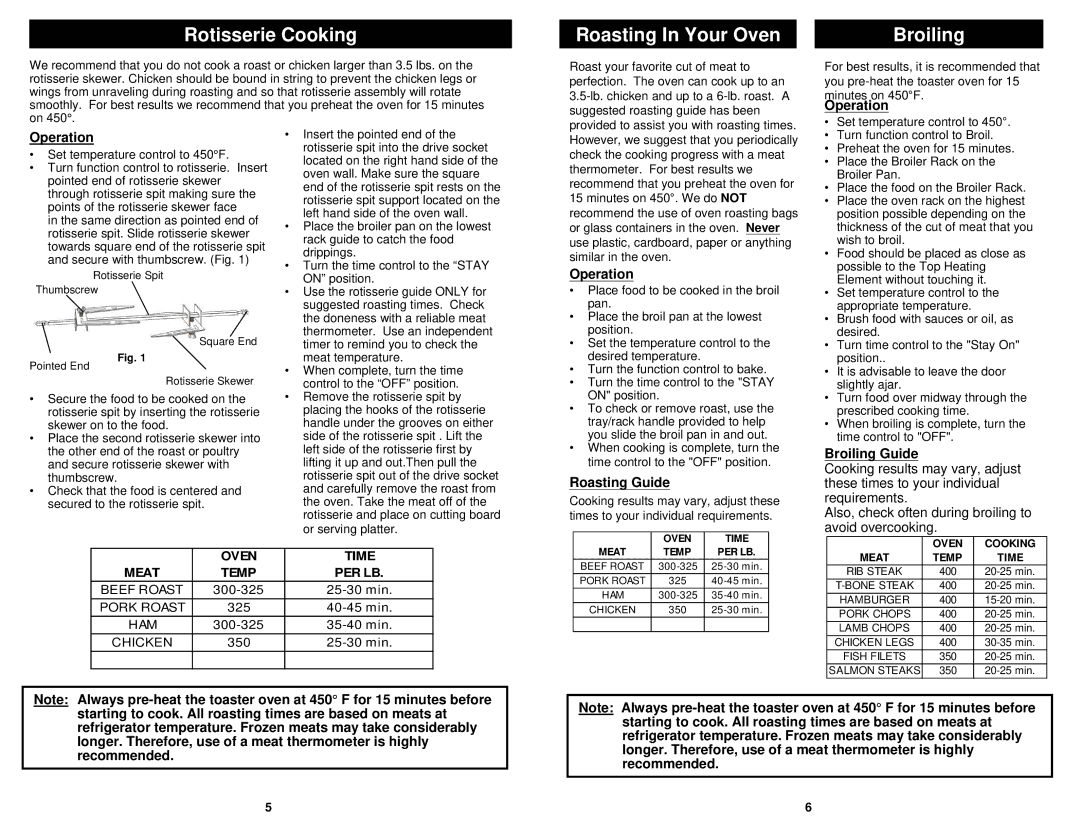
Rotisserie Cooking

We recommend that you do not cook a roast or chicken larger than 3.5 lbs. on the rotisserie skewer. Chicken should be bound in string to prevent the chicken legs or wings from unraveling during roasting and so that rotisserie assembly will rotate smoothly. For best results we recommend that you preheat the oven for 15 minutes on 450°.

Roasting In Your Oven

Roast your favorite cut of meat to perfection. The oven can cook up to an 3.5-lb. chicken and up to a 6-lb. roast. A suggested roasting guide has been provided to assist you with roasting times.

Broiling

For best results, it is recommended that

you pre-heat the toaster oven for 15 minutes on 450°F.

Operation

Set temperature control to 450°.

Operation

Set temperature control to 450°F.

Turn function control to rotisserie. Insert pointed end of rotisserie skewer through rotisserie spit making sure the points of the rotisserie skewer face

in the same direction as pointed end of rotisserie spit. Slide rotisserie skewer towards square end of the rotisserie spit and secure with thumbscrew. (Fig. 1)

Rotisserie Spit

Thumbscrew

Insert the pointed end of the

rotisserie spit into the drive socket

located on the right hand side of the

oven wall. Make sure the square

end of the rotisserie spit rests on the

rotisserie spit support located on the

left hand side of the oven wall.

Place the broiler pan on the lowest

rack guide to catch the food

drippings.

Turn the time control to the “STAY

ON” position.

Use the rotisserie guide ONLY for

suggested roasting times. Check

the doneness with a reliable meat

thermometer. Use an independent

However, we suggest that you periodically check the cooking progress with a meat thermometer. For best results we recommend that you preheat the oven for 15 minutes on 450°. We do NOT recommend the use of oven roasting bags or glass containers in the oven. Never use plastic, cardboard, paper or anything similar in the oven.

Operation

Place food to be cooked in the broil


pan.

Place the broil pan at the lowest


position.

Turn function control to Broil.

Preheat the oven for 15 minutes.

Place the Broiler Rack on the


Broiler Pan.

Place the food on the Broiler Rack.

Place the oven rack on the highest


position possible depending on the


thickness of the cut of meat that you


wish to broil.

Food should be placed as close as


possible to the Top Heating


Element without touching it.

Set temperature control to the


appropriate temperature.

Brush food with sauces or oil, as


desired.

Pointed End

Square End

Fig. 1

Rotisserie Skewer

timer to remind you to check the

meat temperature.

When complete, turn the time

control to the “OFF” position.

Set the temperature control to the


desired temperature.

Turn the function control to bake.

Turn the time control to the "STAY

Turn time control to the "Stay On"


position..

It is advisable to leave the door


slightly ajar.

Secure the food to be cooked on the rotisserie spit by inserting the rotisserie skewer on to the food.

Place the second rotisserie skewer into the other end of the roast or poultry and secure rotisserie skewer with thumbscrew.

Check that the food is centered and secured to the rotisserie spit.

Remove the rotisserie spit by

placing the hooks of the rotisserie

handle under the grooves on either

side of the rotisserie spit . Lift the

left side of the rotisserie first by

lifting it up and out.Then pull the

rotisserie spit out of the drive socket

and carefully remove the roast from

the oven. Take the meat off of the

rotisserie and place on cutting board

or serving platter.

ON" position.

To check or remove roast, use the

tray/rack handle provided to help

you slide the broil pan in and out.

When cooking is complete, turn the

time control to the "OFF" position.

Roasting Guide

Cooking results may vary, adjust these times to your individual requirements.

Turn food over midway through the


prescribed cooking time.

When broiling is complete, turn the


time control to "OFF".

Broiling Guide

Cooking results may vary, adjust these times to your individual requirements.

Also, check often during broiling to avoid overcooking.


OVEN

TIME

MEAT

TEMP

PER LB.

BEEF ROAST

300-325

25-30 min.

PORK ROAST

325

40-45 min.

HAM

300-325

35-40 min.

CHICKEN

350

25-30 min.


OVEN

TIME

MEAT

TEMP

PER LB.

BEEF ROAST

300-325

25-30 min.

PORK ROAST

325

40-45 min.

HAM

300-325

35-40 min.

CHICKEN

350

25-30 min.


OVEN

COOKING

MEAT

TEMP

TIME

RIB STEAK

400

20-25 min.

T-BONE STEAK

400

20-25 min.

HAMBURGER

400

15-20 min.

PORK CHOPS

400

20-25 min.

LAMB CHOPS

400

20-25 min.

CHICKEN LEGS

400

30-35 min.

FISH FILETS

350

20-25 min.

SALMON STEAKS

350

20-25 min.

Note: Always pre-heat the toaster oven at 450° F for 15 minutes before

starting to cook. All roasting times are based on meats at refrigerator temperature. Frozen meats may take considerably longer. Therefore, use of a meat thermometer is highly recommended.

Note: Always pre-heat the toaster oven at 450° F for 15 minutes before

starting to cook. All roasting times are based on meats at refrigerator temperature. Frozen meats may take considerably longer. Therefore, use of a meat thermometer is highly recommended.

5

6

Page 4
Image 4
Euro-Pro K4245W owner manual Rotisserie Cooking, Roasting In Your Oven, Broiling

K4245W specifications

The Euro-Pro K4245W is a versatile and powerful kitchen appliance designed to simplify cooking tasks and enhance the culinary experience. This user-friendly countertop convection oven combines innovation and efficiency, making it a valuable addition to modern kitchens.

One of the standout features of the K4245W is its convection cooking technology. Unlike traditional ovens, this appliance circulates hot air around the food, ensuring even cooking and browning. As a result, users can achieve perfectly cooked meals in less time, making it an ideal choice for busy households. Additionally, the convection function allows for lower cooking temperatures, which not only saves energy but also helps retain the moisture and flavor of the dishes.

The K4245W boasts a spacious cooking capacity, accommodating a variety of foods from full roasts to multiple trays of cookies. Equipped with adjustable racks, it allows for customized cooking arrangements suited to different recipes. This flexibility is complemented by its multiple cooking functions, which include bake, broil, toast, and keep warm settings, catering to a wide range of culinary needs.

Another significant characteristic of the Euro-Pro K4245W is its intuitive digital control panel. The easy-to-read LED display allows users to set cooking times and temperatures with precision. Pre-programmed settings for various dishes further enhance convenience, enabling even novice cooks to achieve professional results.

Safety features are also a priority with the K4245W. The appliance is designed with a cool-touch exterior, preventing burns during cooking. Furthermore, the auto shut-off function ensures that the oven will turn off after a set period, providing peace of mind even when multitasking in the kitchen.

Cleaning the Euro-Pro K4245W is straightforward, thanks to its non-stick interior and removable parts, which can easily be wiped down or placed in the dishwasher. Its compact design makes it suitable for countertops of all sizes, enabling efficient use of kitchen space without sacrificing performance.

In summary, the Euro-Pro K4245W combines advanced convection cooking technology, a versatile range of functions, intuitive controls, and safety features into a sleek design. Its efficiency and ease of use not only make cooking enjoyable but also redefine the way meals are prepared in contemporary kitchens. Whether cooking for a family or entertaining guests, this appliance is sure to impress and simplify the culinary process.