OPERATING INSTRUCTIONS
OPERATING INSTRUCTIONS cont.
Before Use
1.This cordless wet/dry hand vacuum is powered by rechargeable nickel- cadmium batteries. Before using the vacuum, charge the vacuum cleaner for a minimum of 16 hours.
NOTE: Ensure that the On/Off switch is in the “Off” position before charging.
NOTE: Peak performance may only be realized after the unit has been charged and discharged two (2) or three (3) times.
IMPORTANT: To maintain peak performance of your cordless hand vacuum, it is recommended that the unit be fully discharged, then completely
2.Store the vacuum cleaner in the charging base when not in use so that it is always charged and ready to use.
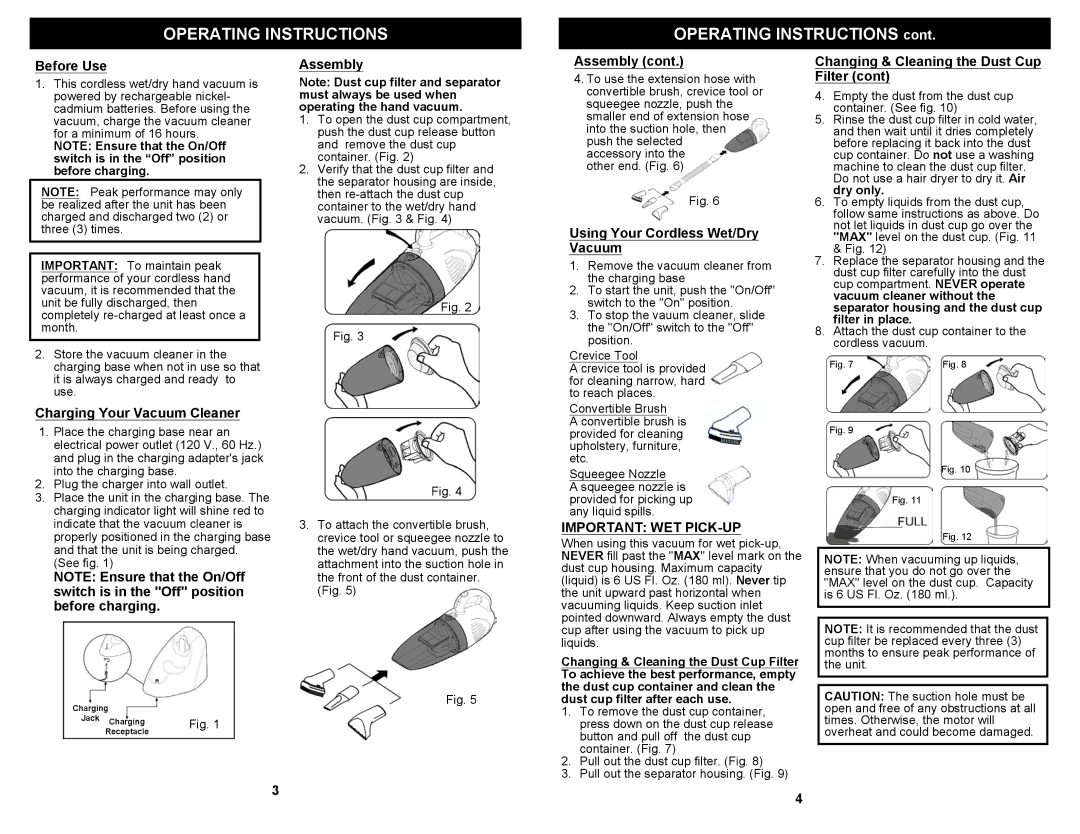
Charging Your Vacuum Cleaner
1.Place the charging base near an electrical power outlet (120 V., 60 Hz.) and plug in the charging adapter's jack into the charging base.
2.Plug the charger into wall outlet.
3.Place the unit in the charging base. The charging indicator light will shine red to indicate that the vacuum cleaner is properly positioned in the charging base and that the unit is being charged.
(See fig. 1)
NOTE: Ensure that the On/Off switch is in the "Off" position before charging.
Charging
Jack Charging Fig. 1
Receptacle
Assembly
Note: Dust cup filter and separator must always be used when operating the hand vacuum.
1.To open the dust cup compartment, push the dust cup release button and remove the dust cup container. (Fig. 2)
2.Verify that the dust cup filter and the separator housing are inside, then
Fig. 2
Fig. 3
Fig. 4
3.To attach the convertible brush, crevice tool or squeegee nozzle to the wet/dry hand vacuum, push the attachment into the suction hole in the front of the dust container. (Fig. 5)
Fig. 5
Assembly (cont.)
4.To use the extension hose with convertible brush, crevice tool or squeegee nozzle, push the smaller end of extension hose into the suction hole, then push the selected
accessory into the other end. (Fig. 6)
Fig. 6
Using Your Cordless Wet/Dry Vacuum
1.Remove the vacuum cleaner from the charging base
2.To start the unit, push the "On/Off" switch to the "On" position.
3.To stop the vauum cleaner, slide the "On/Off" switch to the "Off" position.
Crevice Tool
A crevice tool is provided for cleaning narrow, hard to reach places.
Convertible Brush
A convertible brush is provided for cleaning upholstery, furniture, etc.
Squeegee Nozzle
A squeegee nozzle is provided for picking up any liquid spills.
IMPORTANT: WET PICK-UP
When using this vacuum for wet
Changing & Cleaning the Dust Cup Filter To achieve the best performance, empty the dust cup container and clean the dust cup filter after each use.
1.To remove the dust cup container, press down on the dust cup release button and pull off the dust cup container. (Fig. 7)
2.Pull out the dust cup filter. (Fig. 8)
3.Pull out the separator housing. (Fig. 9)
Changing & Cleaning the Dust Cup Filter (cont)
4.Empty the dust from the dust cup container. (See fig. 10)
5.Rinse the dust cup filter in cold water, and then wait until it dries completely before replacing it back into the dust cup container. Do not use a washing machine to clean the dust cup filter. Do not use a hair dryer to dry it. Air dry only.
6.To empty liquids from the dust cup, follow same instructions as above. Do not let liquids in dust cup go over the "MAX" level on the dust cup. (Fig. 11 & Fig. 12)
7.Replace the separator housing and the dust cup filter carefully into the dust cup compartment. NEVER operate vacuum cleaner without the separator housing and the dust cup filter in place.
8.Attach the dust cup container to the cordless vacuum.
Fig. 7 | Fig. 8 |
Fig. 9
Fig. 10
Fig. 11
Fig. 12
NOTE: When vacuuming up liquids, ensure that you do not go over the "MAX" level on the dust cup. Capacity is 6 US Fl. Oz. (180 ml.).
NOTE: It is recommended that the dust cup filter be replaced every three (3) months to ensure peak performance of the unit.
CAUTION: The suction hole must be open and free of any obstructions at all times. Otherwise, the motor will overheat and could become damaged.
3
4