OPERATING INSTRUCTIONS cont.
Battery Pack Replacement & Disposal
This vacuum cleaner contains a nickel- cadmium
If uncertain as to how to remove the battery pack, we suggest you take your wet/dry hand vacuum to a reputable small appliance service technician to have this service preformed.
The battery pack of your SV745 is replaceable, however care should be taken when doing so. Follow these steps when replacement is required:
1.Open the battery pack compartment by removing the single Phillips head screw located in the recess at the rear of the unit. NEVER open the battery compartment except to change the battery pack when required.
2.Remove battery compartment cover. Set aside battery compartment cover with the screw.
3.Carefully detach the two (2) electrical connectors from the battery pack by pulling straight out from the battery pack.
4.Lift out the battery pack and set aside.
5.Insert the new battery pack and
6.Tuck the wiring inside the battery compartment so that the wiring does not interfere with the battery compartment cover when it is replaced.
7.
8.Replace the battery compartment cover screw.
WARNING: NEVER use ordinary batteries for replacement, as these may leak and damage your vacuum cleaner. Use only battery pack XBP745 provided by EURO- PRO Operating LLC for replacement.
CAUTION: NEVER use the unit without the battery compartment cover in place.
NOTE: Any other servicing should be performed by an authorized service representative.
CAUTION
•Use only with the battery pack supplied with the unit.
•Do not attempt to remove the battery pack from the unit to charge it.
•Never attempt to throw the battery pack or unit into a fire or incinerate it.
•Do not attempt to remove or damage the battery casing.
•Battery must be recycled or disposed of properly at the end of it's service life.
Hints for Spot Cleaning Carpets
Note: Before spot cleaning your carpet, test for color fastness. Dampen a white cloth with the cleaning solution that you will be using and test a small area in a closet or under a piece of furniture. Gently rub the cloth over the area. Check each color for bleeding. If the cloth remains white, it should be safe to clean the carpet or upholstery. When using commercial
1.Apply the
2.Using the Wet/Dry vacuum, suck the pre- cleaner spot remover liquid from the carpet.
3.Spray the same area with water.
4.Vacuum again to remove the water.
5.Repeat steps 3 and 4 again if necessary.
6.Empty the dust cup.
7.If you still see that the
not been completely removed, repeat steps 3 and 4 again.
8.If the stain has not been removed, repeat steps 1 to 6 again.
NOTE:
Wall Mounting Bracket
1.Make sure that the intended wall area for the wall mounting bracket to be drilled is free from any hidden electrical wires, water pipes and gas lines.
2.Select an appropriate place close to a wall power outlet (120V., 60 Hz).
3.Do not mount near direct sunlight, near a heat source or outdoors.
4.Select an appropriate drill type for the material to be drilled.
5.Carefully measure and mark the location of all bracket holes and then drill holes and screw the wall mounting bracket onto the wall.
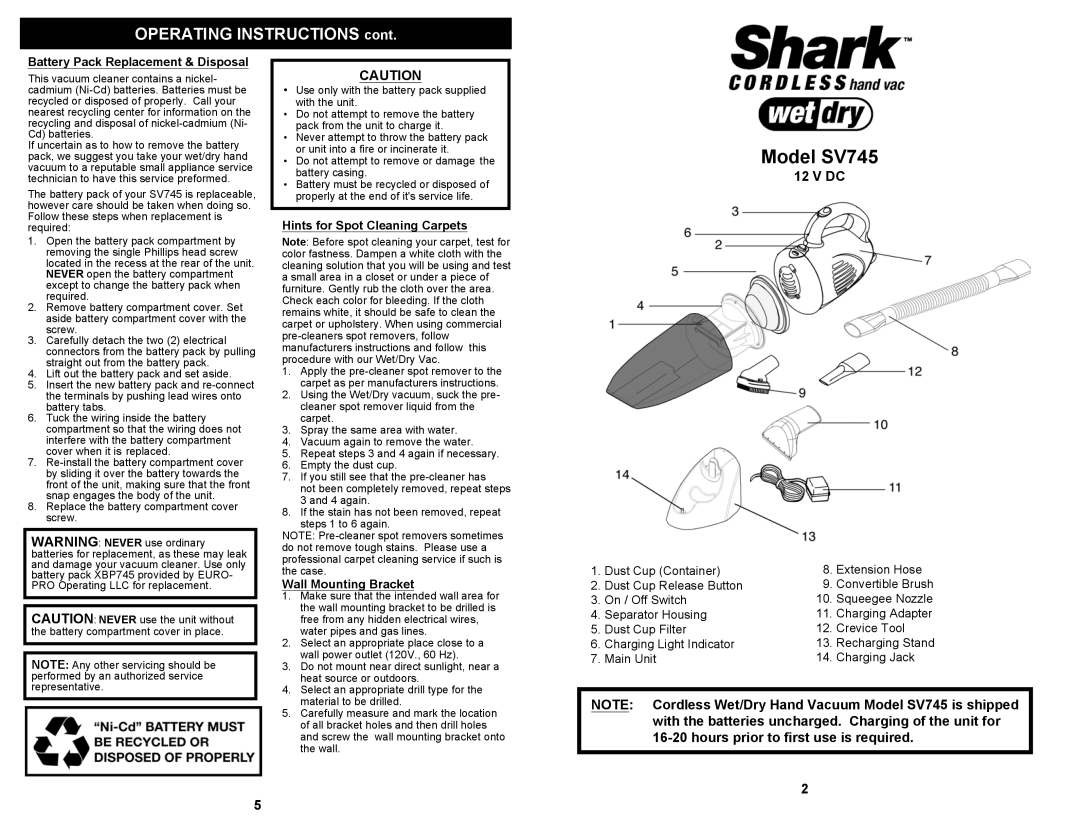
Model SV745
12 V DC
1. | Dust Cup (Container) | 8. | Extension Hose |
2. | Dust Cup Release Button | 9. | Convertible Brush |
3. | On / Off Switch | 10. | Squeegee Nozzle |
4. | Separator Housing | 11. | Charging Adapter |
5. | Dust Cup Filter | 12. | Crevice Tool |
6. | Charging Light Indicator | 13. | Recharging Stand |
7. | Main Unit | 14. | Charging Jack |
NOTE: Cordless Wet/Dry Hand Vacuum Model SV745 is shipped with the batteries uncharged. Charging of the unit for
2
5