Euro-Pro UV610 owner manual Assemblage DE LA Balai Motorisé Sans FIL, Battery Removal & Disposal

Models: UV610

1 16
Download 16 pages 25.04 Kb
Page 9
Image 9

ASSEMBLAGE DE LA BALAI MOTORISÉ

SANS FIL

Avant de commencer :

Le balai motorisé sans fil requiert un assemblage minimal. Pour faciliter l’assemblage et l’utilisation, sortir le balai du carton et se familiariser avec les composantes listées sur le dessin à la page 22. Ceci vous aidera à faire l’assemblage et à utiliser le balai sans fil.

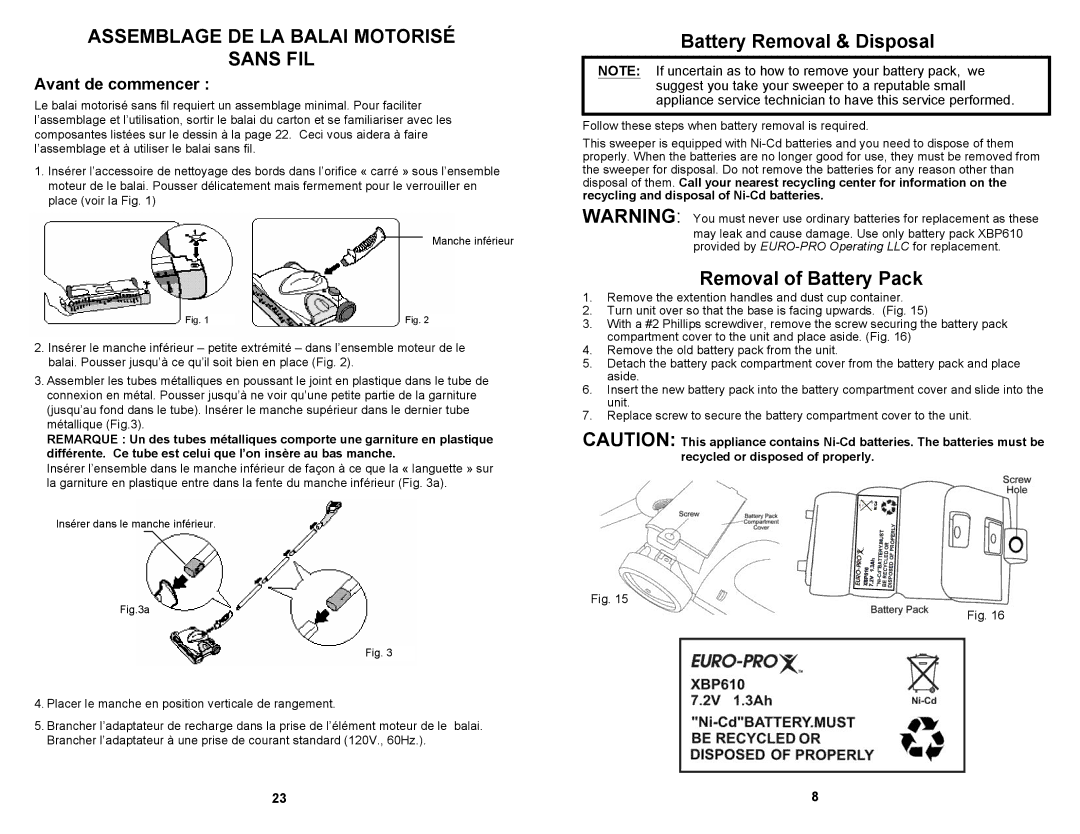
1.Insérer l’accessoire de nettoyage des bords dans l’orifice « carré » sous l’ensemble moteur de le balai. Pousser délicatement mais fermement pour le verrouiller en place (voir la Fig. 1)

Manche inférieur

Fig. 1


Fig. 2


2.Insérer le manche inférieur – petite extrémité – dans l’ensemble moteur de le balai. Pousser jusqu’à ce qu’il soit bien en place (Fig. 2).

3.Assembler les tubes métalliques en poussant le joint en plastique dans le tube de connexion en métal. Pousser jusqu’à ne voir qu’une petite partie de la garniture (jusqu’au fond dans le tube). Insérer le manche supérieur dans le dernier tube métallique (Fig.3).

REMARQUE : Un des tubes métalliques comporte une garniture en plastique différente. Ce tube est celui que l’on insère au bas manche.

Insérer l’ensemble dans le manche inférieur de façon à ce que la « languette » sur la garniture en plastique entre dans la fente du manche inférieur (Fig. 3a).

Insérer dans le manche inférieur.

Fig.3a

Fig. 3

4.Placer le manche en position verticale de rangement.

5.Brancher l’adaptateur de recharge dans la prise de l’élément moteur de le balai. Brancher l’adaptateur à une prise de courant standard (120V., 60Hz.).

Battery Removal & Disposal

NOTE: If uncertain as to how to remove your battery pack, we suggest you take your sweeper to a reputable small appliance service technician to have this service performed.

Follow these steps when battery removal is required.

This sweeper is equipped with Ni-Cd batteries and you need to dispose of them properly. When the batteries are no longer good for use, they must be removed from the sweeper for disposal. Do not remove the batteries for any reason other than disposal of them. Call your nearest recycling center for information on the recycling and disposal of Ni-Cd batteries.

WARNING: You must never use ordinary batteries for replacement as these may leak and cause damage. Use only battery pack XBP610 provided by EURO-PRO Operating LLC for replacement.

Removal of Battery Pack

1.Remove the extention handles and dust cup container.

2.Turn unit over so that the base is facing upwards. (Fig. 15)

3.With a #2 Phillips screwdiver, remove the screw securing the battery pack compartment cover to the unit and place aside. (Fig. 16)

4.Remove the old battery pack from the unit.

5.Detach the battery pack compartment cover from the battery pack and place aside.

6.Insert the new battery pack into the battery compartment cover and slide into the unit.

7.Replace screw to secure the battery compartment cover to the unit.

CAUTION: This appliance contains Ni-Cd batteries. The batteries must be recycled or disposed of properly.

Fig. 15

Fig. 16

23

8

Page 9
Image 9
Euro-Pro UV610 owner manual Assemblage DE LA Balai Motorisé Sans FIL, Battery Removal & Disposal, Removal of Battery Pack

UV610 specifications

The Euro-Pro UV610 is a cutting-edge vacuum cleaner designed to elevate the standards of home cleaning with its innovative features and advanced technologies. This model combines powerful suction capabilities with versatile functionalities, making it a must-have for homeowners seeking an efficient cleaning solution.

One of the standout features of the Euro-Pro UV610 is its impressive suction power. Equipped with a high-performance motor, the vacuum offers robust suction that effectively picks up dirt, dust, and debris from various surfaces, including carpets, hardwood floors, and tiles. This powerful performance ensures that even the most stubborn particles are not left behind.

The Euro-Pro UV610 also emphasizes versatility. With multiple attachments and tools included, users can easily switch between cleaning tasks. The vacuum comes with a crevice tool for tight spaces, a dusting brush for sensitive surfaces, and an upholstery tool that can clean furniture and fabric with ease. This range of accessories allows for a thorough clean throughout the home, from floor to ceiling.

One of the unique technologies featured in the Euro-Pro UV610 is its UV sanitizing light. This innovative addition helps eliminate bacteria and germs from surfaces while vacuuming, providing an extra level of hygiene, especially in homes with children and pets. The UV light activates during cleaning, ensuring that the surfaces are not only free from dust but also sanitized effectively.

An ergonomic design is another key characteristic of the Euro-Pro UV610. It features a lightweight construction that makes it easy to maneuver around the house, even in tight corners and hard-to-reach areas. Additionally, the vacuum is designed with a user-friendly interface, allowing for easy adjustments and control during operation.

The Euro-Pro UV610 also incorporates a HEPA filtration system, which is essential for maintaining clean air quality within the home. This system traps fine particles and allergens, making it an excellent choice for allergy sufferers.

In summary, the Euro-Pro UV610 combines powerful suction, versatile attachments, UV sanitizing technology, and a user-friendly design, making it a remarkable option for anyone looking to maintain a clean and healthy home environment. Its advanced features ensure that cleaning tasks are not only efficient but also promote a higher standard of hygiene.