Euro-Pro UV610 owner manual Assembling Your Cordless Sweeper, Retrait ET Mise AU Rebut DES Piles

Models: UV610

1 16
Download 16 pages 25.04 Kb
Page 4
Image 4

ASSEMBLING YOUR CORDLESS SWEEPER

Before you start:

Your Cordless Sweeper will require very little assembly. You should remove it from the carton and familiarize yourself with all the components listed per the exploded view drawing. (pg.2) This will help you in the assembly and operation of your cordless sweeper.

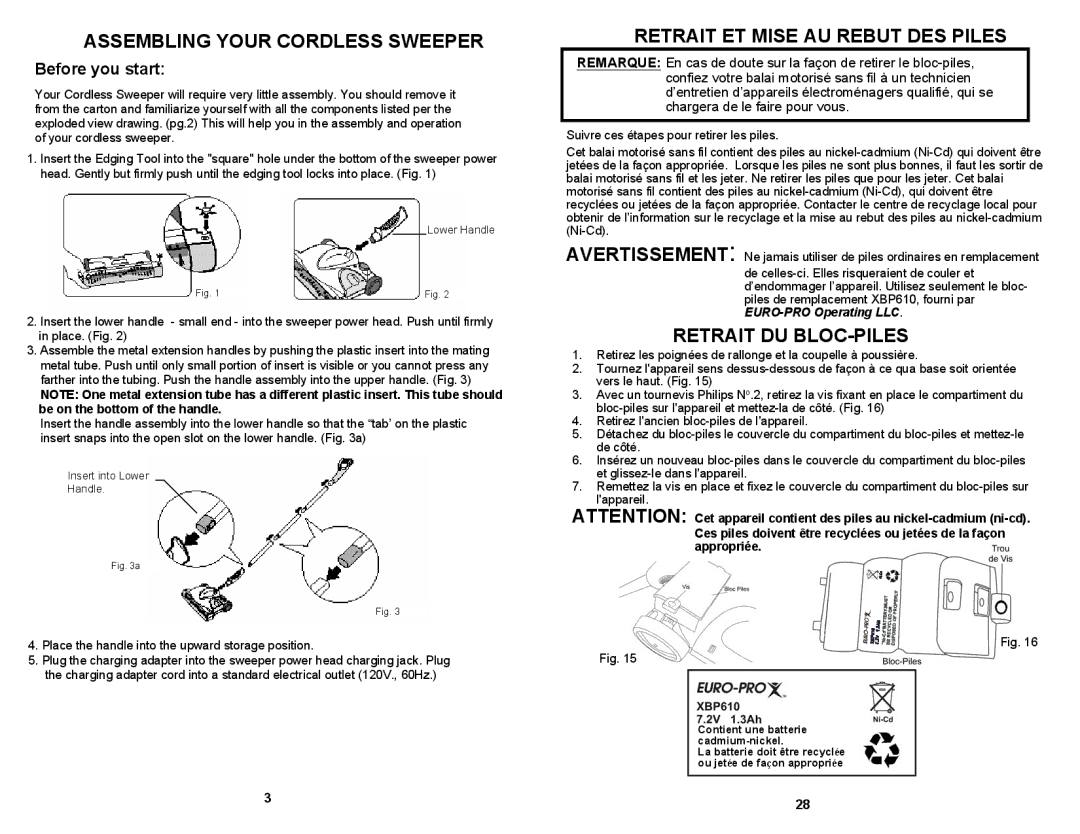
1.Insert the Edging Tool into the "square" hole under the bottom of the sweeper power head. Gently but firmly push until the edging tool locks into place. (Fig. 1)

Lower Handle

Fig. 1


Fig. 2


2.Insert the lower handle - small end - into the sweeper power head. Push until firmly in place. (Fig. 2)

3.Assemble the metal extension handles by pushing the plastic insert into the mating metal tube. Push until only small portion of insert is visible or you cannot press any farther into the tubing. Push the handle assembly into the upper handle. (Fig. 3)

NOTE: One metal extension tube has a different plastic insert. This tube should be on the bottom of the handle.

Insert the handle assembly into the lower handle so that the “tab’ on the plastic insert snaps into the open slot on the lower handle. (Fig. 3a)

Insert into Lower

Handle.

Fig. 3a

Fig. 3

4.Place the handle into the upward storage position.

5.Plug the charging adapter into the sweeper power head charging jack. Plug the charging adapter cord into a standard electrical outlet (120V., 60Hz.)

RETRAIT ET MISE AU REBUT DES PILES

REMARQUE: En cas de doute sur la façon de retirer le bloc-piles, confiez votre balai motorisé sans fil à un technicien d’entretien d’appareils électroménagers qualifié, qui se chargera de le faire pour vous.

Suivre ces étapes pour retirer les piles.

Cet balai motorisé sans fil contient des piles au nickel-cadmium (Ni-Cd) qui doivent être jetées de la façon appropriée. Lorsque les piles ne sont plus bonnes, il faut les sortir de balai motorisé sans fil et les jeter. Ne retirer les piles que pour les jeter. Cet balai motorisé sans fil contient des piles au nickel-cadmium (Ni-Cd), qui doivent être recyclées ou jetées de la façon appropriée. Contacter le centre de recyclage local pour obtenir de l’information sur le recyclage et la mise au rebut des piles au nickel-cadmium (Ni-Cd).

AVERTISSEMENT: Ne jamais utiliser de piles ordinaires en remplacement de celles-ci. Elles risqueraient de couler et d’endommager l’appareil. Utilisez seulement le bloc- piles de remplacement XBP610, fourni par EURO-PRO Operating LLC.

RETRAIT DU BLOC-PILES

1.Retirez les poignées de rallonge et la coupelle à poussière.

2.Tournez l'appareil sens dessus-dessous de façon à ce qua base soit orientée vers le haut. (Fig. 15)

3.Avec un tournevis Philips No.2, retirez la vis fixant en place le compartiment du bloc-piles sur l'appareil et mettez-la de côté. (Fig. 16)

4.Retirez l'ancien bloc-piles de l'appareil.

5.Détachez du bloc-piles le couvercle du compartiment du bloc-piles et mettez-le de côté.

6.Insérez un nouveau bloc-piles dans le couvercle du compartiment du bloc-piles et glissez-le dans l'appareil.

7.Remettez la vis en place et fixez le couvercle du compartiment du bloc-piles sur l'appareil.

ATTENTION: Cet appareil contient des piles au nickel-cadmium (ni-cd). Ces piles doivent être recyclées ou jetées de la façon appropriée.

Fig. 16

Fig. 15

Contient une batterie cadmium-nickel.

La batterie doit être recyclée ou jetée de façon appropriée

3

28


Page 4
Image 4
Euro-Pro UV610 owner manual Assembling Your Cordless Sweeper, Retrait ET Mise AU Rebut DES Piles, Retrait DU BLOC-PILES

UV610 specifications

The Euro-Pro UV610 is a cutting-edge vacuum cleaner designed to elevate the standards of home cleaning with its innovative features and advanced technologies. This model combines powerful suction capabilities with versatile functionalities, making it a must-have for homeowners seeking an efficient cleaning solution.

One of the standout features of the Euro-Pro UV610 is its impressive suction power. Equipped with a high-performance motor, the vacuum offers robust suction that effectively picks up dirt, dust, and debris from various surfaces, including carpets, hardwood floors, and tiles. This powerful performance ensures that even the most stubborn particles are not left behind.

The Euro-Pro UV610 also emphasizes versatility. With multiple attachments and tools included, users can easily switch between cleaning tasks. The vacuum comes with a crevice tool for tight spaces, a dusting brush for sensitive surfaces, and an upholstery tool that can clean furniture and fabric with ease. This range of accessories allows for a thorough clean throughout the home, from floor to ceiling.

One of the unique technologies featured in the Euro-Pro UV610 is its UV sanitizing light. This innovative addition helps eliminate bacteria and germs from surfaces while vacuuming, providing an extra level of hygiene, especially in homes with children and pets. The UV light activates during cleaning, ensuring that the surfaces are not only free from dust but also sanitized effectively.

An ergonomic design is another key characteristic of the Euro-Pro UV610. It features a lightweight construction that makes it easy to maneuver around the house, even in tight corners and hard-to-reach areas. Additionally, the vacuum is designed with a user-friendly interface, allowing for easy adjustments and control during operation.

The Euro-Pro UV610 also incorporates a HEPA filtration system, which is essential for maintaining clean air quality within the home. This system traps fine particles and allergens, making it an excellent choice for allergy sufferers.

In summary, the Euro-Pro UV610 combines powerful suction, versatile attachments, UV sanitizing technology, and a user-friendly design, making it a remarkable option for anyone looking to maintain a clean and healthy home environment. Its advanced features ensure that cleaning tasks are not only efficient but also promote a higher standard of hygiene.