Euro-Pro UV627 Assembling Your Cordless Sweeper, Battery Removal & Disposal, Before you start

Models: UV627

1 6
Download 6 pages 54.89 Kb
Page 4
Image 4

ASSEMBLING YOUR CORDLESS SWEEPER

Before you start:

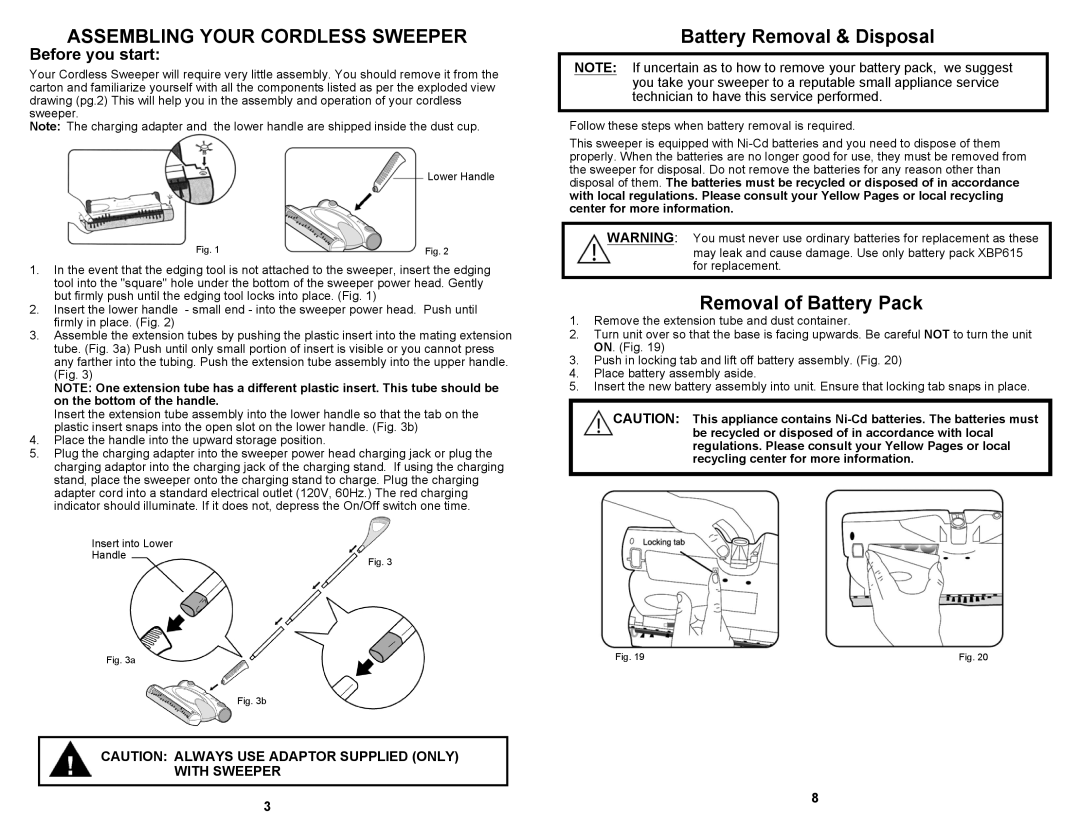
Your Cordless Sweeper will require very little assembly. You should remove it from the carton and familiarize yourself with all the components listed as per the exploded view drawing (pg.2) This will help you in the assembly and operation of your cordless sweeper.

Note: The charging adapter and the lower handle are shipped inside the dust cup.

Lower Handle

Fig. 1


Fig. 2


1.In the event that the edging tool is not attached to the sweeper, insert the edging tool into the "square" hole under the bottom of the sweeper power head. Gently but firmly push until the edging tool locks into place. (Fig. 1)

2.Insert the lower handle - small end - into the sweeper power head. Push until firmly in place. (Fig. 2)

3.Assemble the extension tubes by pushing the plastic insert into the mating extension tube. (Fig. 3a) Push until only small portion of insert is visible or you cannot press any farther into the tubing. Push the extension tube assembly into the upper handle. (Fig. 3)

NOTE: One extension tube has a different plastic insert. This tube should be on the bottom of the handle.

Insert the extension tube assembly into the lower handle so that the tab on the plastic insert snaps into the open slot on the lower handle. (Fig. 3b)

4.Place the handle into the upward storage position.

5.Plug the charging adapter into the sweeper power head charging jack or plug the charging adaptor into the charging jack of the charging stand. If using the charging stand, place the sweeper onto the charging stand to charge. Plug the charging adapter cord into a standard electrical outlet (120V, 60Hz.) The red charging indicator should illuminate. If it does not, depress the On/Off switch one time.

Battery Removal & Disposal

NOTE: If uncertain as to how to remove your battery pack, we suggest you take your sweeper to a reputable small appliance service technician to have this service performed.

Follow these steps when battery removal is required.

This sweeper is equipped with Ni-Cd batteries and you need to dispose of them properly. When the batteries are no longer good for use, they must be removed from the sweeper for disposal. Do not remove the batteries for any reason other than disposal of them. The batteries must be recycled or disposed of in accordance with local regulations. Please consult your Yellow Pages or local recycling center for more information.

WARNING: You must never use ordinary batteries for replacement as these may leak and cause damage. Use only battery pack XBP615 for replacement.

Removal of Battery Pack

1.Remove the extension tube and dust container.

2.Turn unit over so that the base is facing upwards. Be careful NOT to turn the unit ON. (Fig. 19)

3.Push in locking tab and lift off battery assembly. (Fig. 20)

4.Place battery assembly aside.

5.Insert the new battery assembly into unit. Ensure that locking tab snaps in place.

CAUTION: This appliance contains Ni-Cd batteries. The batteries must be recycled or disposed of in accordance with local regulations. Please consult your Yellow Pages or local recycling center for more information.

Insert into Lower Handle

Fig. 3a

Fig. 3

Fig. 19

Fig. 20

Fig. 3b

CAUTION: ALWAYS USE ADAPTOR SUPPLIED (ONLY) WITH SWEEPER

3

8

Page 4
Image 4
Euro-Pro UV627 Assembling Your Cordless Sweeper, Battery Removal & Disposal, Removal of Battery Pack, Before you start

UV627 specifications

The Euro-Pro UV627 is an innovative home cleaning solution designed to enhance the efficiency of your cleaning regimen while incorporating health-conscious technology. This versatile device blends traditional cleaning methods with the latest in ultraviolet (UV) technology to ensure your living space remains sanitary and fresh.

One of the main features of the Euro-Pro UV627 is its dual cleaning capability. It combines powerful suction with the effectiveness of UV sterilization, making it suitable for a variety of surfaces, including carpets, hard floors, and upholstery. The vacuum allows for thorough dirt and dust removal while the UV light targets and neutralizes bacteria and allergens, providing an extra layer of cleaning that is particularly beneficial for households with pets or members suffering from allergies.

Another significant characteristic of the Euro-Pro UV627 is its ergonomic design. The unit is lightweight and easy to maneuver, minimizing strain during extended cleaning sessions. It also boasts a sleek profile, allowing it to reach under furniture and into tight spaces with ease. Users appreciate its user-friendly interface, which includes intuitive controls for switching between modes and adjusting suction power depending on the surface being cleaned.

In terms of filtration, the Euro-Pro UV627 is equipped with a high-efficiency particulate air (HEPA) filter. This advanced filtration system captures fine dust particles and airborne allergens, ensuring that the air in your home is as clean as the surfaces. The HEPA filter is washable and reusable, enhancing the sustainability of this device by reducing the need for disposable bags or filters.

The device also features a large-capacity dust bin, which means less frequent emptying is required, allowing for extended cleaning sessions between maintenance. With its energy-efficient motor, the Euro-Pro UV627 delivers powerful performance without excessive energy consumption, making it an eco-friendly choice for the environmentally conscious consumer.

Smart design elements, such as LED indicators for battery life and filter maintenance, are included to enhance user experience and ensure optimal performance. Overall, the Euro-Pro UV627 stands out as an all-in-one cleaning solution that not only focuses on deep cleaning but also promotes a healthier living environment through its unique UV technologies.