PowerCage 1600 Enclosure • Setup Guide (Continued)
Step 2: Mount the enclosure to an equipment rack.
Attach the included mounting brackets to the sides of the enclosure, then fasten the brackets to the rack. The brackets can be attached at either the front or the back.
![]() CAUTION: Leave open space of at least 1U on the top, bottom, and sides of the enclosure to allow adequate air circulation and prevent overheating. Do not cover the vents or fans.
CAUTION: Leave open space of at least 1U on the top, bottom, and sides of the enclosure to allow adequate air circulation and prevent overheating. Do not cover the vents or fans.
Step 3: Connect A/V and control cables.
Refer to the setup guides and user guides for the models of transmitter and receiver boards you are installing for details on how to cable and set up each board.
zzSome fiber optic boards include
zz Some MTP twisted pair boards include picture adjustment or peaking controls.
Step 4: Connect power and test the system.
a.Connect power to the PowerCage enclosure and to the input and output devices.
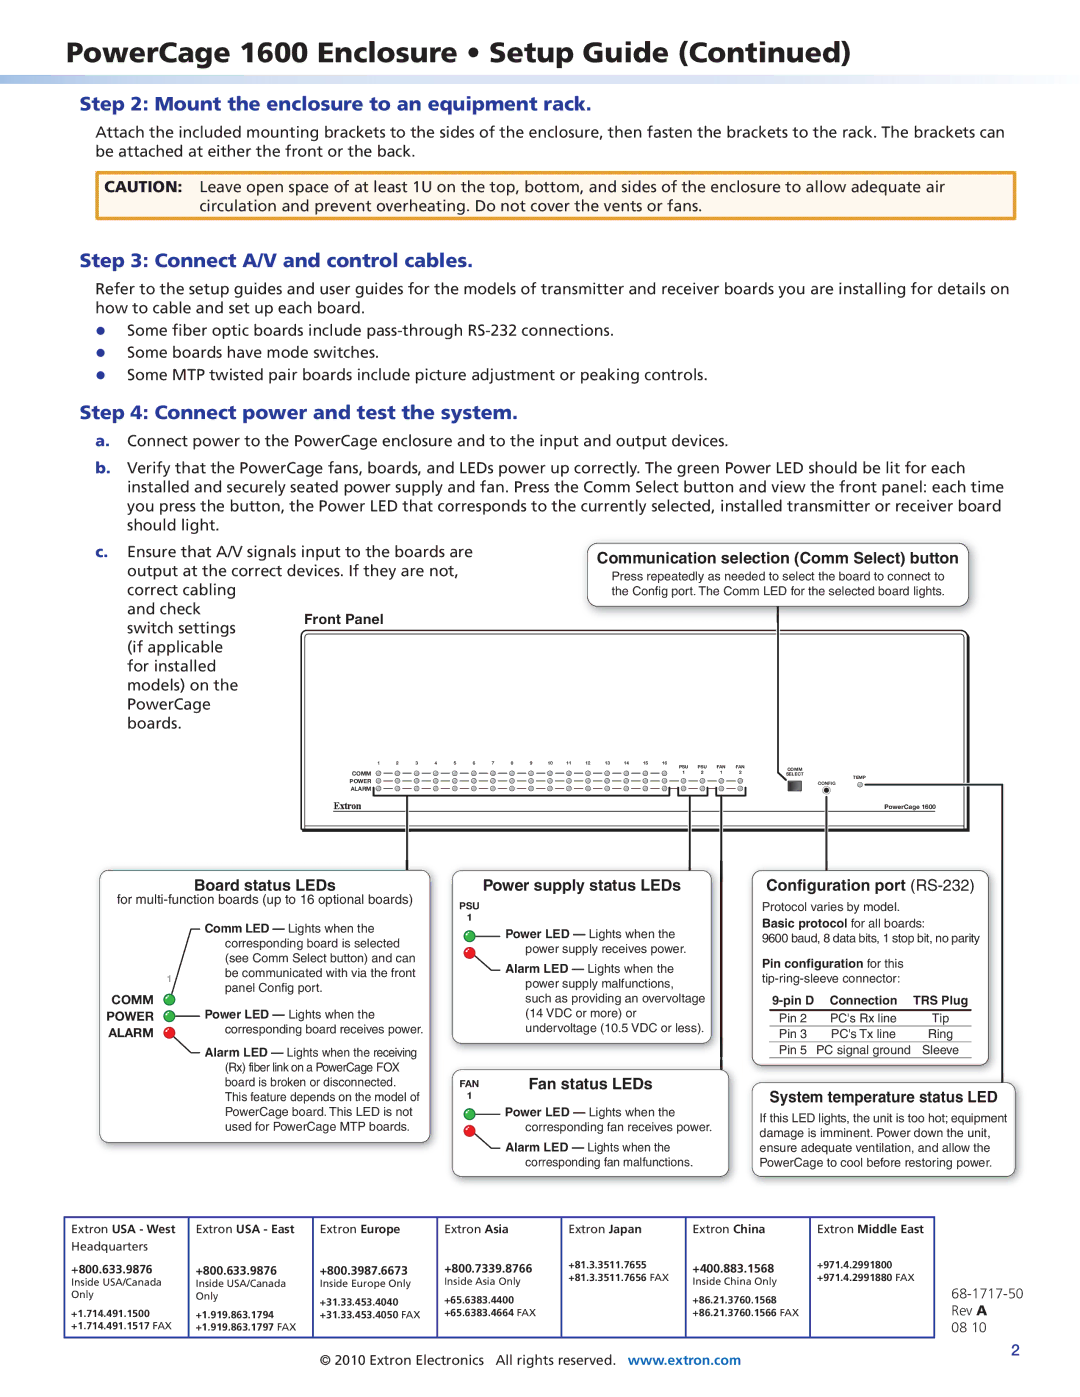
b.Verify that the PowerCage fans, boards, and LEDs power up correctly. The green Power LED should be lit for each installed and securely seated power supply and fan. Press the Comm Select button and view the front panel: each time you press the button, the Power LED that corresponds to the currently selected, installed transmitter or receiver board should light.
c.Ensure that A/V signals input to the boards are output at the correct devices. If they are not,
correct cabling and check switch settings (if applicable for installed models) on the PowerCage boards.
Communication selection (Comm Select) button
Press repeatedly as needed to select the board to connect to the Config port. The Comm LED for the selected board lights.
1 | 2 | 3 | 4 | 5 | 6 | 7 | 8 | 9 | 10 | 11 | 12 | 13 | 14 | 15 | 16 | PSU | PSU | FAN | FAN |
|
|
|
|
|
|
|
|
|
|
|
|
|
|
|
|
|
| COMM |
| ||||
COMM |
|
|
|
|
|
|
|
|
|
|
|
|
|
|
| 1 | 2 | 1 | 2 | SELECT | TEMP |
POWER |
|
|
|
|
|
|
|
|
|
|
|
|
|
|
|
|
|
|
|
| |
|
|
|
|
|
|
|
|
|
|
|
|
|
|
|
|
|
|
|
| CONFIG |
ALARM![]()
![]()
![]()
PowerCage 1600
Board status LEDs
for multi-function boards (up to 16 optional boards)
Comm LED — Lights when the
|
| corresponding board is selected |
|
| (see Comm Select button) and can |
| 1 | be communicated with via the front |
| panel Config port. | |
COMM |
| |
| Power LED — Lights when the | |
POWER |
| |
ALARM |
| corresponding board receives power. |
Alarm LED — Lights when the receiving (Rx) fiber link on a PowerCage FOX board is broken or disconnected. This feature depends on the model of PowerCage board. This LED is not used for PowerCage MTP boards.
Power supply status LEDs
PSU
1
![]() Power LED — Lights when the
Power LED — Lights when the
power supply receives power.
![]() Alarm LED — Lights when the power supply malfunctions, such as providing an overvoltage (14 VDC or more) or undervoltage (10.5 VDC or less).
Alarm LED — Lights when the power supply malfunctions, such as providing an overvoltage (14 VDC or more) or undervoltage (10.5 VDC or less).
FAN | Fan status LEDs |
1 |
|
| Power LED — Lights when the |
| corresponding fan receives power. |
| Alarm LED — Lights when the |
| corresponding fan malfunctions. |
Configuration port (RS-232)
Protocol varies by model. Basic protocol for all boards:
9600 baud, 8 data bits, 1 stop bit, no parity
Pin configuration for this
Connection | TRS Plug | |
Pin 2 | PC's Rx line | Tip |
Pin 3 | PC's Tx line | Ring |
Pin 5 | PC signal ground | Sleeve |
System temperature status LED
If this LED lights, the unit is too hot; equipment damage is imminent. Power down the unit, ensure adequate ventilation, and allow the PowerCage to cool before restoring power.
Extron USA - West | Extron USA - East | Extron Europe | Extron Asia | Extron Japan | Extron China | Extron Middle East |
|
Headquarters |
|
|
|
|
|
|
|
+800.633.9876 | +800.633.9876 | +800.3987.6673 | +800.7339.8766 | +81.3.3511.7655 | +400.883.1568 | +971.4.2991800 |
|
+81.3.3511.7656 FAX | +971.4.2991880 FAX |
| |||||
Inside USA/Canada | Inside USA/Canada | Inside Europe Only | Inside Asia Only | Inside China Only |
| ||
|
| ||||||
Only | Only | +31.33.453.4040 | +65.6383.4400 |
| +86.21.3760.1568 |
| |
|
|
|
| Rev A | |||
+1.714.491.1500 | +1.919.863.1794 | +31.33.453.4050 FAX | +65.6383.4664 FAX |
| +86.21.3760.1566 FAX |
| |
+1.714.491.1517 FAX | +1.919.863.1797 FAX |
|
|
|
|
| 08 10 |
© 2010 Extron Electronics All rights reserved. www.extron.com | 2 |
|