TOOLS NEEDED FOR INSTALLATION
• Saber Saw or Jig Saw
• Drill
• 1 1/4" Wood Drill Bit
• Pliers
• Phillips Screwdriver
• Flat Blade Screwdriver
• Wire Stripper or Utility Knife
K
![]() I
I
J
• Metal Snips
• Measuring Tape or Ruler
• Level
• Pencil
• Caulking Gun
• Duct Tape
PARTS SUPPLIED FOR INSTALLATION
• 1 Hardware Package
• 1 Literature Package
PARTS NEEDED FOR INSTALLATION
• 2 Conduit Connectors
• Power Supply Cable
• 1 Wall or Roof Cap
• All Metal Ductwork
OPTIONAL ACCESSORIES AVAILABLE
• *Ductless Conversion Kit For
* it is highly recommended that professional style cooking always be vented to the outside
part # 620000042 - Stainless
• Replacement Charcoal Filter For
H
L
![]() M
M
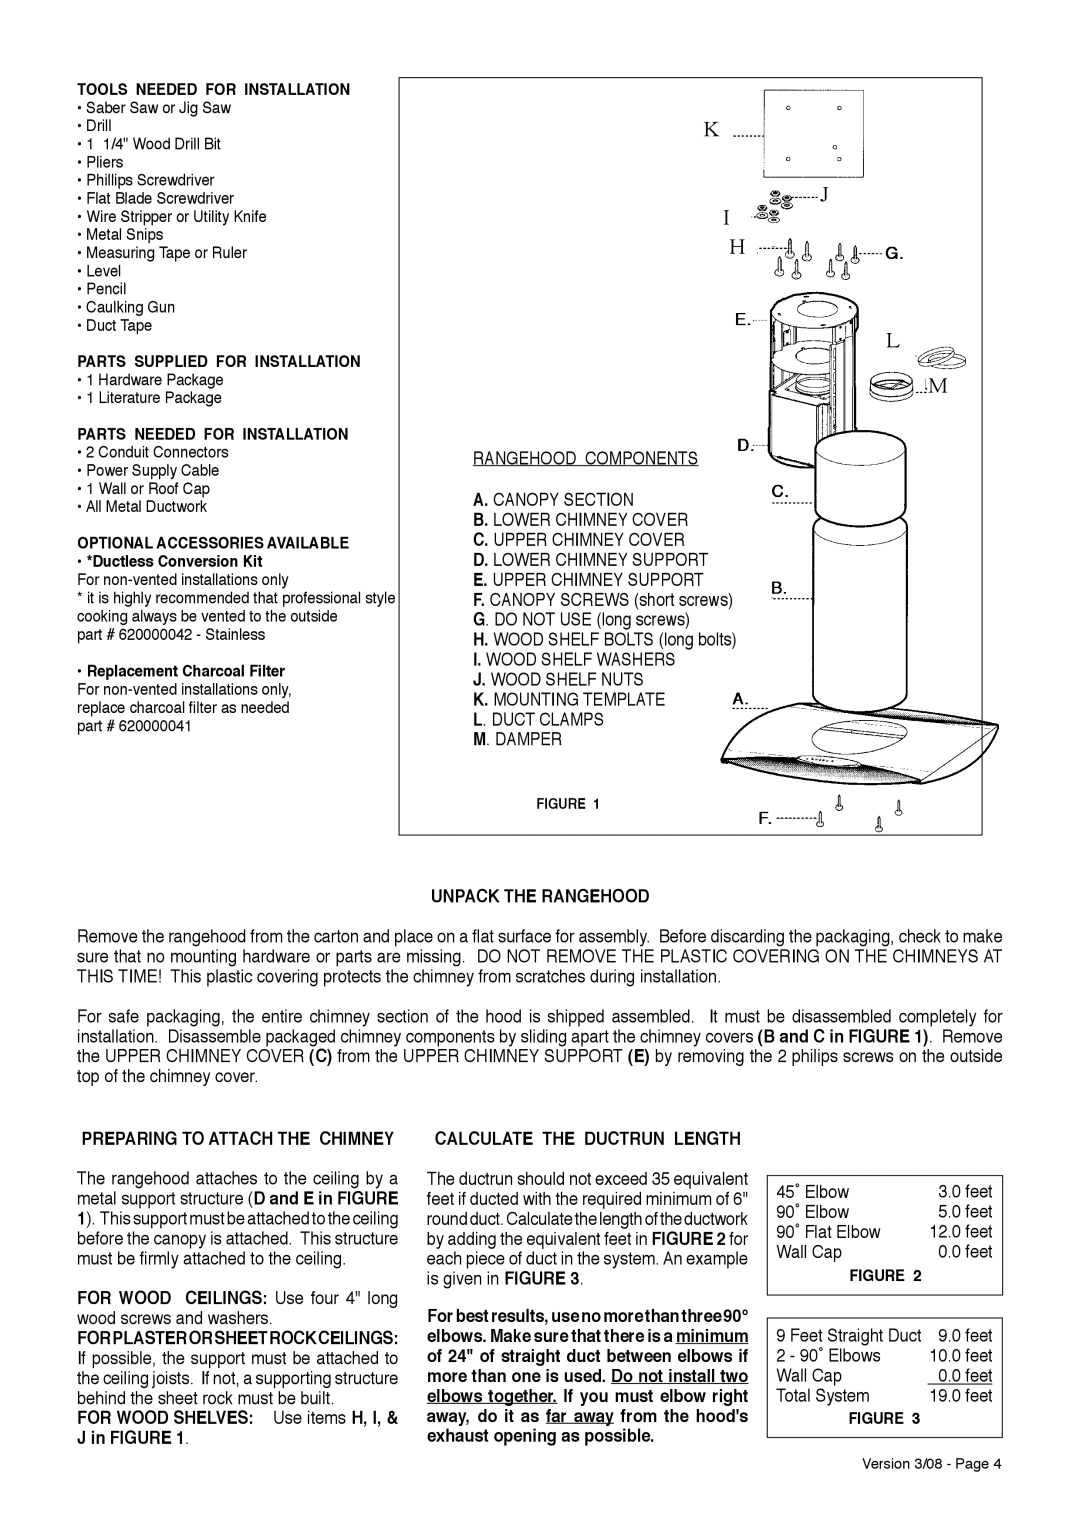
RANGEHOOD COMPONENTS
A. CANOPY SECTION
B. LOWER CHIMNEY COVER
C. UPPER CHIMNEY COVER
D. LOWER CHIMNEY SUPPORT
E. UPPER CHIMNEY SUPPORT
F. CANOPY SCREWS (short screws)
G. DO NOT USE (long screws)
H. WOOD SHELF BOLTS (long bolts)
I. WOOD SHELF WASHERS
J. WOOD SHELF NUTS
K. MOUNTING TEMPLATE
L. DUCT CLAMPS
M. DAMPER
FIGURE 1
UNPACK THE RANGEHOOD
Remove the rangehood from the carton and place on a flat surface for assembly. Before discarding the packaging, check to make sure that no mounting hardware or parts are missing. DO NOT REMOVE THE PLASTIC COVERING ON THE CHIMNEYS AT THIS TIME! This plastic covering protects the chimney from scratches during installation.
For safe packaging, the entire chimney section of the hood is shipped assembled. It must be disassembled completely for installation. Disassemble packaged chimney components by sliding apart the chimney covers (B and C in FIGURE 1). Remove the UPPER CHIMNEY COVER (C) from the UPPER CHIMNEY SUPPORT (E) by removing the 2 philips screws on the outside top of the chimney cover.
PREPARING TO ATTACH THE CHIMNEY
The rangehood attaches to the ceiling by a metal support structure (D and E in FIGURE 1). This support must be attached to the ceiling before the canopy is attached. This structure must be firmly attached to the ceiling.
FOR WOOD CEILINGS: Use four 4" long
CALCULATE THE DUCTRUN LENGTH |
|
| |
The ductrun should not exceed 35 equivalent |
|
| |
45˚ Elbow | 3.0 feet | ||
feet if ducted with the required minimum of 6" | |||
roundduct.Calculatethelengthoftheductwork | 90˚ Elbow | 5.0 feet | |
by adding the equivalent feet in FIGURE 2 for | 90˚ Flat Elbow | 12.0 feet | |
each piece of duct in the system. An example | Wall Cap | 0.0 feet | |
is given in FIGURE 3. | FIGURE 2 |
|
wood screws and washers.
FORPLASTERORSHEETROCKCEILINGS: If possible, the support must be attached to the ceiling joists. If not, a supporting structure behind the sheet rock must be built.
FOR WOOD SHELVES: Use items H, I, & J in FIGURE 1.
For best results, use no more than three 90° elbows. Make sure that there is a minimum of 24" of straight duct between elbows if more than one is used. Do not install two elbows together. If you must elbow right away, do it as far away from the hood's exhaust opening as possible.
9 | Feet Straight Duct | 9.0 feet |
2 | - 90˚ Elbows | 10.0 feet |
Wall Cap | 0.0 feet | |
Total System | 19.0 feet | |
FIGURE 3
Version 3/08 - Page 4
