TOOLS NEEDED FOR INSTALLATION

CALCULATE THE DUCTRUN LENGTH

Saber Saw or Jig Saw

Drill

1 1/4" Wood Drill Bit

Pliers

Phillips Screwdriver

Flat Blade Screwdriver

Wire Stripper or Utility Knife

Metal Snips

Measuring Tape or Ruler

Level

Pencil

Caulking Gun

Duct Tape

PARTS SUPPLIED FOR INSTALLATION

1 Hardware Package

1 Literature Package

PARTS NEEDED FOR INSTALLATION

• 2 Conduit Connectors

• Power Supply Cable

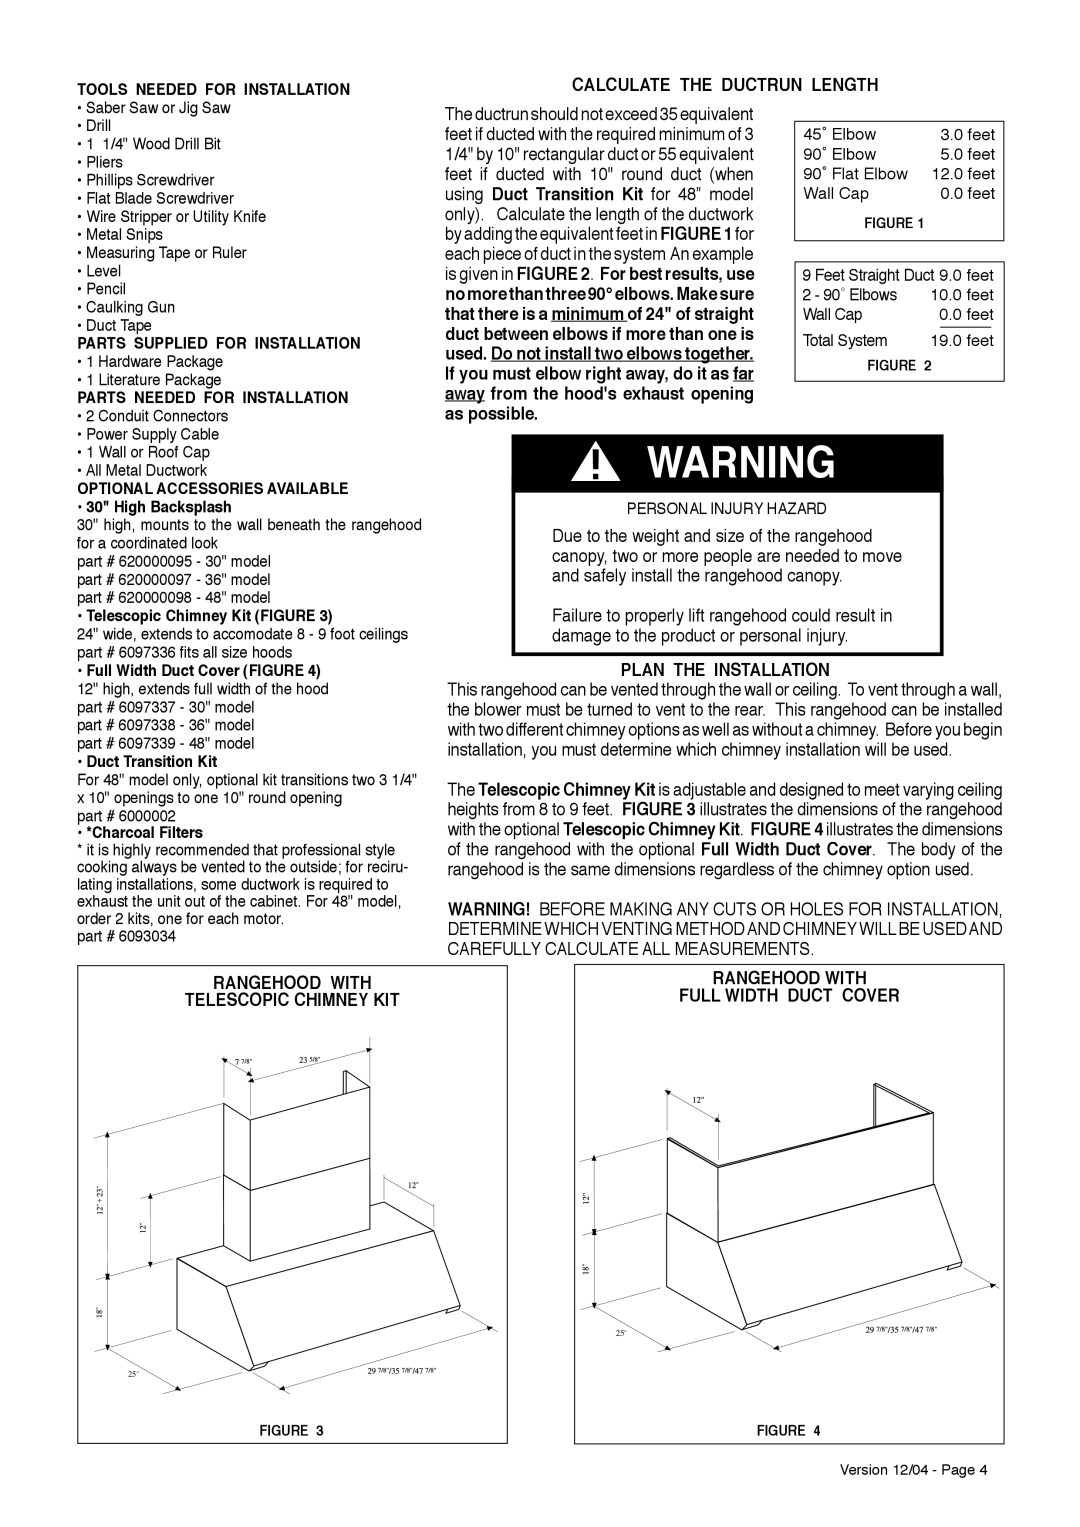
The ductrun should not exceed 35 equivalent feet if ducted with the required minimum of 3 1/4" by 10" rectangular duct or 55 equivalent feet if ducted with 10" round duct (when using Duct Transition Kit for 48” model only). Calculate the length of the ductwork by adding the equivalent feet in FIGURE 1 for each piece of duct in the system An example is given in FIGURE 2. For best results, use no more than three 90° elbows. Make sure that there is a minimum of 24" of straight duct between elbows if more than one is used. Do not install two elbows together. If you must elbow right away, do it as far away from the hood's exhaust opening as possible.

45˚ Elbow

3.0 feet

90˚ Elbow

5.0 feet

90˚ Flat Elbow

12.0 feet

Wall Cap

0.0 feet

FIGURE 1


9

Feet Straight Duct 9.0 feet

2

- 90˚ Elbows

10.0 feet

Wall Cap

0.0 feet

Total System

19.0 feet


FIGURE 2


• 1 Wall or Roof Cap

• All Metal Ductwork

OPTIONAL ACCESSORIES AVAILABLE

• 30" High Backsplash

30" high, mounts to the wall beneath the rangehood for a coordinated look

part # 620000095 - 30" model part # 620000097 - 36" model part # 620000098 - 48" model

• Telescopic Chimney Kit (FIGURE 3)

24" wide, extends to accomodate 8 - 9 foot ceilings part # 6097336 fits all size hoods

Full Width Duct Cover (FIGURE 4) 12" high, extends full width of the hood part # 6097337 - 30" model

part # 6097338 - 36" model part # 6097339 - 48" model

Duct Transition Kit

For 48" model only, optional kit transitions two 3 1/4" x 10" openings to one 10" round opening

part # 6000002

• *Charcoal Filters

*it is highly recommended that professional style cooking always be vented to the outside; for reciru- lating installations, some ductwork is required to exhaust the unit out of the cabinet. For 48" model, order 2 kits, one for each motor.

part # 6093034

!WARNING

PERSONAL INJURY HAZARD

Due to the weight and size of the rangehood canopy, two or more people are needed to move and safely install the rangehood canopy.

Failure to properly lift rangehood could result in damage to the product or personal injury.

PLAN THE INSTALLATION

This rangehood can be vented through the wall or ceiling. To vent through a wall, the blower must be turned to vent to the rear. This rangehood can be installed with two different chimney options as well as without a chimney. Before you begin installation, you must determine which chimney installation will be used.

The Telescopic Chimney Kit is adjustable and designed to meet varying ceiling heights from 8 to 9 feet. FIGURE 3 illustrates the dimensions of the rangehood with the optional Telescopic Chimney Kit. FIGURE 4 illustrates the dimensions of the rangehood with the optional Full Width Duct Cover. The body of the rangehood is the same dimensions regardless of the chimney option used.

WARNING! BEFORE MAKING ANY CUTS OR HOLES FOR INSTALLATION, DETERMINE WHICH VENTING METHODAND CHIMNEY WILLBE USEDAND CAREFULLY CALCULATE ALL MEASUREMENTS.

RANGEHOOD WITH

TELESCOPIC CHIMNEY KIT

25"

FIGURE 3

RANGEHOOD WITH

FULL WIDTH DUCT COVER

25"

FIGURE 4

Version 12/04 - Page 4

Page 4
Image 4
Faber PRO MAGNUMw installation instructions Calculate the Ductrun Length, Plan the Installation

PRO MAGNUMw specifications

Faber PRO MAGNUMW is an advanced professional hood designed for both performance and aesthetic appeal in modern kitchens. It stands out for its powerful ventilation capabilities, which are essential in maintaining a fresh and clean cooking environment. The hood is equipped with a high-efficiency motor that ensures excellent air extraction, effectively eliminating smoke, odors, and grease from the kitchen space.

One of the standout features of the PRO MAGNUMW is its impressive extraction rate. The model can provide up to 1200 m³/h of airflow, making it suitable for large cooking areas. This high extraction rate ensures that even the most rigorous cooking sessions do not compromise air quality.

The PRO MAGNUMW also incorporates advanced noise-reduction technology. This innovation allows for quieter operation, which is a significant consideration for many homeowners when choosing a kitchen hood. The combination of high-performance extraction and low noise levels creates a comfortable cooking atmosphere.

In terms of design, the Faber PRO MAGNUMW offers a sleek, contemporary aesthetic that complements a variety of kitchen styles. Its stainless steel finish is not only visually appealing but also easy to clean, ensuring that the hood maintains its pristine appearance over time.

Another notable characteristic is the efficient LED lighting integrated into the unit. This feature provides bright illumination over the cooking surface, enhancing visibility while preparing meals. The energy-efficient LED lights also contribute to lower energy consumption, aligning with eco-friendly practices.

The control system of the PRO MAGNUMW is user-friendly, often featuring a touch control interface or remote control options. This enables users to adjust fan speeds and lighting effortlessly. Moreover, many models come with programmable timers that allow for automatic shut-off, providing convenience and energy savings.

Installation flexibility is another advantage of the Faber PRO MAGNUMW. It can be mounted as a wall hood, chimney hood, or even as an island hood, making it versatile for various kitchen layouts.

Overall, the Faber PRO MAGNUMW combines powerful ventilation, low noise operation, modern design, and user-friendly features, making it an excellent choice for both professional chefs and home cooks who demand efficiency and style in their kitchen equipment.