PLAN AND MAKE THE CUTOUT

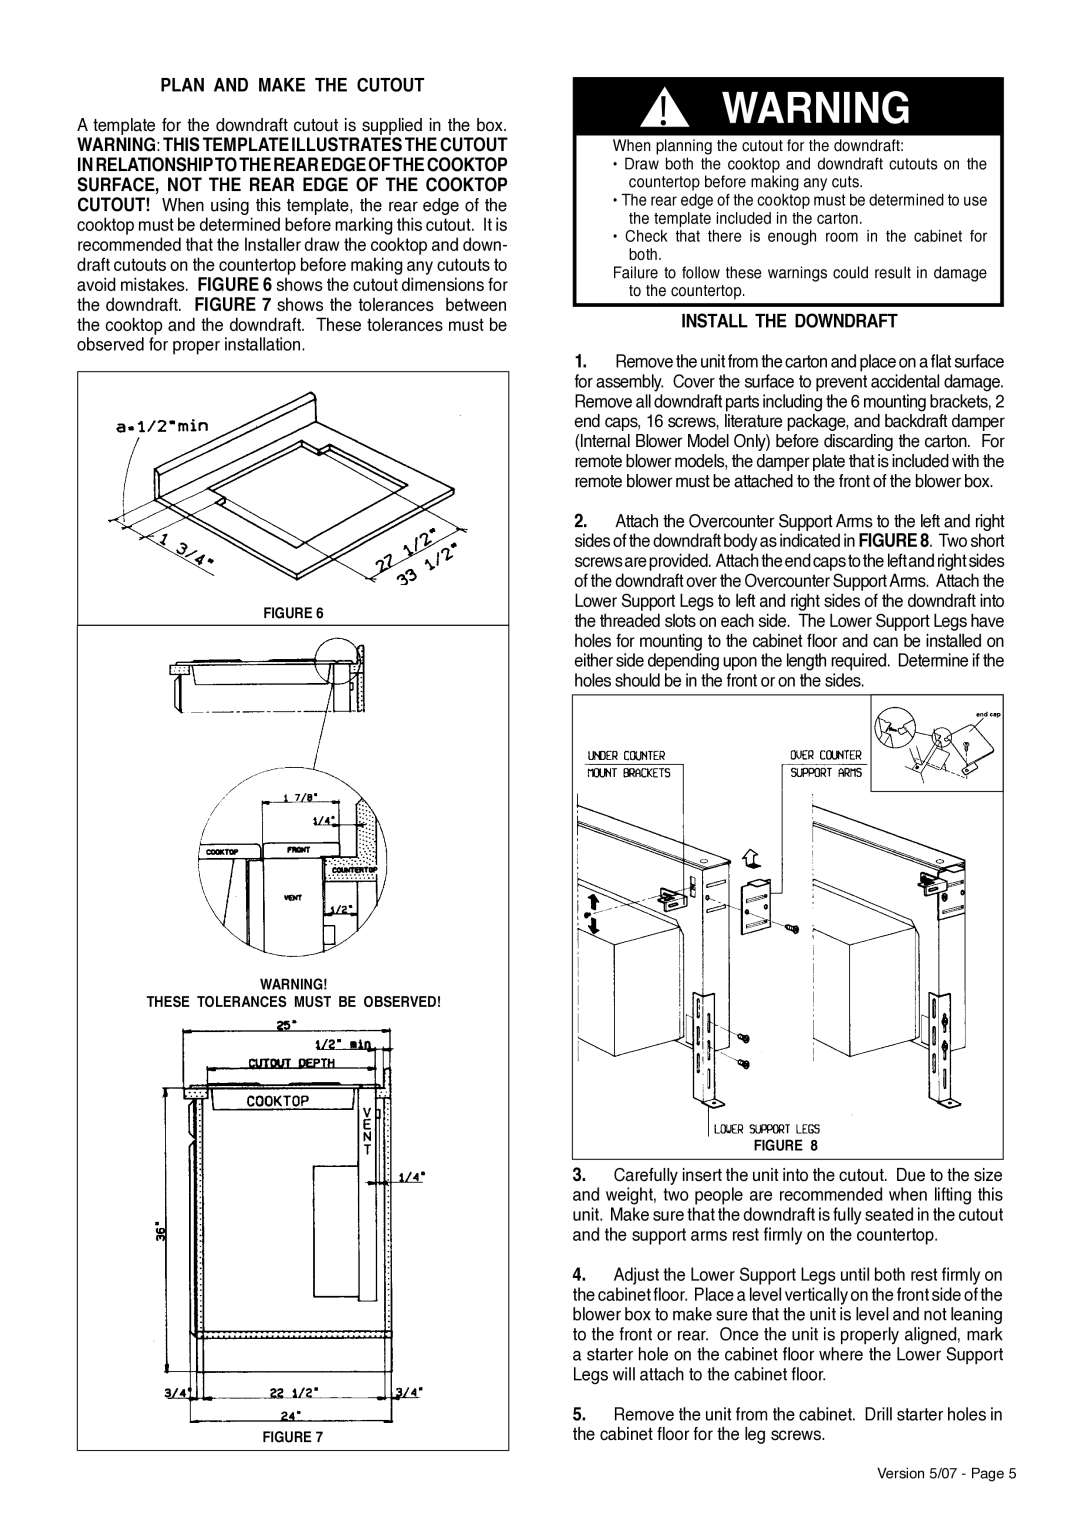
A template for the downdraft cutout is supplied in the box.

WARNING: THIS TEMPLATE ILLUSTRATES THE CUTOUT

INRELATIONSHIPTOTHEREAREDGEOFTHECOOKTOP SURFACE, NOT THE REAR EDGE OF THE COOKTOP CUTOUT! When using this template, the rear edge of the cooktop must be determined before marking this cutout. It is recommended that the Installer draw the cooktop and down- draft cutouts on the countertop before making any cutouts to avoid mistakes. FIGURE 6 shows the cutout dimensions for the downdraft. FIGURE 7 shows the tolerances between the cooktop and the downdraft. These tolerances must be observed for proper installation.

FIGURE 6

WARNING!

THESE TOLERANCES MUST BE OBSERVED!

FIGURE 7

! WARNING

When planning the cutout for the downdraft:

• Draw both the cooktop and downdraft cutouts on the countertop before making any cuts.

• The rear edge of the cooktop must be determined to use the template included in the carton.

• Check that there is enough room in the cabinet for both.

Failure to follow these warnings could result in damage to the countertop.

INSTALL THE DOWNDRAFT

1.Remove the unit from the carton and place on a flat surface for assembly. Cover the surface to prevent accidental damage. Remove all downdraft parts including the 6 mounting brackets, 2 end caps, 16 screws, literature package, and backdraft damper (Internal Blower Model Only) before discarding the carton. For remote blower models, the damper plate that is included with the remote blower must be attached to the front of the blower box.

2.Attach the Overcounter Support Arms to the left and right sides of the downdraft body as indicated in FIGURE 8. Two short screwsareprovided. Attachtheendcapstotheleftandrightsides of the downdraft over the Overcounter Support Arms. Attach the Lower Support Legs to left and right sides of the downdraft into the threaded slots on each side. The Lower Support Legs have holes for mounting to the cabinet floor and can be installed on either side depending upon the length required. Determine if the holes should be in the front or on the sides.

FIGURE 8

3.Carefully insert the unit into the cutout. Due to the size and weight, two people are recommended when lifting this unit. Make sure that the downdraft is fully seated in the cutout and the support arms rest firmly on the countertop.

4.Adjust the Lower Support Legs until both rest firmly on the cabinet floor. Place a level vertically on the front side of the blower box to make sure that the unit is level and not leaning to the front or rear. Once the unit is properly aligned, mark a starter hole on the cabinet floor where the Lower Support Legs will attach to the cabinet floor.

5.Remove the unit from the cabinet. Drill starter holes in the cabinet floor for the leg screws.

Version 5/07 - Page 5

Page 5
Image 5
Faber Scirocco Downdraft Rangehood Plan and Make the Cutout, Template for the downdraft cutout is supplied in the box

Scirocco Downdraft Rangehood specifications

The Faber Scirocco Downdraft Rangehood exemplifies a perfect blend of functionality and modern design, making it an essential addition to contemporary kitchens. This innovative downdraft rangehood is engineered to provide optimal ventilation while maintaining a minimalist aesthetic, seamlessly integrating into your kitchen space.

One of the main features of the Scirocco is its powerful extraction capacity. With a motor that delivers an impressive air flow of up to 600 cubic meters per hour, this rangehood efficiently removes smoke, odors, and grease from the air, ensuring a fresh and pleasant cooking environment. The adjustable speed settings allow users to customize the ventilation power based on their cooking needs, whether simmering a delicate sauce or frying up a hearty meal.

The design of the Scirocco is where it truly stands out. When not in use, the unit elegantly retracts into the countertop, nearly disappearing from view. This functionality maximizes space and enhances sight lines in the kitchen, making it a preferred choice for island cooking setups and open-concept living spaces. The sleek glass and stainless steel finish not only adds a touch of sophistication but also makes for easy cleaning and maintenance.

Faber's commitment to innovation is evident in the technologies incorporated into the Scirocco. It features an advanced grease filtration system that captures even the finest grease particles, ensuring that your kitchen remains clean and fresh. The lifetime aluminum filters are washable, promoting sustainability and cost-effectiveness by eliminating the need for frequent replacements.

Another significant characteristic of the Scirocco is its low noise level. Operating at a whisper-quiet level, it permits users to enjoy conversations and music while cooking without being overwhelmed by disruptive sounds. This is a vital aspect for those who enjoy cooking as a social activity.

The Faber Scirocco also embraces modern technology with optional remote control functionality, allowing users to operate the rangehood from a distance. Additionally, LED lighting enhances the cooking surface visibility while adding energy-efficient lighting to the kitchen space.

In conclusion, the Faber Scirocco Downdraft Rangehood combines robust performance with stylish aesthetics, advanced technologies, and user-friendly features. Its ability to blend seamlessly into any kitchen design while delivering exceptional ventilation makes it a standout choice for cooking enthusiasts looking to elevate their culinary experience.