PREPARE THE WALL

INSTALL THE RANGEHOOD

1.Disconnect and move freestanding range from cabinet open- ing to provide easier access to rear wall. Put a thick, protective covering over cooktop, set-in range or countertop to protect from damage or dirt.

2.Determine and clearly mark with a pencil the center line on the wall where the rangehood will be installed.

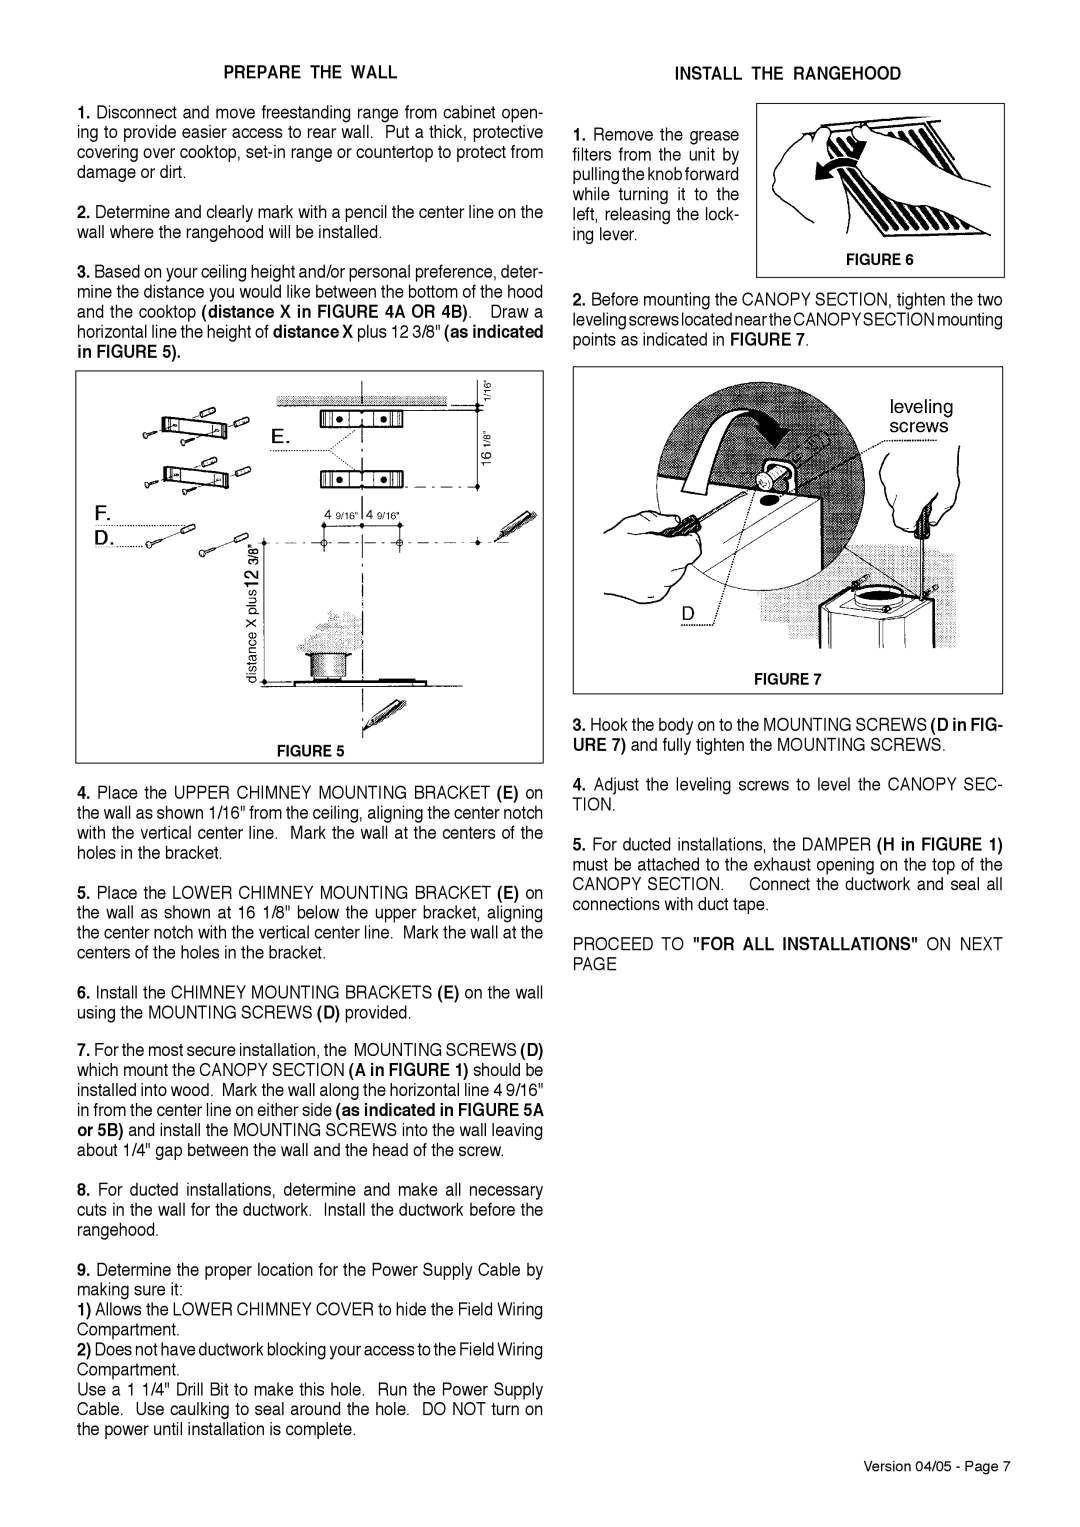
3.Based on your ceiling height and/or personal preference, deter- mine the distance you would like between the bottom of the hood and the cooktop (distance X in FIGURE 4A OR 4B). Draw a horizontal line the height of distance X plus 12 3/8" (as indicated in FIGURE 5).

FIGURE 5

4.Place the UPPER CHIMNEY MOUNTING BRACKET (E) on the wall as shown 1/16" from the ceiling, aligning the center notch with the vertical center line. Mark the wall at the centers of the holes in the bracket.

5.Place the LOWER CHIMNEY MOUNTING BRACKET (E) on the wall as shown at 16 1/8" below the upper bracket, aligning the center notch with the vertical center line. Mark the wall at the centers of the holes in the bracket.

6.Install the CHIMNEY MOUNTING BRACKETS (E) on the wall using the MOUNTING SCREWS (D) provided.

7.For the most secure installation, the MOUNTING SCREWS (D) which mount the CANOPY SECTION (A in FIGURE 1) should be installed into wood. Mark the wall along the horizontal line 4 9/16" in from the center line on either side (as indicated in FIGURE 5A or 5B) and install the MOUNTING SCREWS into the wall leaving about 1/4" gap between the wall and the head of the screw.

8.For ducted installations, determine and make all necessary cuts in the wall for the ductwork. Install the ductwork before the rangehood.

9.Determine the proper location for the Power Supply Cable by making sure it:

1) Allows the LOWER CHIMNEY COVER to hide the Field Wiring Compartment.

2) Does not have ductwork blocking your access to the Field Wiring Compartment.

Use a 1 1/4" Drill Bit to make this hole. Run the Power Supply Cable. Use caulking to seal around the hole. DO NOT turn on the power until installation is complete.

1.Remove the grease filters from the unit by pulling the knob forward while turning it to the left, releasing the lock- ing lever.

FIGURE 6

2.Before mounting the CANOPY SECTION, tighten the two leveling screws located near the CANOPYSECTION mounting points as indicated in FIGURE 7.

FIGURE 7

3.Hook the body on to the MOUNTING SCREWS (D in FIG- URE 7) and fully tighten the MOUNTING SCREWS.

4.Adjust the leveling screws to level the CANOPY SEC- TION.

5.For ducted installations, the DAMPER (H in FIGURE 1) must be attached to the exhaust opening on the top of the CANOPY SECTION. Connect the ductwork and seal all connections with duct tape.

PROCEED TO "FOR ALL INSTALLATIONS" ON NEXT PAGE

Version 04/05 - Page 7

Page 7
Image 7
Faber TRATTO installation instructions Prepare the Wall, Proceed to for ALL Installations on Next

TRATTO specifications

Faber TRATTO is a modern kitchen hood that combines cutting-edge technology with sleek design, aimed at enhancing the cooking experience while maintaining a stylish aesthetic. This appliance is not just a functional necessity but also a design statement in contemporary kitchens.

One of the standout features of Faber TRATTO is its advanced filtration system. It utilizes a combination of aluminum filters and a high-performance motor to efficiently capture grease, smoke, and odors produced during cooking. The multi-layered filtration aids in maintaining indoor air quality, ensuring that your kitchen remains fresh and inviting.

Faber TRATTO is equipped with a powerful ventilation system that can handle high-volume cooking with ease. The hood's powerful extraction rates mean it can quickly clear the air, making it particularly beneficial for those who love to cook elaborate meals or use strong spices. With noise reduction technology, the TRATTO operates quietly, allowing for comfortable conversation even during meal preparation.

Another remarkable feature of the TRATTO is its energy efficiency. Designed to be environmentally friendly, it includes LED lighting that not only illuminates the cooking area but also consumes significantly less energy compared to traditional light fixtures. This results in cost savings on electricity bills and a lower carbon footprint.

The user-friendly controls of the Faber TRATTO further enhance its appeal. It features intuitive touch controls that allow for easy operation of the hood's settings, including speed adjustments and lighting. Additionally, many models offer smart connectivity, enabling users to control the hood remotely via a smartphone app.

The design of Faber TRATTO stands out with its minimalist aesthetic, available in various finishes that blend seamlessly with any kitchen décor. Whether you opt for a stainless steel finish or a more contemporary black model, the TRATTO adds a touch of elegance to your space.

In summary, Faber TRATTO is an exceptional kitchen hood that combines powerful performance, energy efficiency, and a modern design. With its advanced filtration system, quiet operation, user-friendly controls, and stylish appearance, it is an indispensable addition to any kitchen, enhancing both functionality and style.