PREPARE THE WALL

1.Disconnect and move freestanding range from cabinet open- ing to provide easier access to rear wall. Put a thick, protective covering over cooktop, set-in range or countertop to protect from damage or dirt.

2.Determine and clearly mark with a pencil the center line on the wall where the rangehood will be installed.

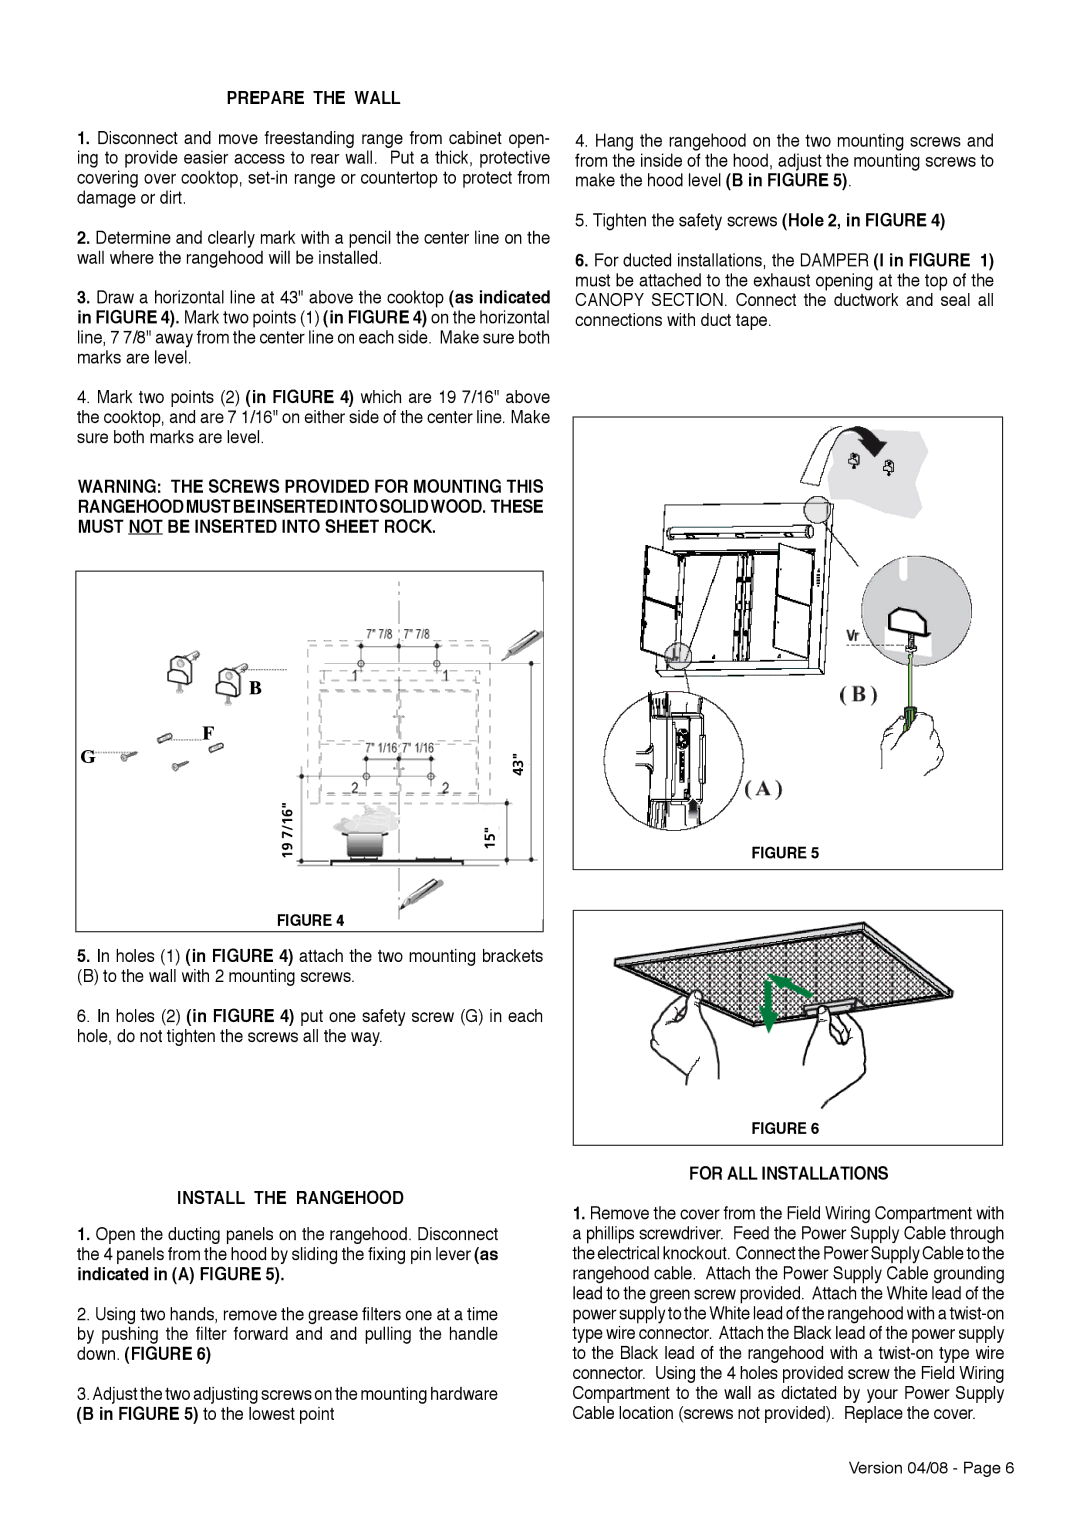
3.Draw a horizontal line at 43" above the cooktop (as indicated in FIGURE 4). Mark two points (1) (in FIGURE 4) on the horizontal line, 7 7/8" away from the center line on each side. Make sure both marks are level.

4.Mark two points (2) (in FIGURE 4) which are 19 7/16" above the cooktop, and are 7 1/16" on either side of the center line. Make sure both marks are level.

WARNING: THE SCREWS PROVIDED FOR MOUNTING THIS RANGEHOODMUSTBEINSERTEDINTOSOLIDWOOD. THESE MUST NOT BE INSERTED INTO SHEET ROCK.

B

F


G


43"


19 7/16"


15"


FIGURE 4

5.In holes (1) (in FIGURE 4) attach the two mounting brackets

(B) to the wall with 2 mounting screws.

6.In holes (2) (in FIGURE 4) put one safety screw (G) in each hole, do not tighten the screws all the way.

4.Hang the rangehood on the two mounting screws and from the inside of the hood, adjust the mounting screws to make the hood level (B in FIGURE 5).

5.Tighten the safety screws (Hole 2, in FIGURE 4)

6.For ducted installations, the DAMPER (I in FIGURE 1) must be attached to the exhaust opening at the top of the CANOPY SECTION. Connect the ductwork and seal all connections with duct tape.

FIGURE 5

FIGURE 6

INSTALL THE RANGEHOOD

1.Open the ducting panels on the rangehood. Disconnect the 4 panels from the hood by sliding the fixing pin lever (as indicated in (A) FIGURE 5).

2.Using two hands, remove the grease filters one at a time by pushing the filter forward and and pulling the handle down. (FIGURE 6)

3.Adjust the two adjusting screws on the mounting hardware (B in FIGURE 5) to the lowest point

FOR ALL INSTALLATIONS

1.Remove the cover from the Field Wiring Compartment with a phillips screwdriver. Feed the Power Supply Cable through the electrical knockout. Connect the Power Supply Cable to the rangehood cable. Attach the Power Supply Cable grounding lead to the green screw provided. Attach the White lead of the power supply to the White lead of the rangehood with a twist-on type wire connector. Attach the Black lead of the power supply to the Black lead of the rangehood with a twist-on type wire connector. Using the 4 holes provided screw the Field Wiring Compartment to the wall as dictated by your Power Supply Cable location (screws not provided). Replace the cover.

Version 04/08 - Page 6

Page 6
Image 6
Faber Wall Mount Luxury Rangehood installation instructions Prepare the Wall, Install the Rangehood, For ALL Installations

Wall Mount Luxury Rangehood specifications

The Faber Wall Mount Luxury Rangehood exemplifies sophistication and functionality, merging innovation with design to transform modern kitchens. This high-end appliance not only elevates the aesthetic appeal of your cooking space but also enhances the overall cooking experience. Designed for those who appreciate culinary artistry, the Faber Wall Mount Rangehood is a statement piece that combines style and performance seamlessly.

One of the key features of the Faber Wall Mount Luxury Rangehood is its powerful suction capability. Equipped with high-performance motors, it effectively eliminates smoke, odors, and steam, ensuring that your kitchen remains a pleasant and inviting environment. With various speed settings, users can easily adjust the suction power according to the intensity of their cooking, whether it's a simple simmer or a fiery stir-fry.

This rangehood is also known for its whisper-quiet operation. Thanks to advanced noise-reduction technologies, the Faber Wall Mount Rangehood operates at low decibel levels, allowing you to engage in conversation or enjoy the ambiance of your kitchen without disruption. The balance between performance and low noise levels makes it ideal for open-concept living spaces.

In terms of design, the Faber Wall Mount Luxury Rangehood boasts clean lines and sleek finishes that complement contemporary kitchen aesthetics. Available in various materials, such as stainless steel and glass, it can easily integrate into any decor style. Its elegant canopy design not only enhances the visual appeal but also provides optimal ventilation coverage.

Technologically, the rangehood features intuitive controls, often integrating touch-sensitive panels or remote controls for added convenience. Many models are also equipped with LED lighting that illuminates the cooking surface, enhancing visibility while being energy-efficient.

Another notable characteristic is the ease of maintenance. With removable and washable filters designed to capture grease and particles effectively, the Faber Wall Mount Rangehood simplifies the cleaning process. This ensures that your rangehood remains in top condition, delivering peak performance over time.

In summary, the Faber Wall Mount Luxury Rangehood stands out for its powerful suction, quiet operation, elegant design, and user-friendly technology. It embodies a perfect blend of form and function, making it an essential addition for any modern kitchen. Invest in this luxury appliance to enjoy a harmonious cooking environment that underscores the joy of culinary exploration.