Field Controls S2000 Insulate Water Tank Reservoir, Mounting Template, Drillholesand CUT Openings

Models: S2000

1 16
Download 16 pages 5.62 Kb
Page 2
Image 2

SIMPLIFIED INSTALLATION INSTRUCTIONS

1.Insulate the water reservoir. See figure 3.

2.Select the mounting location on the duct and tape on the mounting template.

3.Drill the (8) 1/8" mountings holes.

4.Cut out the humidifier opening in the duct.

5.Insert the humidifier into the opening and screw in place.

6.Flush and connect the water line.

7.Connect the drain line.

8.Make 24 VAC electrical connections to achieve fan operation and interlock circuit.

9.Install and connect the humidistat.

10.Plug power cord into a grounded dedicated 120 VAC, 20 amp outlet for S2000 (240 VAC, 15 amp for S2020).

DETAILED INSTALLATION INSTRUCTIONS

1. INSULATE WATER TANK RESERVOIR

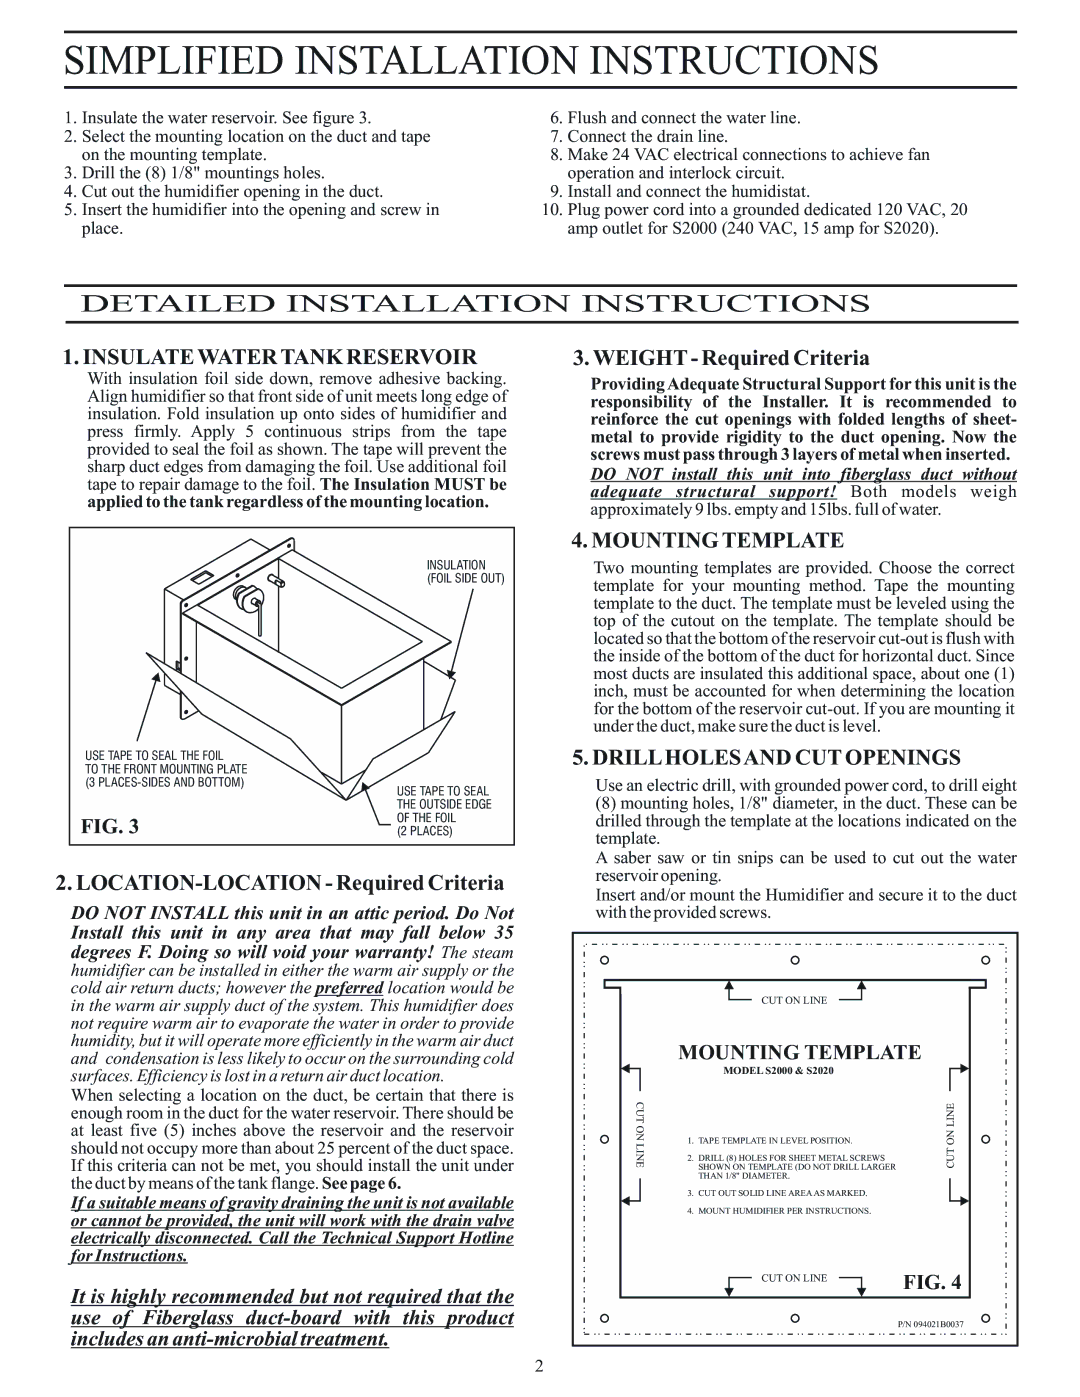
With insulation foil side down, remove adhesive backing. Align humidifier so that front side of unit meets long edge of insulation. Fold insulation up onto sides of humidifier and press firmly. Apply 5 continuous strips from the tape provided to seal the foil as shown. The tape will prevent the sharp duct edges from damaging the foil. Use additional foil tape to repair damage to the foil. The Insulation MUST be applied to the tank regardless of the mounting location.

3. WEIGHT - Required Criteria

Providing Adequate Structural Support for this unit is the responsibility of the Installer. It is recommended to reinforce the cut openings with folded lengths of sheet- metal to provide rigidity to the duct opening. Now the screws must pass through 3 layers of metal when inserted.

DO NOT install this unit into fiberglass duct without adequate structural support! Both models weigh approximately 9 lbs. empty and 15lbs. full of water.

USE TAPE TO SEAL THE FOIL

TO THE FRONT MOUNTING PLATE (3 PLACES-SIDES AND BOTTOM)

FIG. 3

INSULATION (FOIL SIDE OUT)

USE TAPE TO SEAL THE OUTSIDE EDGE OF THE FOIL

(2 PLACES)

4. MOUNTING TEMPLATE

Two mounting templates are provided. Choose the correct template for your mounting method. Tape the mounting template to the duct. The template must be leveled using the top of the cutout on the template. The template should be located so that the bottom of the reservoir cut-out is flush with the inside of the bottom of the duct for horizontal duct. Since most ducts are insulated this additional space, about one (1) inch, must be accounted for when determining the location for the bottom of the reservoir cut-out. If you are mounting it under the duct, make sure the duct is level.

5. DRILLHOLESAND CUT OPENINGS

Use an electric drill, with grounded power cord, to drill eight

(8) mounting holes, 1/8" diameter, in the duct. These can be

drilled through the template at the locations indicated on the

template.

A saber saw or tin snips can be used to cut out the water

reservoir opening.

2. LOCATION-LOCATION - Required Criteria

DO NOT INSTALL this unit in an attic period. Do Not Install this unit in any area that may fall belowThe steam35 humidifierdegrees F.canDoingbe installedo willinvoeitherd yourthe warmarranty!air supply or the

cold air return ducts; however the location would be in the warm air supply duct of the systempreferred. This humidifier does not require warm air to evaporate the water in order to provide humidity, but it will operate more efficiently in the warm air duct and condensation is less likely to occur on the surrounding cold surfaces. Efficiency is lost in a return air duct location.

When selecting a location on the duct, be certain that there is enough room in the duct for the water reservoir. There should be at least five (5) inches above the reservoir and the reservoir should not occupy more than about 25 percent of the duct space. If this criteria can not be met, you should install the unit under the duct by means of the tank flange. See page 6.

If a suitable means of gravity draining the unit is not available or cannot be provided, the unit will work with the drain valve electrically disconnected. Call the Technical Support Hotline for Instructions.

It is highly recommended but not required that the use of Fiberglass duct-board with this product includes an anti-microbial treatment.

Insert and/or mount the Humidifier and secure it to the duct

with the provided screws.

CUT ON LINE

MOUNTING TEMPLATE

MODEL S2000 & S2020

CUT ONLINE

2.

DRILL (8) HOLES FOR SHEET METAL SCREWS

CUTON LINE


1.

TAPE TEMPLATE IN LEVEL POSITION.


SHOWN ON TEMPLATE (DO NOT DRILL LARGER


3.

THAN 1/8" DIAMETER.


CUT OUT SOLID LINE AREA AS MARKED.


4.

MOUNT HUMIDIFIER PER INSTRUCTIONS.

FIG. 4


CUT ON LINE


P/N 094021B0037

2

Page 2
Image 2
Field Controls S2000 installation instructions Insulate Water Tank Reservoir, Mounting Template, Drillholesand CUT Openings

S2000 specifications

Field Controls S2000 is an advanced indoor air quality solution designed for enhancing the cleanliness and safety of indoor environments. It primarily functions as a whole-house air purification system, effectively removing airborne pollutants such as dust, allergens, and biological contaminants, thereby promoting healthier living spaces.

One of the standout features of the S2000 is its multi-stage filtration process. This system utilizes a combination of pre-filters, HEPA filters, and activated carbon filters. The pre-filter captures larger particles, extending the life of the more delicate HEPA filter, which is capable of trapping 99.97% of particulates as small as 0.3 microns. The activated carbon filter adsorbs odors, volatile organic compounds (VOCs), and other gaseous pollutants, ensuring that the air emitted is not only clean but also fresh.

The S2000 incorporates advanced technologies that set it apart from standard air purifiers. One notable innovation is its ultraviolet (UV) light technology, which further enhances the purification process by neutralizing bacteria, viruses, and mold spores that may pass through the filters. This dual-action approach ensures that the air is not merely filtered but also sanitized, making it an excellent choice for households with allergies or respiratory conditions.

In terms of ease of use, the Field Controls S2000 features a user-friendly interface that includes an intuitive control panel. Users can easily monitor filter status, adjust fan speeds, and set timers for operation, allowing for customizable air purification according to specific needs. Additionally, the system is designed for quiet operation, ensuring minimal disruption in the home environment.

Energy efficiency is another characteristic that makes the S2000 appealing to consumers. It is designed to consume minimal power while maximizing airflow, allowing it to maintain a clean air supply without significantly impacting energy bills.

The S2000 is compatible with a wide range of HVAC systems, making it a versatile addition to various residential settings. Its compact design allows for flexible installation, whether it's integrated within an existing ductwork system or used as a standalone unit. Overall, the Field Controls S2000 combines cutting-edge technology with practical features to deliver comprehensive air purification for healthier indoor living.