13. MAINTENANCE/SPRING SHUTDOWN
Proper maintenance and removal of mineral deposits is still required on your steam humidifier in order to optimize performance. Annual cleaning is a must and more frequent cleaning may be necessary depending on the mineral content of the water in your area.
A post winter cleaning and shutdown, will prevent hard deposits from accumulating inside the bin, while the humidifier is idle over the summer. Do not allow the unit to sit idle for long periods without a proper cleaning and shutdown. Failure to do so will affect the performance of your steam humidifier.
Maintenance and inspection of the unit requires removal of the humidifier from the duct. This can be done following these steps.
A.Unplug the power cord from the 120 volt source for S2000 (240 volt for S2020) and allow the water to cool for at least 30 minutes prior to removal.
B.Turn off the water supply at the saddle tapping valve.
C.Remove the cable assembly wire plug from the top of the plastic control housing.
D.Drain the water with the manual drain valve. NOTE: The drain valve will be hot if the humidifier has not been allowed to cool.
E.Disconnect the water and drain lines. NOTE: Some water may drain out of the water line. Have a small container ready to catch the water.
NOTE: Although the water has been drained, some water may still remain in the humidifier reservoir along with sediment. Be careful not to tip the unit over when removing it from the duct.
Remove the eight (8) screws from the front mounting plate.
F. Slide the humidifier out of the duct.
G. Remove the two (2) screws holding the tank baffle to the pan flange and remove the baffle from the unit. Scrape all mineral deposits from the baffle and wash baffle off as described in step J. Remove the Anode from the baffle plate and purchase a new one. Operating the unit without the Anode will degrade the performance and increase maintenance.
H. Use a putty knife to scrape the minerals from the sides and bottom of the water reservoir. DO NOT scrape on the smallvinegartempe ature probe, forthe heatIf necessarylement, fill. Usetheatanksoft
with c th orandstiffletnylonit sit brushseveral. hours or even over- emorynight allowing the scale to soften and making it easier to
I. remove.
J. Carefully scrape the Water Level Probe to remove mineral deposits. Use soft emory cloth if necessary.
Clean the Water Probe Insulator, inside the pan, with a cloth and 50-50 mixture of water and vinegar, rinse with fresh water. Inspect for any mineral deposits on the plastic insulator. Repeat cleaning if necessary and thoroughly dry. Use a small nylon brush to clean deposits off the heater element and thermistor probe. Be careful not to damage any of the components.
K.Rinse out the reservoir. Be careful to keep water off of the wiring compartment and the front cover of the humidifier.
Allow the unit to dry thoroughly before using!
L.Reinstall the tank baffle and tighten the two (2) screws.
M.Re-install the unit in the duct and connect the water line and the drain lines. Store the unit in this condition for the summer, or continue to the next step.
START -UP
N.Turn on the water supply. Inspect the water connections and drain fittings for leaks.
O.Plug-in the S2000 power cord to the 120 VAC (240 VAC for S2020) grounded outlet. DO NOT use an extension cord.
1.The green POWER light should blink rapidly until it detects a demand to humidify, then it will blink slowly.
2.If the humidistat is calling for humidity the water
valve will energize and the water pan will fill with water.
3.The Heater element will energize to heat the water, and the Fan will start up to distribute the moisture
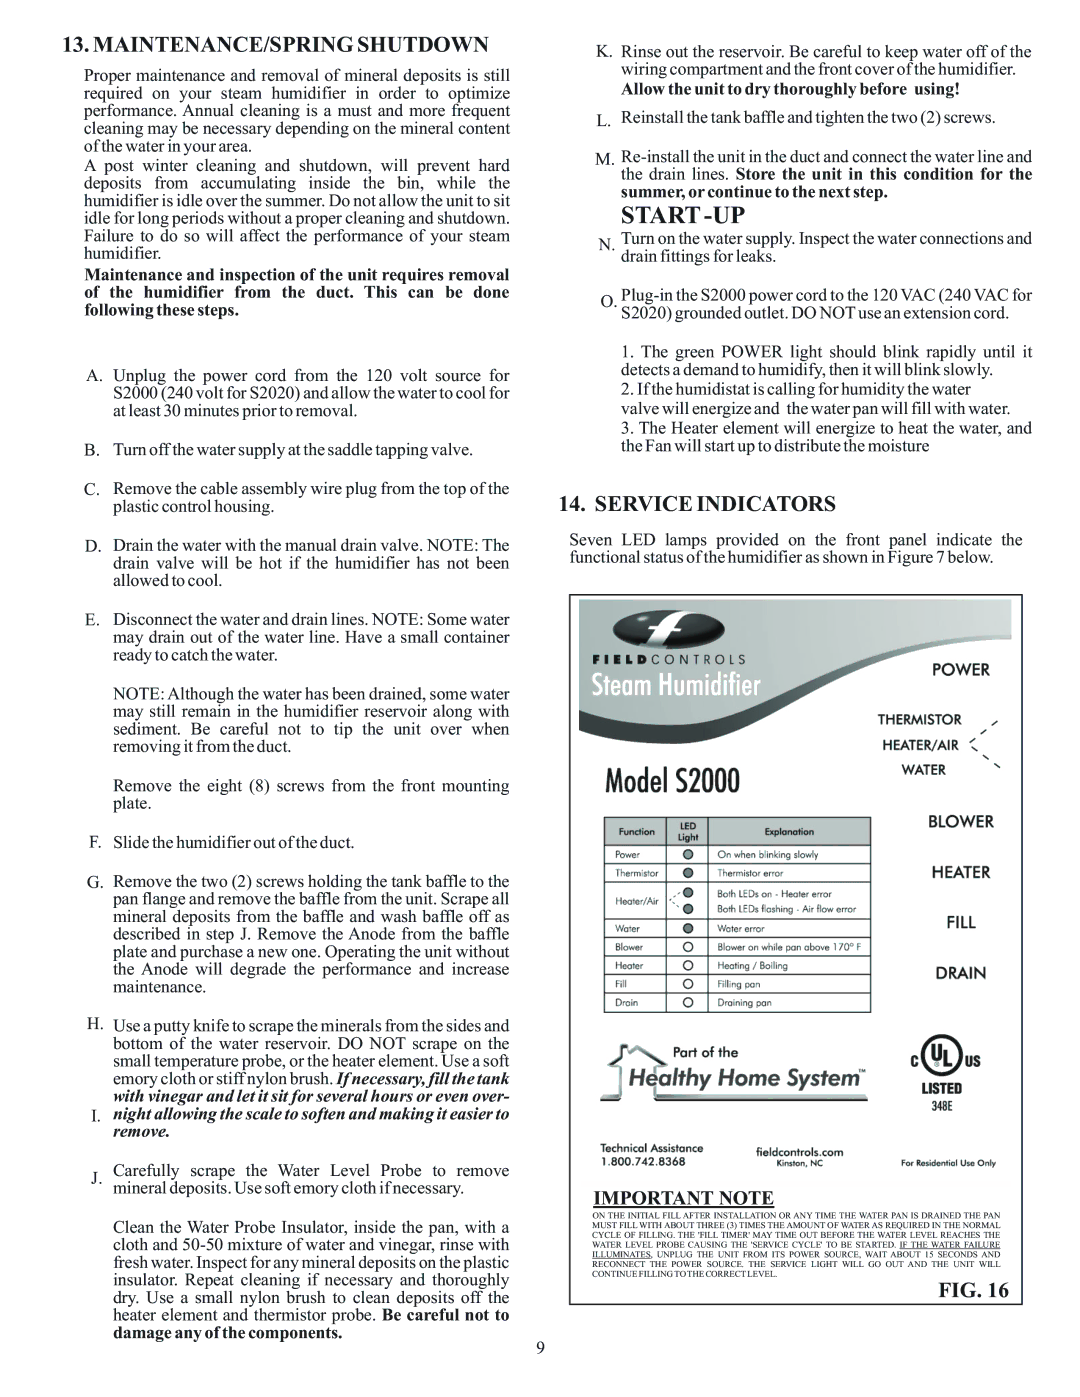
14.SERVICE INDICATORS
Seven LED lamps provided on the front panel indicate the functional status of the humidifier as shown in Figure 7 below.
| | POWER |
| ® | Thermistor |
| Heater / Air |
| Water |
Steam Humidifier | BLOWER |
Model S2020 | |
2.0 KW 240 Volt 8.3 Amps | HEATER |
Suitable for Residential Use Only | FILL |
385 Highway 33, Englishtown, NJ 07726 |
serial number | | DRAIN |
BUILT UNDER U.S. PATENT | |
NUMBER 5758018 | LISTED 141V | |
For Replacement Parts Call (800) 446-3110 | |
09021A0118 REV. J | | |
| | | | |
POWER | LED LIGHT- | EXPLANATION |
THERMISTOR FAILURE | GREEN - BLINKING SLOWLY-IF POWER TO UNIT |
- RED | - ON STEADY |
HEATER FAILURE | - RED | - BOTH LED'S ON STEADY |
AIR FLOW FAILURE | - RED | - BOTH LED’S ON FLASHING |
WATER FAILURE | - RED | - ON STEADY |
BLOWER | | - AMBER - ON STEADY WHILE PAN ABOVE 170 DEG F. |
HEATER | | - AMBER - ON STEADY WHILE HEATING (BOILING) |
FILL | | - AMBER - ON STEADY WHILE FILLING PAN |
DRAIN | | - AMBER - ON STEADY WHILE DRAINING PAN |
IMPORTANT NOTE
ON THE INITIAL FILL AFTER INSTALLATION OR ANY TIME THE WATER PAN IS DRAINED THE PAN MUST FILL WITH ABOUT THREE (3) TIMES THE AMOUNT OF WATER AS REQUIRED IN THE NORMAL CYCLE OF FILLING. THE 'FILL TIMER' MAY TIME OUT BEFORE THE WATER LEVEL REACHES THE WATER LEVEL PROBE CAUSING THE 'SERVICE CYCLE' TO BE STARTED. IF THE WATER FAILURE ILLUMINATES, UNPLUG THE UNIT FROM ITS POWER SOURCE, WAIT ABOUT 15 SECONDS AND RECONNECT THE POWER SOURCE. THE SERVICE LIGHT WILL GO OUT AND THE UNIT WILL CONTINUE FILLING TO THE CORRECT LEVEL.
FIG. 16