Normal Operation | OPERATION OF THE ALARM |
The alarm is not fitted with an on/off switch, it is automatically switched on when the tab is removed. This is to ensure that the alarm cannot be inadvertently switched off and therefore fail to detect a
WALL MOUNTING INSTALLATION
The alarm is designed to be wall mounted using the hardware provided. Find a position to install the alarm (see “Where to put the alarm” and
WHAT TO DO WHEN THE ALARM SOUNDS
![]() WARNING
WARNING
Red Light | Buzzer |
When no carbon monoxide is present, the red light will flash approximately once every 60 seconds.
1 every 60 secs
Test / Reset Button (in Normal operation) | First |
|
|
|
|
| |
sequence: |
|
|
|
|
| ||
If required, the alarm operation can be checked for correct operation |
|
|
|
|
| ||
|
|
|
|
|
|
| |
by pushing the Test/Reset button on the front of the unit. |
|
|
|
|
| ||
| 4 flashes |
| 4 beeps | ||||
|
|
|
|
|
|
|
|
“Where not to put the alarm”).
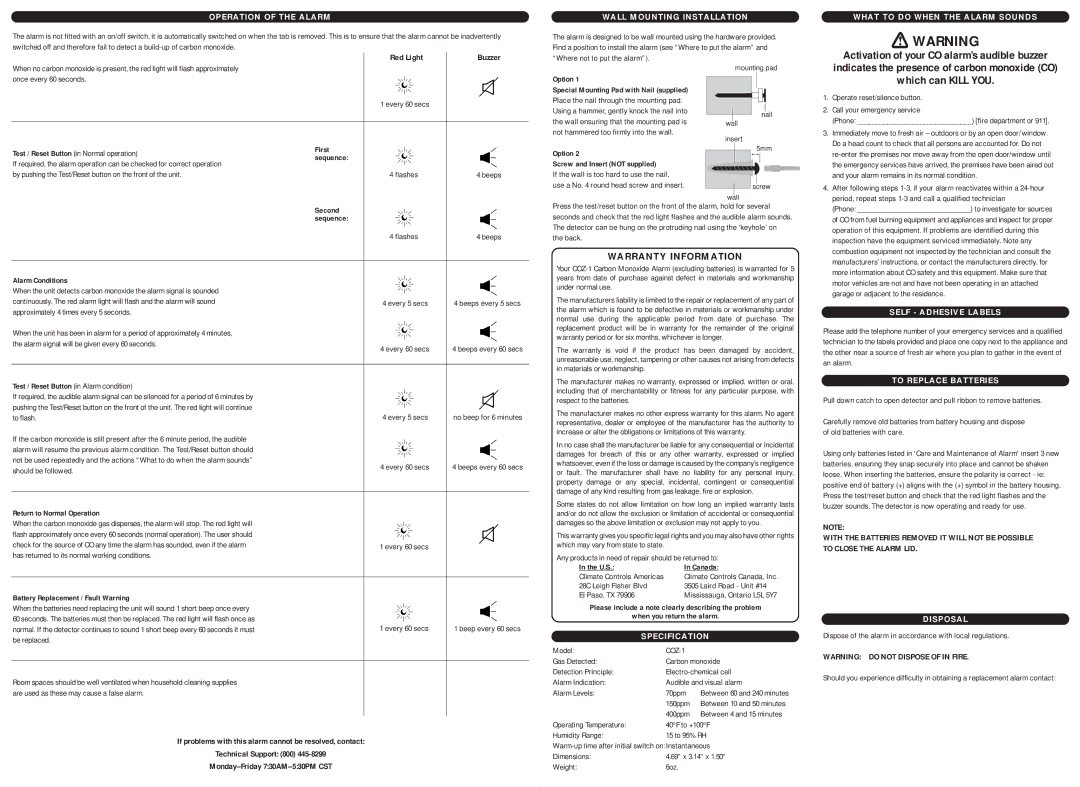
Option 1
Special Mounting Pad with Nail (supplied)
Place the nail through the mounting pad. Using a hammer, gently knock the nail into the wall ensuring that the mounting pad is not hammered too firmly into the wall.
Option 2
Screw and Insert (NOT supplied)
If the wall is too hard to use the nail,
use a No. 4 round head screw and insert.
mounting pad
nail
wall
insert
5mm
screw
wall
Activation of your CO alarm’s audible buzzer indicates the presence of carbon monoxide (CO) which can KILL YOU.
1. | Operate reset/silence button. |
2. | Call your emergency service |
| (Phone: _______________________________) [fire department or 911]. |
3. | Immediately move to fresh air – outdoors or by an open door/window. |
| Do a head count to check that all persons are accounted for. Do not |
| |
| the emergency services have arrived, the premises have been aired out |
| and your alarm remains in its normal condition. |
4. After following steps | |
| period, repeat steps |
| Second |
|
|
|
|
|
|
|
|
| |||||
| sequence: |
|
|
|
|
|
|
|
|
| |||||
|
|
|
| ||||||||||||
|
|
|
|
|
|
|
|
|
|
|
|
|
| ||
|
|
|
|
| 4 flashes |
|
|
|
|
| 4 beeps | ||||
|
|
|
|
|
|
|
|
|
|
|
|
|
|
|
|
|
|
|
|
|
|
|
|
|
|
|
|
|
|
|
|
Alarm Conditions |
|
|
|
|
|
|
|
|
|
|
|
|
|
|
|
|
|
|
|
|
|
|
|
|
|
|
|
|
|
| |
When the unit detects carbon monoxide the alarm signal is sounded |
|
|
|
|
|
|
|
|
|
|
|
|
|
|
|
continuously. The red alarm light will flash and the alarm will sound |
|
|
|
|
|
|
|
|
| 4 beeps every 5 secs | |||||
4 | every 5 secs | ||||||||||||||
approximately 4 times every 5 seconds. |
|
|
|
|
|
|
|
|
|
|
|
|
|
|
|
When the unit has been in alarm for a period of approximately 4 minutes, |
|
|
|
|
|
|
|
|
|
|
|
|
|
|
|
|
|
|
|
|
|
|
|
|
|
|
|
|
|
| |
|
|
|
|
|
|
|
|
|
|
|
|
|
|
| |
the alarm signal will be given every 60 seconds. |
|
|
|
|
|
|
|
|
|
|
|
| 4 beeps every 60 secs | ||
|
|
| 4 every 60 secs |
| |||||||||||
|
|
|
|
| |||||||||||
|
|
|
|
|
|
|
|
|
|
|
|
|
|
|
|
Test / Reset Button (in Alarm condition) |
|
|
|
|
|
|
|
|
|
|
|
|
|
|
|
|
|
|
|
|
|
|
|
|
|
|
|
|
|
| |
|
|
|
|
|
|
|
|
|
|
|
|
|
|
| |
If required, the audible alarm signal can be silenced for a period of 6 minutes by |
|
|
|
|
|
|
|
|
|
|
|
|
|
|
|
pushing the Test/Reset button on the front of the unit. The red light will continue |
|
|
|
|
|
|
|
|
|
|
|
|
|
|
|
to flash. |
|
| 4 | every 5 secs | no beep for 6 minutes | ||||||||||
If the carbon monoxide is still present after the 6 minute period, the audible |
|
|
|
|
|
|
|
|
|
|
|
|
|
|
|
|
|
|
|
|
|
|
|
|
|
|
|
|
|
| |
alarm will resume the previous alarm condition. The Test/Reset button should |
|
|
|
|
|
|
|
|
|
|
|
|
|
|
|
|
|
|
|
|
|
|
|
|
|
|
|
|
|
| |
not be used repeatedly and the actions “What to do when the alarm sounds” |
|
|
|
|
|
|
|
|
|
|
|
| 4 beeps every 60 secs | ||
|
|
| 4 every 60 secs |
|
| ||||||||||
should be followed. |
|
|
|
| |||||||||||
|
|
|
|
|
|
|
|
|
|
|
|
|
|
| |
|
|
|
|
|
|
|
|
|
|
|
|
|
|
|
|
|
|
|
|
|
|
|
|
|
|
|
|
|
|
|
|
Return to Normal Operation |
|
|
|
|
|
|
|
|
|
|
|
|
|
|
|
When the carbon monoxide gas disperses, the alarm will stop. The red light will |
|
|
|
|
|
|
|
|
|
|
|
|
|
|
|
flash approximately once every 60 seconds (normal operation). The user should |
|
|
|
|
|
|
|
|
|
|
|
|
|
|
|
check for the source of CO any time the alarm has sounded, even if the alarm |
|
|
|
|
|
|
|
|
|
| |||||
|
|
| 1 every 60 | secs |
|
|
| ||||||||
has returned to its normal working conditions. |
|
|
|
|
|
|
|
|
|
|
|
|
|
|
|
|
|
|
|
|
|
|
|
|
|
|
|
|
|
| |
|
|
|
|
|
|
|
|
|
|
|
|
|
|
|
|
Battery Replacement / Fault Warning |
|
|
|
|
|
|
|
|
|
|
|
|
|
|
|
When the batteries need replacing the unit will sound 1 short beep once every |
|
|
|
|
|
|
|
|
|
|
|
|
|
|
|
60 seconds. The batteries must then be replaced. The red light will flash once as |
|
|
|
|
|
|
|
|
|
|
|
| 1 beep every 60 secs | ||
normal. If the detector continues to sound 1 short beep every 60 seconds it must |
|
|
| 1 every 60 | secs |
| |||||||||
be replaced. |
|
|
|
|
|
|
|
|
|
|
|
|
|
|
|
Room spaces should be well ventilated when household cleaning supplies are used as these may cause a false alarm.
If problems with this alarm cannot be resolved, contact:
Technical Support: (800)
Press the test/reset button on the front of the alarm, hold for several seconds and check that the red light flashes and the audible alarm sounds. The detector can be hung on the protruding nail using the ‘keyhole’ on the back.
WARRANTY INFORMATION
Your
The manufacturers liability is limited to the repair or replacement of any part of the alarm which is found to be defective in materials or workmanship under normal use during the applicable period from date of purchase. The replacement product will be in warranty for the remainder of the original warranty period or for six months, whichever is longer.
The warranty is void if the product has been damaged by accident, unreasonable use, neglect, tampering or other causes not arising from defects in materials or workmanship.
The manufacturer makes no warranty, expressed or implied, written or oral, including that of merchantability or fitness for any particular purpose, with respect to the batteries.
The manufacturer makes no other express warranty for this alarm. No agent representative, dealer or employee of the manufacturer has the authority to increase or alter the obligations or limitations of this warranty.
In no case shall the manufacturer be liable for any consequential or incidental damages for breach of this or any other warranty, expressed or implied whatsoever, even if the loss or damage is caused by the company’s negligence or fault. The manufacturer shall have no liability for any personal injury, property damage or any special, incidental, contingent or consequential damage of any kind resulting from gas leakage, fire or explosion.
Some states do not allow limitation on how long an implied warranty lasts and/or do not allow the exclusion or limitation of accidental or consequential damages so the above limitation or exclusion may not apply to you.
This warranty gives you specific legal rights and you may also have other rights which may vary from state to state.
Any products in need of repair should be returned to:
In the U.S.: | In Canada: |
Climate Controls Americas | Climate Controls Canada, Inc. |
28C Leigh Fisher Blvd | 3505 Laird Road - Unit #14 |
El Paso, TX 79906 | Mississauga, Ontario L5L 5Y7 |
Please include a note clearly describing the problem
when you return the alarm.
| SPECIFICATION | |
Model: |
|
|
Gas Detected: | Carbon monoxide | |
Detection Principle: | ||
Alarm Indication: | Audible and visual alarm | |
Alarm Levels: | 70ppm | Between 60 and 240 minutes |
| 150ppm Between 10 and 50 minutes | |
| 400ppm Between 4 and 15 minutes | |
Operating Temperature: | 40°F to +100°F | |
Humidity Range: | 15 to 95% RH | |
Dimensions: | 4.69” x 3.14” x 1.50” | |
Weight: | 6oz. |
|
(Phone: _______________________________) to investigate for sources |
of CO from fuel burning equipment and appliances and inspect for proper |
operation of this equipment. If problems are identified during this |
inspection have the equipment serviced immediately. Note any |
combustion equipment not inspected by the technician and consult the |
manufacturers’ instructions, or contact the manufacturers directly, for |
more information about CO safety and this equipment. Make sure that |
motor vehicles are not and have not been operating in an attached |
garage or adjacent to the residence. |
SELF - ADHESIVE LABELS
Please add the telephone number of your emergency services and a qualified technician to the labels provided and place one copy next to the appliance and the other near a source of fresh air where you plan to gather in the event of an alarm.
TO REPLACE BATTERIES
Pull down catch to open detector and pull ribbon to remove batteries.
Carefully remove old batteries from battery housing and dispose of old batteries with care.
Using only batteries listed in 'Care and Maintenance of Alarm' insert 3 new batteries, ensuring they snap securely into place and cannot be shaken loose. When inserting the batteries, ensure the polarity is correct - ie: positive end of battery (+) aligns with the (+) symbol in the battery housing. Press the test/reset button and check that the red light flashes and the buzzer sounds. The detector is now operating and ready for use.
NOTE:
WITH THE BATTERIES REMOVED IT WILL NOT BE POSSIBLE TO CLOSE THE ALARM LID.
DISPOSAL
Dispose of the alarm in accordance with local regulations.
WARNING: DO NOT DISPOSE OF IN FIRE.
Should you experience difficulty in obtaining a replacement alarm contact: