INSTALLATION
WHERE TO INSTALL THIS ALARM
Minimum coverage for Smoke Alarms, as recommended by the National Fire Protection Association (NFPA), is one Smoke Alarm on every floor, in every sleeping area, and in every bedroom (See “Regulatory Information For Smoke Alarms” for details on the NFPA recommendations).
For CO Alarms, the National Fire Protection Association (NFPA) recommends that a CO Alarm should be centrally located outside of each separate sleeping area in the immediate vicinity of the bedrooms. For added protection, install additional CO Alarms in each separate bedroom, and on every level
of your home.
NOTE: For added protection, install an additional Smoke/CO Alarm at least
20 feet (6 meters) away from the furnace or fuel burning heat source where pos- sible. In smaller homes or in manufactured homes where this distance cannot be maintained, install the Alarm as far away as possible from the furnace or other fuel burning source. Installing the Alarm closer than 20 feet (6 meters) will not harm the Alarm, but may increase the frequency of nuisance alarms.
In general, install combination Smoke and Carbon Monoxide Alarms:
•On every level of your home, including finished attics and basements.
•Inside every bedroom, especially if people sleep with the door partly or completely closed.
•In the hall near every sleeping area. If your home has multiple sleeping areas, install a unit in each. If a hall is more than 40 feet (12 meters) long, install a unit at each end.
•At the top of first-to-second floor stairs.
•At the bottom of the basement stairs.
•For additional coverage, install Alarms in all rooms, halls, and storage areas, where temperatures normally remain between 40˚F and 100˚F (4˚C and 38˚C).
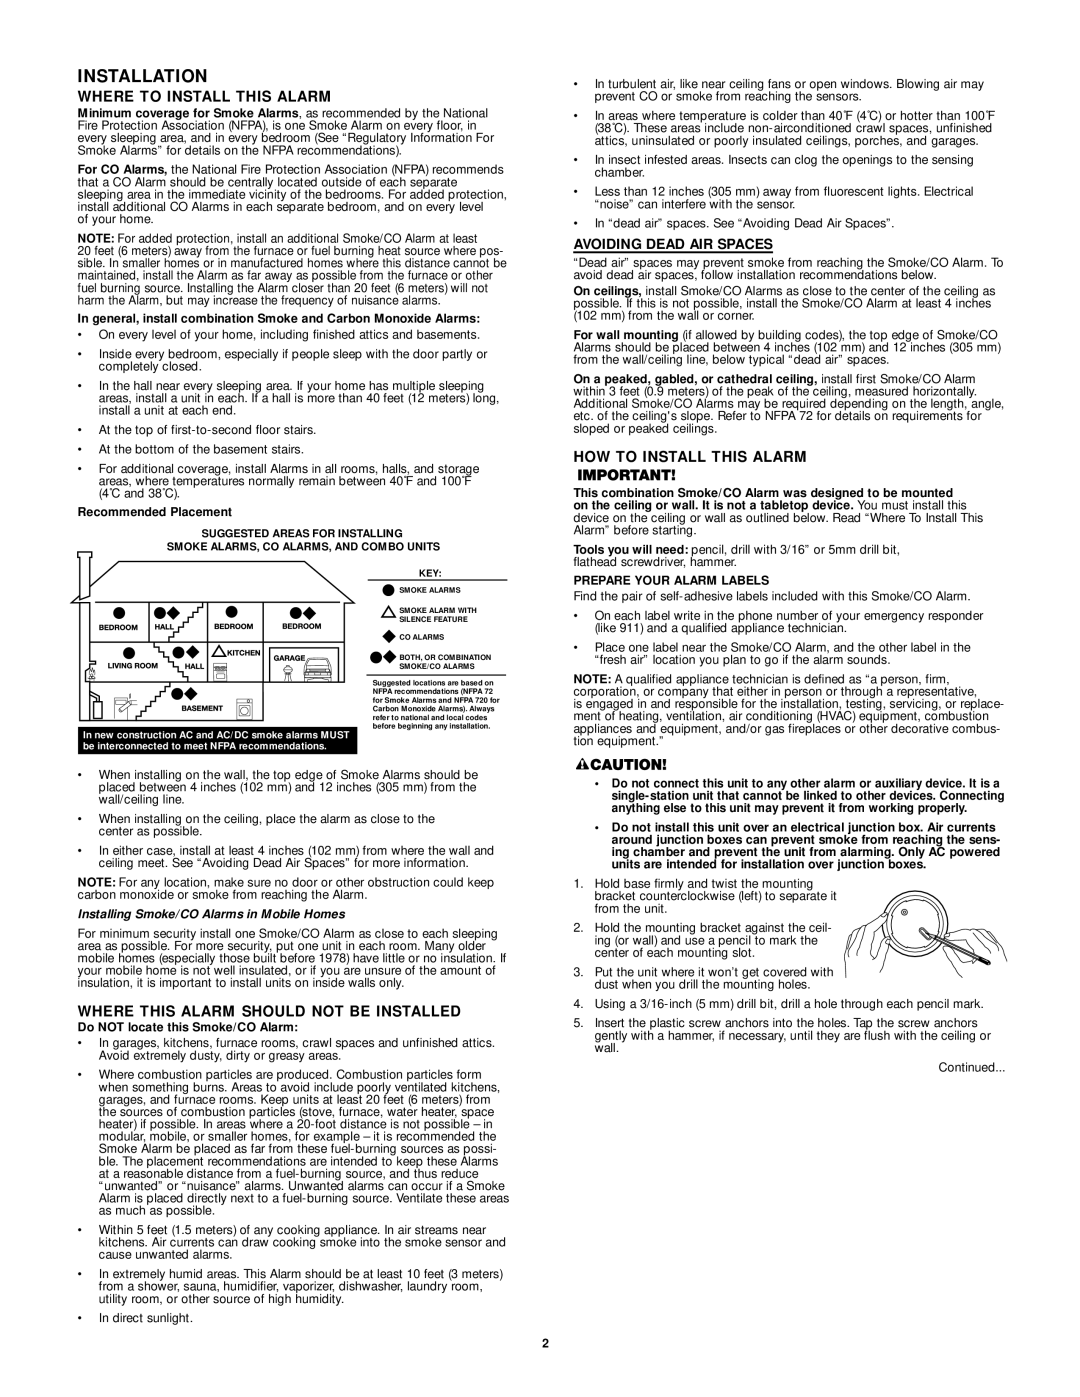
Recommended Placement
SUGGESTED AREAS FOR INSTALLING
SMOKE ALARMS, CO ALARMS, AND COMBO UNITS
KEY:
SMOKE ALARMS
SMOKE ALARM WITH
SILENCE FEATURE
 CO ALARMS

 BOTH, OR COMBINATION
SMOKE/CO ALARMS
Suggested locations are based on NFPA recommendations (NFPA 72 for Smoke Alarms and NFPA 720 for Carbon Monoxide Alarms). Always refer to national and local codes before beginning any installation.
In new construction AC and AC/DC smoke alarms MUST be interconnected to meet NFPA recommendations.
•When installing on the wall, the top edge of Smoke Alarms should be placed between 4 inches (102 mm) and 12 inches (305 mm) from the wall/ceiling line.
•When installing on the ceiling, place the alarm as close to the center as possible.
•In either case, install at least 4 inches (102 mm) from where the wall and ceiling meet. See “Avoiding Dead Air Spaces” for more information.
NOTE: For any location, make sure no door or other obstruction could keep carbon monoxide or smoke from reaching the Alarm.
Installing Smoke/CO Alarms in Mobile Homes
For minimum security install one Smoke/CO Alarm as close to each sleeping area as possible. For more security, put one unit in each room. Many older mobile homes (especially those built before 1978) have little or no insulation. If your mobile home is not well insulated, or if you are unsure of the amount of insulation, it is important to install units on inside walls only.
WHERE THIS ALARM SHOULD NOT BE INSTALLED
Do NOT locate this Smoke/CO Alarm:
•In garages, kitchens, furnace rooms, crawl spaces and unfinished attics. Avoid extremely dusty, dirty or greasy areas.
•Where combustion particles are produced. Combustion particles form when something burns. Areas to avoid include poorly ventilated kitchens, garages, and furnace rooms. Keep units at least 20 feet (6 meters) from the sources of combustion particles (stove, furnace, water heater, space heater) if possible. In areas where a 20-foot distance is not possible – in modular, mobile, or smaller homes, for example – it is recommended the Smoke Alarm be placed as far from these fuel-burning sources as possi- ble. The placement recommendations are intended to keep these Alarms at a reasonable distance from a fuel-burning source, and thus reduce “unwanted” or “nuisance” alarms. Unwanted alarms can occur if a Smoke Alarm is placed directly next to a fuel-burning source. Ventilate these areas as much as possible.
•Within 5 feet (1.5 meters) of any cooking appliance. In air streams near kitchens. Air currents can draw cooking smoke into the smoke sensor and cause unwanted alarms.
•In extremely humid areas. This Alarm should be at least 10 feet (3 meters) from a shower, sauna, humidifier, vaporizer, dishwasher, laundry room, utility room, or other source of high humidity.
•In direct sunlight.
•In turbulent air, like near ceiling fans or open windows. Blowing air may prevent CO or smoke from reaching the sensors.
•In areas where temperature is colder than 40˚F (4˚C) or hotter than 100˚F (38˚C). These areas include non-airconditioned crawl spaces, unfinished attics, uninsulated or poorly insulated ceilings, porches, and garages.
•In insect infested areas. Insects can clog the openings to the sensing chamber.
•Less than 12 inches (305 mm) away from fluorescent lights. Electrical “noise” can interfere with the sensor.
•In “dead air” spaces. See “Avoiding Dead Air Spaces”.
AVOIDING DEAD AIR SPACES
“Dead air” spaces may prevent smoke from reaching the Smoke/CO Alarm. To avoid dead air spaces, follow installation recommendations below.
On ceilings, install Smoke/CO Alarms as close to the center of the ceiling as possible. If this is not possible, install the Smoke/CO Alarm at least 4 inches (102 mm) from the wall or corner.
For wall mounting (if allowed by building codes), the top edge of Smoke/CO Alarms should be placed between 4 inches (102 mm) and 12 inches (305 mm) from the wall/ceiling line, below typical “dead air” spaces.
On a peaked, gabled, or cathedral ceiling, install first Smoke/CO Alarm within 3 feet (0.9 meters) of the peak of the ceiling, measured horizontally. Additional Smoke/CO Alarms may be required depending on the length, angle, etc. of the ceiling's slope. Refer to NFPA 72 for details on requirements for sloped or peaked ceilings.
HOW TO INSTALL THIS ALARM
This combination Smoke/CO Alarm was designed to be mounted on the ceiling or wall. It is not a tabletop device. You must install this device on the ceiling or wall as outlined below. Read “Where To Install This Alarm” before starting.
Tools you will need: pencil, drill with 3/16” or 5mm drill bit, flathead screwdriver, hammer.
PREPARE YOUR ALARM LABELS
Find the pair of self-adhesive labels included with this Smoke/CO Alarm.
•On each label write in the phone number of your emergency responder (like 911) and a qualified appliance technician.
•Place one label near the Smoke/CO Alarm, and the other label in the “fresh air” location you plan to go if the alarm sounds.
NOTE: A qualified appliance technician is defined as “a person, firm, corporation, or company that either in person or through a representative,
is engaged in and responsible for the installation, testing, servicing, or replace- ment of heating, ventilation, air conditioning (HVAC) equipment, combustion appliances and equipment, and/or gas fireplaces or other decorative combus- tion equipment.”
•Do not connect this unit to any other alarm or auxiliary device. It is a single-station unit that cannot be linked to other devices. Connecting anything else to this unit may prevent it from working properly.
•Do not install this unit over an electrical junction box. Air currents around junction boxes can prevent smoke from reaching the sens- ing chamber and prevent the unit from alarming. Only AC powered units are intended for installation over junction boxes.
1.Hold base firmly and twist the mounting bracket counterclockwise (left) to separate it
from the unit.
2. Hold the mounting bracket against the ceil- ing (or wall) and use a pencil to mark the center of each mounting slot.
3.Put the unit where it won’t get covered with dust when you drill the mounting holes.
4.Using a 3/16-inch (5 mm) drill bit, drill a hole through each pencil mark.
5.Insert the plastic screw anchors into the holes. Tap the screw anchors gently with a hammer, if necessary, until they are flush with the ceiling or wall.
Continued...