USING THE SILENCE FEATURES
The Silence Feature is intended to temporarily silence your CO Alarm’s horn while you correct the problem—it will not correct a CO problem. While the alarm is silenced, it will continue to monitor the air for CO.
To Activate the Silence Feature Manually:
Press and hold the Test/Silence/Scroll button until the horn is silent.
To Activate the Silence Feature Using Your Remote Control:
Standing no farther than 12 feet (3.5 meters) away, point your remote control at the cover of the CO Alarm and push the VOLUME or CHANNEL button. Hold the button down for at least 2 seconds.
Once you activate the Silence Feature: the Silence cycle will last approximately 4 minutes.
NOTE: The remote Silence Feature only works once in an alarm situation. Using the Test/Silence button on the CO Alarm will still silence the unit. The remote Silence Feature will return when the unit clears itself.
•If CO levels drop below alarm levels after 4 minutes, the unit will return to normal operation and remain silent.
•If CO levels do not drop below alarm levels, the unit will alarm again.
The Silence Feature is for your convenience only and will not correct a CO problem. Always check your home for a potential problem after any alarm. Failure to do so can result in injury or death.
NEVER disconnect your CO Alarm to silence the horn. Use the Silence Feature. Unplugging the CO Alarm and removing the batteries removes your protection!
SILENCING THE LOW BATTERY WARNING
This silence feature can temporarily quiet the low battery warning “chirp” for up to 8 hours without having to remove the battery. You can silence the low battery warning “chirp” two ways:
1.Manually: Press the Test/Silence button on the alarm cover.
2.Using Your Remote Control: Standing no further than 20 feet (6 meters) away from the CO Alarm, aim your IR remote at the CO Alarm and press the CHANNEL or VOLUME button for at least 3-5 seconds.
Once the low battery warning “chirp” silence feature is activated, the unit con- tinues to flash the red light once a minute for 8 hours; the word “bat” will flash on and off on the display. After 8 hours, the low battery “chirp” will resume.
Replace the battery as soon as possible, this unit will not operate without battery power!
To deactivate this feature: Press the Test/Silence button or use your remote control again. The unit will go into Test Mode and the low battery warning will resume (LED flashes and unit sounds “chirp” once a minute.)
If you cannot silence the low battery warning, replace your battery immediately.
TESTING AND MAINTENANCE
WEEKLY TESTING
You can test this CO Alarm two ways:
1. Manually: Press the Test/Silence/Scroll button on the Alarm cover until alarm sounds.
2. Remote Control: Aim your remote control at the CO Alarm and press the CHANNEL or VOLUME button.
During testing, you will hear a loud alarm sequence – 4 beeps, pause, 4 beeps, pause.
•If the Alarm ever fails to test properly, replace it immediately. Products under warranty may be returned to the manufacturer for replacement. See “Limited Warranty” at the end of this manual.
•DO NOT stand close to the Alarm when the horn is sounding. Exposure at close range may be harmful to your hearing. When testing, step away when horn starts sounding.
•The two methods described on this page are the only proper ways to test the CO Alarm. NEVER use vehicle exhaust! Exhaust may cause permanent damage and voids your warranty.
REGULAR MAINTENANCE
To keep the CO Alarm working properly:
•Test it every week as described in “Weekly Testing.”
•Vacuum the CO Alarm cover at least once a month, using the soft brush attachment. Never use water, cleaners, or solvents, since they may dam- age the unit. Test the Alarm again after vacuuming.
•Replace the battery immediately when you see/hear the “Low Battery Warning”.
The Low (or Missing) Battery Warning:
The horn will “chirp” once a minute and the word “bat” will flash on and off on the display.
REPLACING THE BATTERY
Choosing a Replacement Battery:
This unit requires one standard 9V alkaline battery. The following alkaline batteries are acceptable as replacements: Duracell #MN1604 or MX1604; Eveready “Energizer” 522. You can also use an Ultralife 9 volt lithium battery #U9VL for longer service life between battery changes. These replacement batteries are commonly available at local retail stores.
Use only the alkaline or lithium replacement batteries listed. The unit may not operate properly with other batteries. Never use rechargeable batteries since they may not provide a constant charge.
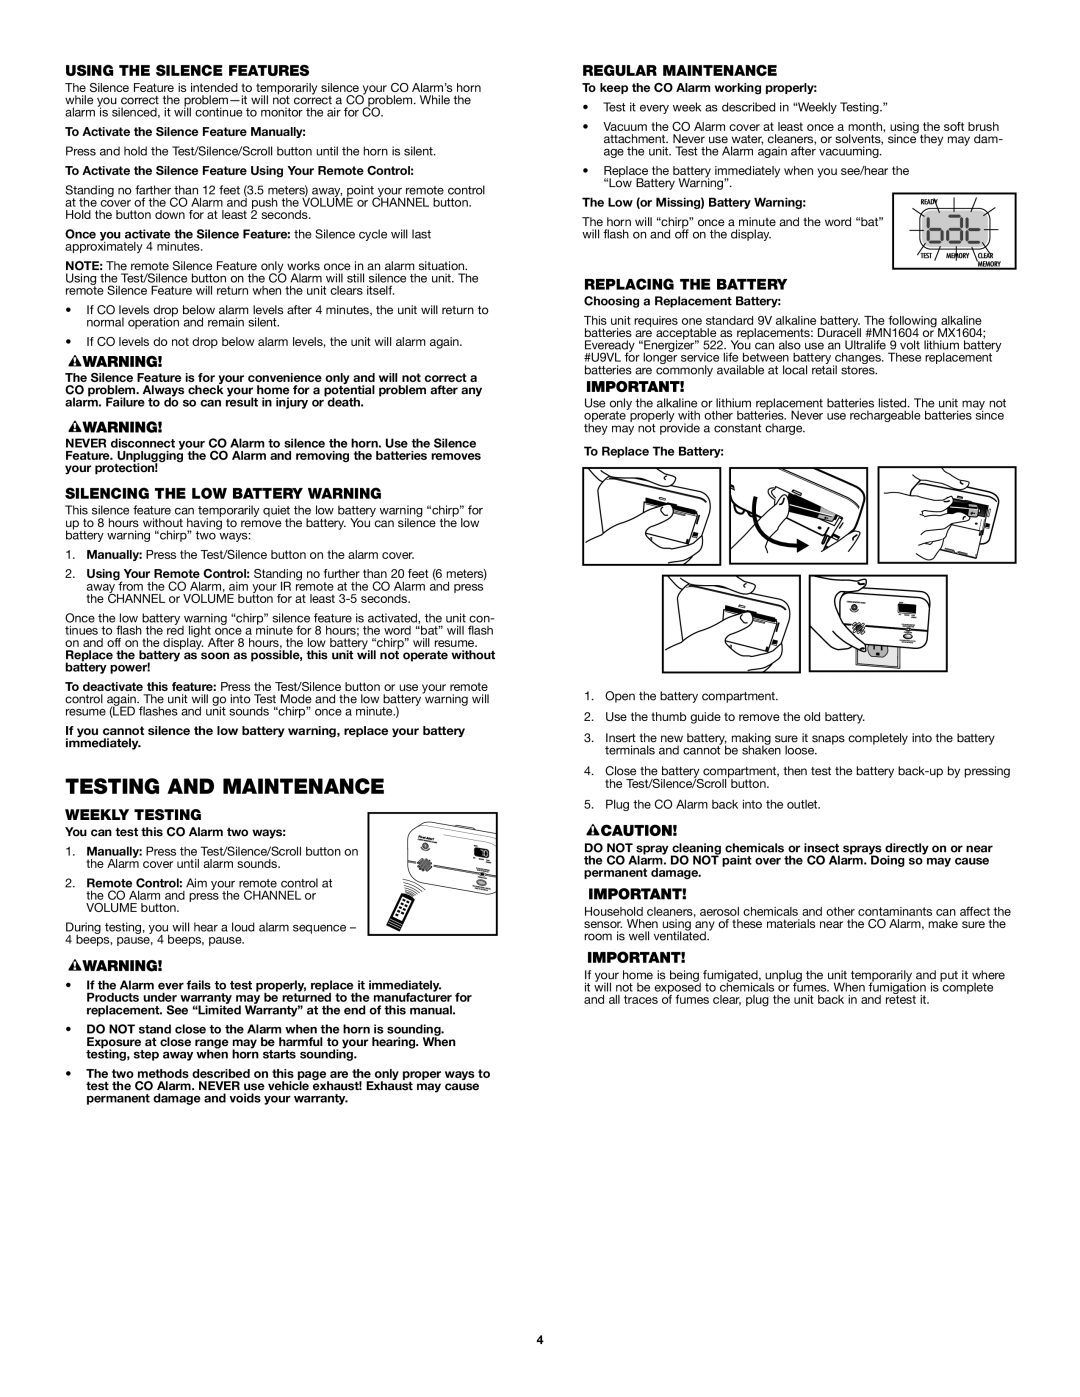
To Replace The Battery:
1.Open the battery compartment.
2.Use the thumb guide to remove the old battery.
3.Insert the new battery, making sure it snaps completely into the battery terminals and cannot be shaken loose.
4.Close the battery compartment, then test the battery back-up by pressing the Test/Silence/Scroll button.
5.Plug the CO Alarm back into the outlet.
DO NOT spray cleaning chemicals or insect sprays directly on or near the CO Alarm. DO NOT paint over the CO Alarm. Doing so may cause permanent damage.
Household cleaners, aerosol chemicals and other contaminants can affect the sensor. When using any of these materials near the CO Alarm, make sure the room is well ventilated.
If your home is being fumigated, unplug the unit temporarily and put it where it will not be exposed to chemicals or fumes. When fumigation is complete and all traces of fumes clear, plug the unit back in and retest it.