HOW TO INSTALL THIS SMOKE ALARM

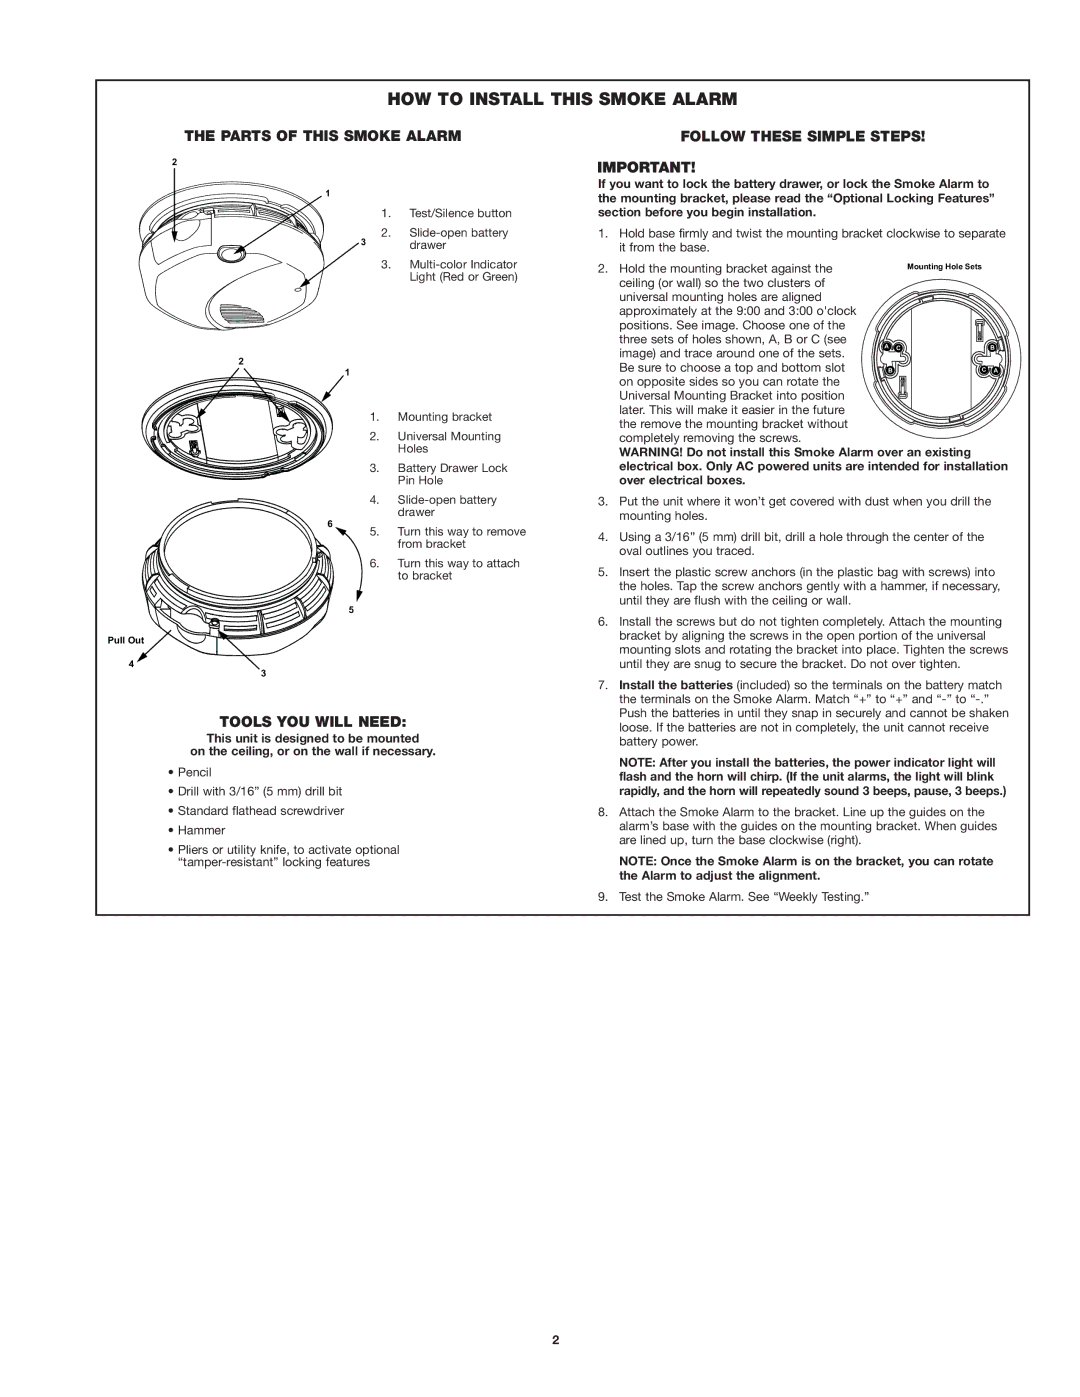
THE PARTS OF THIS SMOKE ALARM

2

1

1. Test/Silence button

2. Slide-open battery

3 drawer

FOLLOW THESE SIMPLE STEPS!

If you want to lock the battery drawer, or lock the Smoke Alarm to the mounting bracket, please read the “Optional Locking Features” section before you begin installation.

1.Hold base firmly and twist the mounting bracket clockwise to separate it from the base.

3. Multi-color Indicator Light (Red or Green)

2

1

1. Mounting bracket

2. Universal Mounting

2.Hold the mounting bracket against the ceiling (or wall) so the two clusters of universal mounting holes are aligned approximately at the 9:00 and 3:00 o'clock positions. See image. Choose one of the three sets of holes shown, A, B or C (see image) and trace around one of the sets. Be sure to choose a top and bottom slot on opposite sides so you can rotate the Universal Mounting Bracket into position later. This will make it easier in the future the remove the mounting bracket without completely removing the screws.

Mounting Hole Sets

ACB

BCA

Pull Out 4

Holes

3. Battery Drawer Lock

Pin Hole

4. Slide-open battery drawer

6

5. Turn this way to remove from bracket

6. Turn this way to attach to bracket

5

3

TOOLS YOU WILL NEED:

This unit is designed to be mounted

on the ceiling, or on the wall if necessary.

Pencil

Drill with 3/16” (5 mm) drill bit

Standard flathead screwdriver

Hammer

Pliers or utility knife, to activate optional “tamper-resistant” locking features

WARNING! Do not install this Smoke Alarm over an existing electrical box. Only AC powered units are intended for installation over electrical boxes.

3.Put the unit where it won’t get covered with dust when you drill the mounting holes.

4.Using a 3/16” (5 mm) drill bit, drill a hole through the center of the oval outlines you traced.

5.Insert the plastic screw anchors (in the plastic bag with screws) into the holes. Tap the screw anchors gently with a hammer, if necessary, until they are flush with the ceiling or wall.

6.Install the screws but do not tighten completely. Attach the mounting bracket by aligning the screws in the open portion of the universal mounting slots and rotating the bracket into place. Tighten the screws until they are snug to secure the bracket. Do not over tighten.

7.Install the batteries (included) so the terminals on the battery match the terminals on the Smoke Alarm. Match “+” to “+” and “-” to “-.” Push the batteries in until they snap in securely and cannot be shaken loose. If the batteries are not in completely, the unit cannot receive battery power.

NOTE: After you install the batteries, the power indicator light will flash and the horn will chirp. (If the unit alarms, the light will blink rapidly, and the horn will repeatedly sound 3 beeps, pause, 3 beeps.)

8.Attach the Smoke Alarm to the bracket. Line up the guides on the alarm’s base with the guides on the mounting bracket. When guides are lined up, turn the base clockwise (right).

NOTE: Once the Smoke Alarm is on the bracket, you can rotate the Alarm to adjust the alignment.

9.Test the Smoke Alarm. See “Weekly Testing.”

2

Page 2
Image 2
First Alert SA320 user manual HOW to Install this Smoke Alarm, Parts of this Smoke Alarm, Follow These Simple Steps

SA320 specifications

The First Alert SA320 is a state-of-the-art smoke and carbon monoxide detector designed to enhance home safety through advanced technology and user-friendly features. Combining a smoke alarm with a carbon monoxide detector into one compact unit, the SA320 offers dual protection, ensuring that homeowners are alerted to two of the most common and deadly household hazards.

One of the standout features of the SA320 is its photoelectric smoke detection technology. Unlike traditional ionization smoke detectors, photoelectric technology is more effective at sensing smoldering fires, which produce larger smoke particles. This capability helps reduce false alarms often triggered by cooking or steam, providing peace of mind for everyday use.

In addition to smoke detection, the SA320 includes a built-in carbon monoxide detector that reliably monitors levels of this colorless, odorless gas. Carbon monoxide is often referred to as the "silent killer" because it can go undetected until it is too late. The SA320 is designed to alert users with a loud alarm when CO levels rise to dangerous levels, ensuring timely evacuation and response.

The device is equipped with a battery backup, which means it will continue to function during power outages, keeping homes protected at all times. The SA320 also features an easy-to-read LED indicator that provides visual confirmation of the unit's operational status.

Another notable characteristic of the First Alert SA320 is its simple installation process. The unit can be easily mounted on a wall or ceiling, and its compact design allows it to blend seamlessly into any room's decor. Furthermore, it has a test/silence button that allows users to easily check the unit's functionality or silence false alarms without removing the device from its place.

The First Alert SA320 is also designed with a durable housing that can withstand typical household conditions, ensuring that it remains reliable over time. The unit complies with the latest safety standards, providing users with confidence in its effectiveness and reliability.

In summary, the First Alert SA320 combines innovative smoke and carbon monoxide detection technologies with user-friendly features, making it an essential tool for enhancing home safety. Its reliable performance, easy installation, and dual hazard detection capabilities position it as an invaluable addition to any household, promoting a safer living environment for families.