First Alert SA500 user manual Optional Locking Features, Weekly Testing, Regular Maintenance

Models: SA500

1 6
Download 6 pages 32.02 Kb
Page 3
Image 3

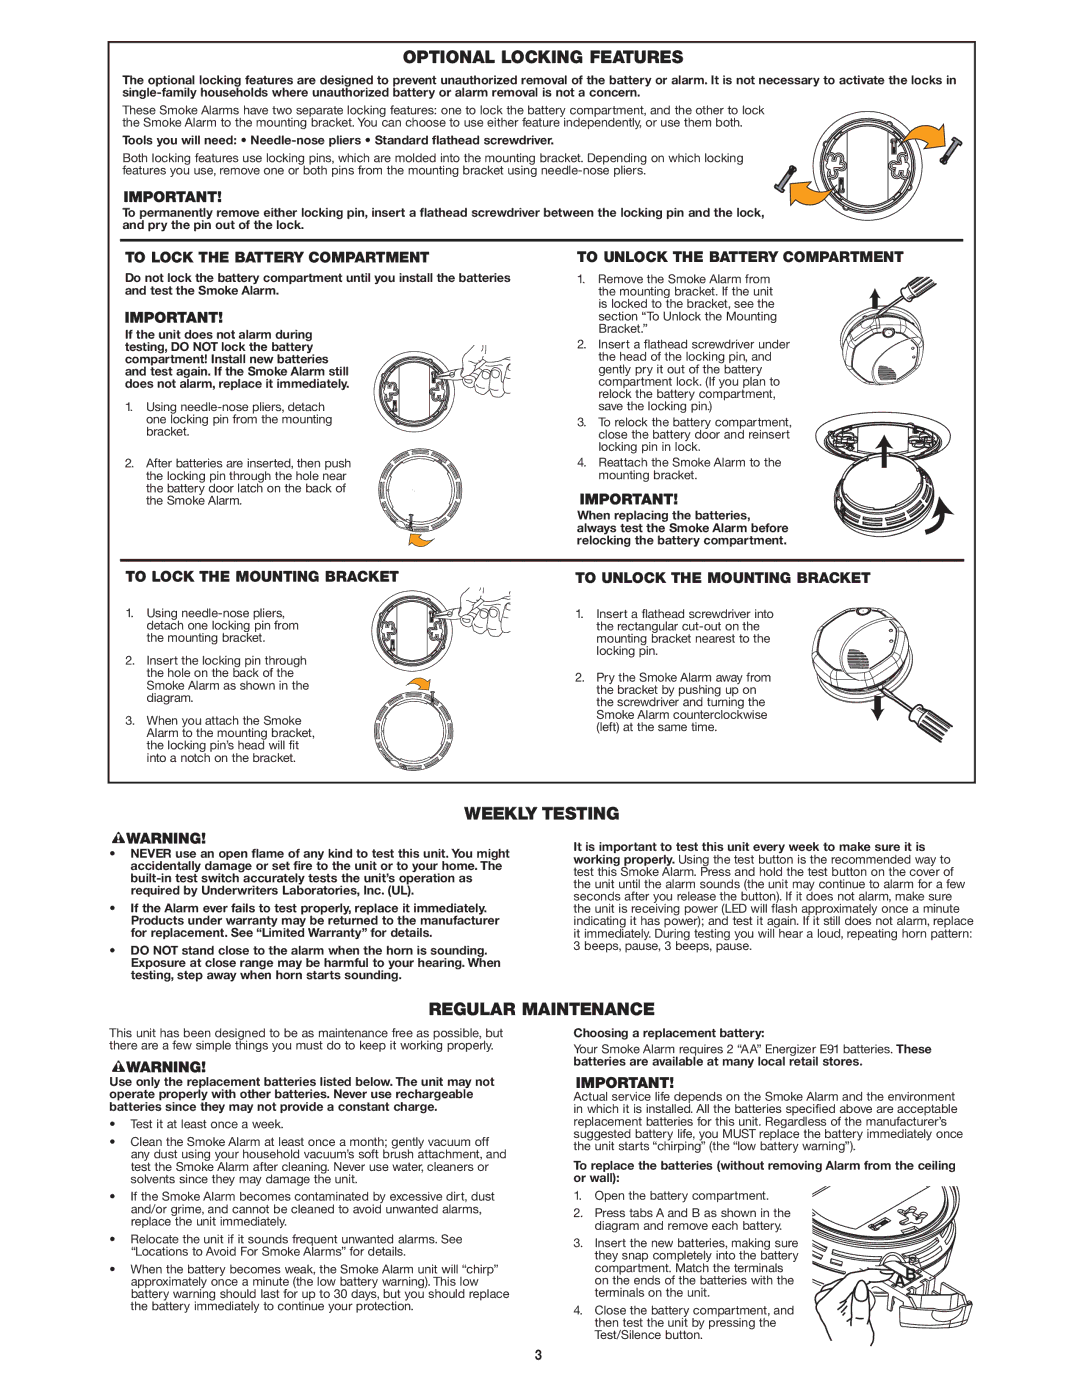
OPTIONAL LOCKING FEATURES

The optional locking features are designed to prevent unauthorized removal of the battery or alarm. It is not necessary to activate the locks in single-family households where unauthorized battery or alarm removal is not a concern.

These Smoke Alarms have two separate locking features: one to lock the battery compartment, and the other to lock the Smoke Alarm to the mounting bracket. You can choose to use either feature independently, or use them both.

Tools you will need: • Needle-nose pliers • Standard flathead screwdriver.

Both locking features use locking pins, which are molded into the mounting bracket. Depending on which locking features you use, remove one or both pins from the mounting bracket using needle-nose pliers.

To permanently remove either locking pin, insert a flathead screwdriver between the locking pin and the lock, and pry the pin out of the lock.

TO LOCK THE BATTERY COMPARTMENT

Do not lock the battery compartment until you install the batteries and test the Smoke Alarm.

If the unit does not alarm during testing, DO NOT lock the battery compartment! Install new batteries and test again. If the Smoke Alarm still does not alarm, replace it immediately.

1. Using needle-nose pliers, detach one locking pin from the mounting bracket.

2. After batteries are inserted, then push the locking pin through the hole near the battery door latch on the back of the Smoke Alarm.

TO UNLOCK THE BATTERY COMPARTMENT

1. Remove the Smoke Alarm from the mounting bracket. If the unit is locked to the bracket, see the section “To Unlock the Mounting Bracket.”

2. Insert a flathead screwdriver under the head of the locking pin, and gently pry it out of the battery compartment lock. (If you plan to relock the battery compartment, save the locking pin.)

3. To relock the battery compartment, close the battery door and reinsert locking pin in lock.

4. Reattach the Smoke Alarm to the mounting bracket.

When replacing the batteries, always test the Smoke Alarm before relocking the battery compartment.

TO LOCK THE MOUNTING BRACKET

1. Using needle-nose pliers, detach one locking pin from the mounting bracket.

2. Insert the locking pin through the hole on the back of the Smoke Alarm as shown in the diagram.

3. When you attach the Smoke Alarm to the mounting bracket, the locking pin’s head will fit into a notch on the bracket.

TO UNLOCK THE MOUNTING BRACKET

1. Insert a flathead screwdriver into the rectangular cut-out on the mounting bracket nearest to the locking pin.

2. Pry the Smoke Alarm away from the bracket by pushing up on the screwdriver and turning the Smoke Alarm counterclockwise (left) at the same time.

WEEKLY TESTING

NEVER use an open flame of any kind to test this unit. You might accidentally damage or set fire to the unit or to your home. The built-in test switch accurately tests the unit’s operation as required by Underwriters Laboratories, Inc. (UL).

If the Alarm ever fails to test properly, replace it immediately. Products under warranty may be returned to the manufacturer for replacement. See “Limited Warranty” for details.

DO NOT stand close to the alarm when the horn is sounding. Exposure at close range may be harmful to your hearing. When testing, step away when horn starts sounding.

It is important to test this unit every week to make sure it is working properly. Using the test button is the recommended way to test this Smoke Alarm. Press and hold the test button on the cover of the unit until the alarm sounds (the unit may continue to alarm for a few seconds after you release the button). If it does not alarm, make sure the unit is receiving power (LED will flash approximately once a minute indicating it has power); and test it again. If it still does not alarm, replace it immediately. During testing you will hear a loud, repeating horn pattern: 3 beeps, pause, 3 beeps, pause.

REGULAR MAINTENANCE

This unit has been designed to be as maintenance free as possible, but there are a few simple things you must do to keep it working properly.

Use only the replacement batteries listed below. The unit may not operate properly with other batteries. Never use rechargeable batteries since they may not provide a constant charge.

Test it at least once a week.

Clean the Smoke Alarm at least once a month; gently vacuum off any dust using your household vacuum’s soft brush attachment, and test the Smoke Alarm after cleaning. Never use water, cleaners or solvents since they may damage the unit.

If the Smoke Alarm becomes contaminated by excessive dirt, dust and/or grime, and cannot be cleaned to avoid unwanted alarms, replace the unit immediately.

Relocate the unit if it sounds frequent unwanted alarms. See “Locations to Avoid For Smoke Alarms” for details.

When the battery becomes weak, the Smoke Alarm unit will “chirp” approximately once a minute (the low battery warning). This low battery warning should last for up to 30 days, but you should replace the battery immediately to continue your protection.

Choosing a replacement battery:

Your Smoke Alarm requires 2 “AA” Energizer E91 batteries. These batteries are available at many local retail stores.

Actual service life depends on the Smoke Alarm and the environment in which it is installed. All the batteries specified above are acceptable replacement batteries for this unit. Regardless of the manufacturer’s suggested battery life, you MUST replace the battery immediately once the unit starts “chirping” (the “low battery warning”).

To replace the batteries (without removing Alarm from the ceiling or wall):

1. Open the battery compartment.

2. Press tabs A and B as shown in the diagram and remove each battery.

3. Insert the new batteries, making sure


they snap completely into the battery


compartment. Match the terminals

AB

on the ends of the batteries with the

terminals on the unit.


4. Close the battery compartment, and then test the unit by pressing the Test/Silence button.

3

Page 3
Image 3
First Alert SA500 user manual Optional Locking Features, Weekly Testing, Regular Maintenance

SA500 specifications

The First Alert SA500 is a highly reliable combination smoke and carbon monoxide detector designed to provide early warning for both smoke and gas hazards in residential settings. This advanced device incorporates several state-of-the-art technologies and features to ensure the highest level of safety for you and your family.

One of the most notable features of the SA500 is its dual-sensor technology. It uses both photoelectric and ionization sensing technologies, which enhances its ability to detect a wide range of fire types, including smoldering fires and fast-flaming fires. This dual approach means that users can enjoy greater peace of mind knowing that they are protected from a variety of potential dangers.

In addition to smoke detection, the SA500 is also equipped with a carbon monoxide (CO) sensor. Carbon monoxide is an odorless and colorless gas that can be extremely dangerous, making the inclusion of CO detection an essential feature for any home's safety system. The detector continuously monitors the air for CO levels and provides an immediate alarm if dangerous concentrations are detected.

Another key characteristic of the First Alert SA500 is its easy-to-read digital display. This feature shows real-time updates on the concentration of carbon monoxide in the environment, making it user-friendly and informative. The display also indicates the status of the smoke detector, ensuring that users can easily tell if the device is functioning correctly.

The SA500 is designed with a long-lasting battery backup, ensuring that it remains operational even during power outages. This is crucial for maintaining safety, as smoke and CO detectors must be functional at all times. The device is easy to install, with a sleek and modern design that blends seamlessly into any home decor.

Furthermore, the SA500 features a voice alarm that announces the type of danger detected, whether it is smoke or carbon monoxide. This distinct feature helps users respond quickly and appropriately in emergencies, differentiating between potential fire hazards and carbon monoxide dangers.

Overall, the First Alert SA500 combines advanced technologies and user-focused features to deliver comprehensive protection against both smoke and carbon monoxide. Its reliability, dual-sensor technology, and informative display make it an essential addition to any home safety plan, ensuring you and your loved ones are well-protected from potential hazards.