QUICK START GUIDE

Built-in oven

NZ AU GB IE

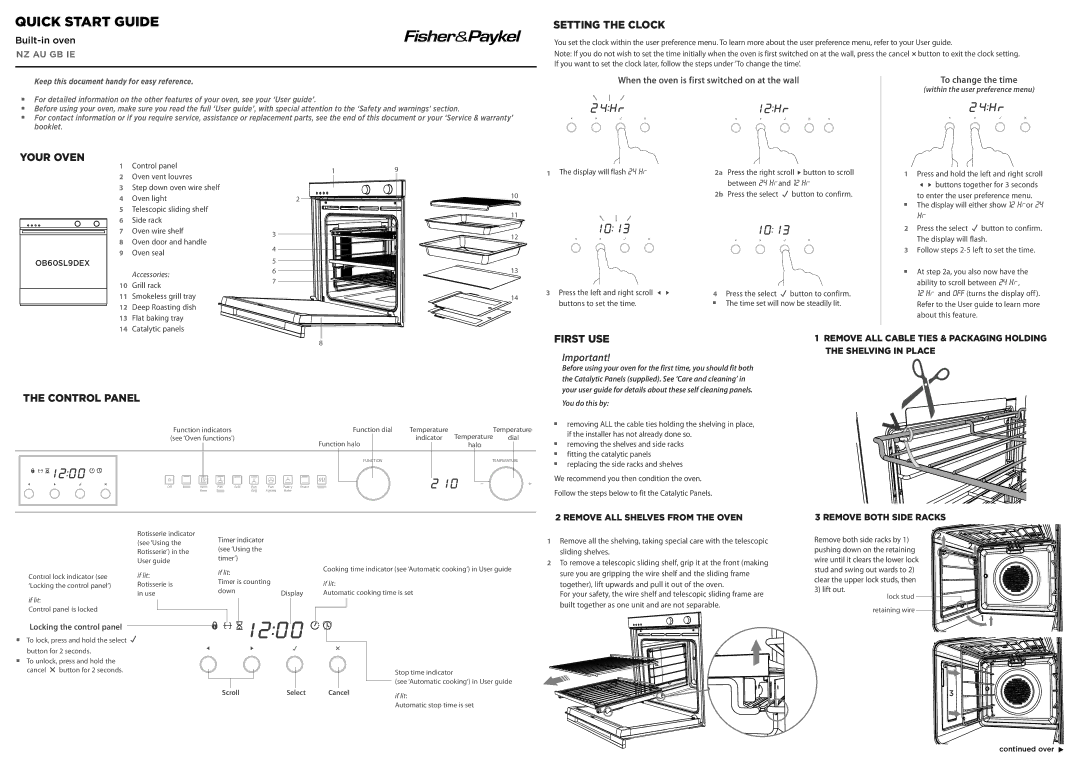
SETTING THE CLOCK

You set the clock within the user preference menu. To learn more about the user preference menu, refer to your User guide.

Note: If you do not wish to set the time initially when the oven is first switched on at the wall, press the cancel button to exit the clock setting. If you want to set the clock later, follow the steps under ‘To change the time’.

Keep this document handy for easy reference.

For detailed information on the other features of your oven, see your ‘User guide’.

Before using your oven, make sure you read the full ‘User guide’, with special attention to the ‘Safety and warnings’ section.

For contact information or if you require service, assistance or replacement parts, see the end of this document or your ‘Service & warranty’ booklet.

When the oven is first switched on at the wall

To change the time

(within the user preference menu)

YOUR OVEN

OB60SL9DEX

1

Control panel

1

9

2

Oven vent louvres


3

Step down oven wire shelf


10

4

Oven light

2

5

Telescopic sliding shelf


11

6

Side rack


7

Oven wire shelf

3

12

8

Oven door and handle


4


9

Oven seal


5


Accessories:

6

13


7


10

Grill rack


11

Smokeless grill tray


14

12

Deep Roasting dish


13

Flat baking tray


14

Catalytic panels


1 The display will flash 24 Hr.

2a

Press the right scroll button to scroll


between 24 Hrand 12 Hr


2b

Press the select

button to confirm.

3 Press the left and right scroll

4 Press the select

button to confirm.

buttons to set the time.


The time set will now be steadily lit.


1Press and hold the left and right scroll

buttons together for 3 seconds

to enter the user preference menu.

The display will either show 12 Hror 24 Hr

2Press the select button to confirm. The display will flash.

3Follow steps 2-5 left to set the time.

At step 2a, you also now have the ability to scroll between 24 Hr,

12 Hr and OFF (turns the display off). Refer to the User guide to learn more about this feature.

8

FIRST USE

1 REMOVE ALL CABLE TIES & PACKAGING HOLDING

Important!

THE SHELVING IN PLACE


Before using your oven for the first time, you should fit both the Catalytic Panels (supplied). See ‘Care and cleaning’ in your user guide for details about these self cleaning panels.

THE CONTROL PANEL

You do this by:


Function indicators


Function dial

Temperature


Temperature


removing ALL the cable ties holding the shelving in place,


Temperature


if the installer has not already done so.


(see ‘Oven functions’)


indicator

dial


Function halo


removing the shelves and side racks


halo


fitting the catalytic panels


FUNCTION


TEMPERATURE


replacing the side racks and shelves


We recommend you then condition the oven.


Follow the steps below to fit the Catalytic Panels.


2 REMOVE ALL SHELVES FROM THE OVEN

3 REMOVE BOTH SIDE RACKS


Rotisserie indicator


(see ‘Using the


Rotisserie’) in the


User guide

Control lock indicator (see

if lit:

‘Locking the control panel’)

Rotisserie is

if lit:

in use


Control panel is locked


Locking the control panel To lock, press and hold the select

button for 2 seconds. To unlock, press and hold the

cancel

button for 2 seconds.

Timer indicator (see ‘Using the timer’)

if lit:


Cooking time indicator (see ‘Automatic cooking’) in User guide


Timer is counting


if lit:

down

Display

Automatic cooking time is set


Stop time indicator

(see ‘Automatic cooking’) in User guide

1Remove all the shelving, taking special care with the telescopic sliding shelves.

2To remove a telescopic sliding shelf, grip it at the front (making sure you are gripping the wire shelf and the sliding frame together), lift upwards and pull it out of the oven.

For your safety, the wire shelf and telescopic sliding frame are built together as one unit and are not separable.

Remove both side racks by 1) pushing down on the retaining wire until it clears the lower lock stud and swing out wards to 2) clear the upper lock studs, then 3) lift out.

lock stud

retaining wire

2 2

1

Scroll

Select

Cancel

if lit:


Automatic stop time is set

3

continued over

Page 1
Image 1
Fisher & Paykel OB60SL9DEX quick start Setting the Clock, Your Oven, First USE, Control Panel

OB60SL9DEX specifications

The Fisher & Paykel OB60SL9DEX is a remarkable built-in oven that combines style with advanced cooking technology. A part of the company's commitment to blending contemporary design with innovative features, this oven stands out with its sleek appearance and user-friendly operation.

One of the key features of the Fisher & Paykel OB60SL9DEX is its generous cooking capacity, boasting a 60-liter internal volume. This allows for ample space to accommodate large dishes, making it ideal for families or those who enjoy entertaining guests. The oven also comes with 11 cooking functions, providing versatility to tackle a wide array of recipes. Whether you prefer baking, grilling, or roasting, this model has you covered, allowing you to explore your culinary creativity.

The intuitive interface of the oven is another highlight. It features a digital display and simple controls that make it easy to navigate through the various cooking options. The programmable timer allows for precise cooking, enhancing your efficiency in the kitchen. Additionally, the soft-close door adds an extra touch of elegance and safety, ensuring a quiet and secure closure every time.

Equipped with the latest technologies, the OB60SL9DEX features a powerful heating mechanism that ensures even heat distribution for consistent cooking results. The ActiveVent technology ensures optimal airflow within the cavity, which helps to maintain the perfect baking environment. This ensures that your pastries rise beautifully and cook evenly.

Cleaning is a breeze with the Fisher & Paykel OB60SL9DEX, thanks to its self-cleaning function. The oven's catalytic liners absorb and break down food splatter and grease, allowing for an effortless cleaning experience. Moreover, the interior is designed with easy-to-remove shelves and racks, making maintenance simpler.

Aesthetically, the OB60SL9DEX boasts a stylish stainless steel finish that complements modern kitchen designs. Its streamlined appearance allows it to integrate seamlessly into any cabinetry.

In conclusion, the Fisher & Paykel OB60SL9DEX is an exceptional built-in oven that offers a blend of functionality, innovative technology, and sophisticated design. With its range of cooking functions, user-friendly controls, and ease of maintenance, it is a valuable addition to any kitchen, making cooking and baking a delightful experience.