IMPORTANT!
BATTERY
INSTALLATION
JUST FOR BABY
![]() CAUTION
CAUTION
•This product cannot replace responsible adult supervision.
•Please keep small parts out of children’s reach. Dispose of dead “AAA” batteries properly.
•This product is not intended to be used as a medical monitor and its use should not replace adult supervision.
•Test sound reception of receiver before
•To prevent entanglement:
-Never place transmitter in a crib or playpen. Keep transmitter and receiver out of baby’s reach.
-Never use extension cords with AC adaptors.
•Never use transmitter, receiver or AC adaptors near water (ie.: bathtub, sink, laundry tub or wet basement, etc.).
•Always use transmitter, receiver and AC adaptors where there is adequate ventilation. To prevent overheating, keep transmitter, receiver and AC adaptors away from heat sources such as radiators, heat registers, direct sunlight, stoves, amplifiers, or other appliances which produce hear.
TESTING
SOUND RECEPTION
Test transmitter transmission and receiver reception.
| For use with baby, place trans- | |
| mitter in room in which you | |
| intend to use it. Slide transmitter | |
| power switch to turn on. Turn on | |
| a radio. | |
| For use with toddler, have tod- | |
POWER | dler stand in the area in which | |
ON | ||
they will be playing. Slide trans- | ||
A B | ||
| mitter power switch to turn on. | |
| Ask child to speak. |
9V (6LR61)
SHOWN ACTUAL SIZE
Battery
Compartment
Door
Receiver
– | 1.5V x 3 | + |
| “AAA” (LR03) |
|
SHOWN ACTUAL SIZE
Battery ![]()
Compartment
Door
Transmitter
• Remove transmitter from base. |
• Locate battery compartment door on bottom of receiver and back |
of transmitter. |
• Loosen screw in both battery compartment doors with a Phillips |
screwdriver. |
• Open battery compartment doors. |
• Snap terminals of a fresh, 9V alkaline battery into receiver connectors. |
![]() 2
2
3
5
6
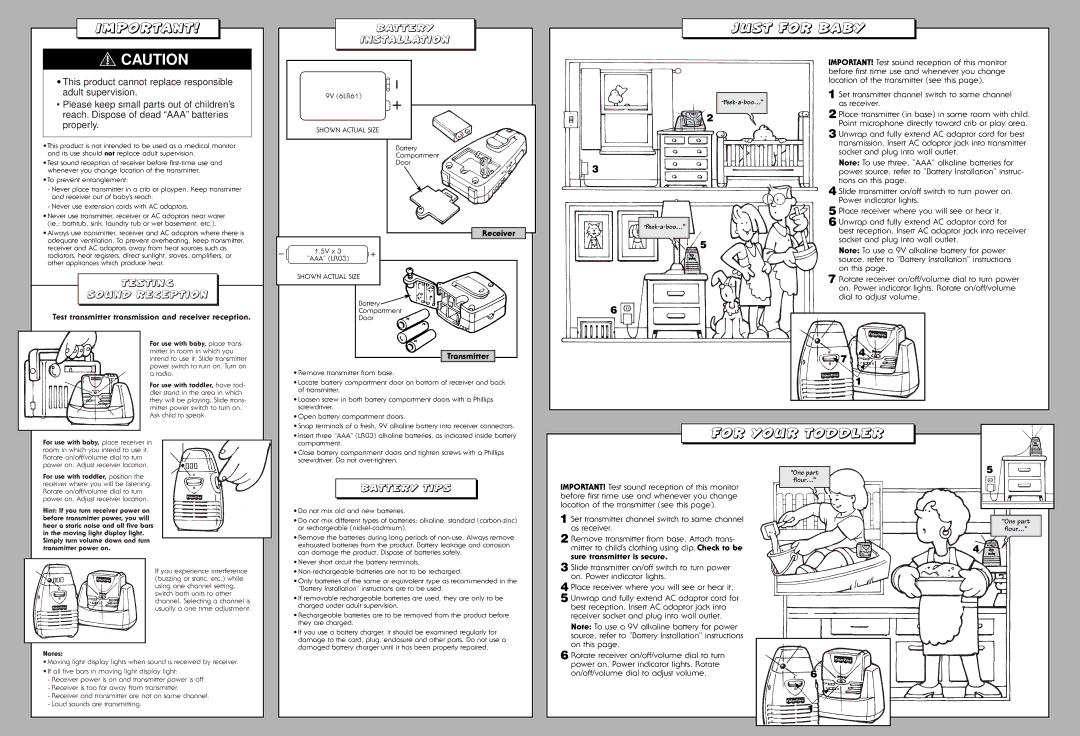
IMPORTANT! Test sound reception of this monitor before first time use and whenever you change location of the transmitter (see this page).
1 Set transmitter channel switch to same channel as receiver.
2 Place transmitter (in base) in same room with child. Point microphone directly toward crib or play area.
3 Unwrap and fully extend AC adaptor cord for best transmission. Insert AC adaptor jack into transmitter socket and plug into wall outlet.
Note: To use three, “AAA” alkaline batteries for power source, refer to “Battery Installation” instruc- tions on this page.
4 Slide transmitter on/off switch to turn power on. Power indicator lights.
5 Place receiver where you will see or hear it.
6 Unwrap and fully extend AC adaptor cord for best reception. Insert AC adaptor jack into receiver socket and plug into wall outlet.
Note: To use a 9V alkaline battery for power source, refer to “Battery Installation” instructions on this page.
7 Rotate receiver on/off/volume dial to turn power on. Power indicator lights. Rotate on/off/volume dial to adjust volume.
A | 4 | |||
|
|
|
| |
| 7 | ON |
| |
B | A | B | ||
| ||||
1
For use with baby, place receiver in room in which you intend to use it. Rotate on/off/volume dial to turn power on. Adjust receiver location.
• Insert three “AAA” (LR03) alkaline batteries, as indicated inside battery |
compartment. |
• Close battery compartment doors and tighten screws with a Phillips |
screwdriver. Do not |
FOR YOUR TODDLER
5 |
For use with toddler, position the | A | |
| ||
receiver where you will be listening. | B | |
Rotate on/off/volume dial to turn | ||
| ||
power on. Adjust receiver location. |
|
Hint: If you turn receiver power on before transmitter power, you will hear a static noise and all five bars in the moving light display light. Simply turn volume down and turn transmitter power on.
|
|
| If you experience interference |
|
|
| (buzzing or static, etc.) while |
A |
|
| using one channel setting, |
|
| switch both units to other | |
|
|
| |
B | ON |
| channel. Selecting a channel is |
| A | B | |
|
|
| usually a one time adjustment. |
|
|
|
|
Notes:
•Moving light display lights when sound is received by receiver.
•If all five bars in moving light display light:
-Receiver power is on and transmitter power is off.
-Receiver is too far away from transmitter.
-Receiver and transmitter are not on same channel.
-Loud sounds are transmitting.
BATTERY TIPS
•Do not mix old and new batteries.
•Do not mix different types of batteries: alkaline, standard
•Remove the batteries during long periods of
•Never short circuit the battery terminals.
•
•Only batteries of the same or equivalent type as recommended in the “Battery Installation” instructions are to be used.
•If removable rechargeable batteries are used, they are only to be charged under adult supervision.
•Rechargeable batteries are to be removed from the product before they are charged.
•If you use a battery charger, it should be examined regularly for damage to the cord, plug, enclosure and other parts. Do not use a damaged battery charger until it has been properly repaired.
IMPORTANT! Test sound reception of this monitor before first time use and whenever you change location of the transmitter (see this page).
1 Set transmitter channel switch to same channel as receiver.
2 Remove transmitter from base. Attach trans- mitter to child’s clothing using clip. Check to be sure transmitter is secure.
3 Slide transmitter on/off switch to turn power on. Power indicator lights.
4 Place receiver where you will see or hear it.
5 Unwrap and fully extend AC adaptor cord for best reception. Insert AC adaptor jack into receiver socket and plug into wall outlet.
Note: To use a 9V alkaline battery for power source, refer to “Battery Installation” instructions on this page.
6 Rotate receiver on/off/volume dial to turn power on. Power indicator lights. Rotate on/off/volume dial to adjust volume.
“One part
flour…”
2 ![]() 4
4
A6
| ON |
|
| |
|
|
|
|
|
B |
| A |
|
|
|
| B | ||
1
“One part |
flour…” |