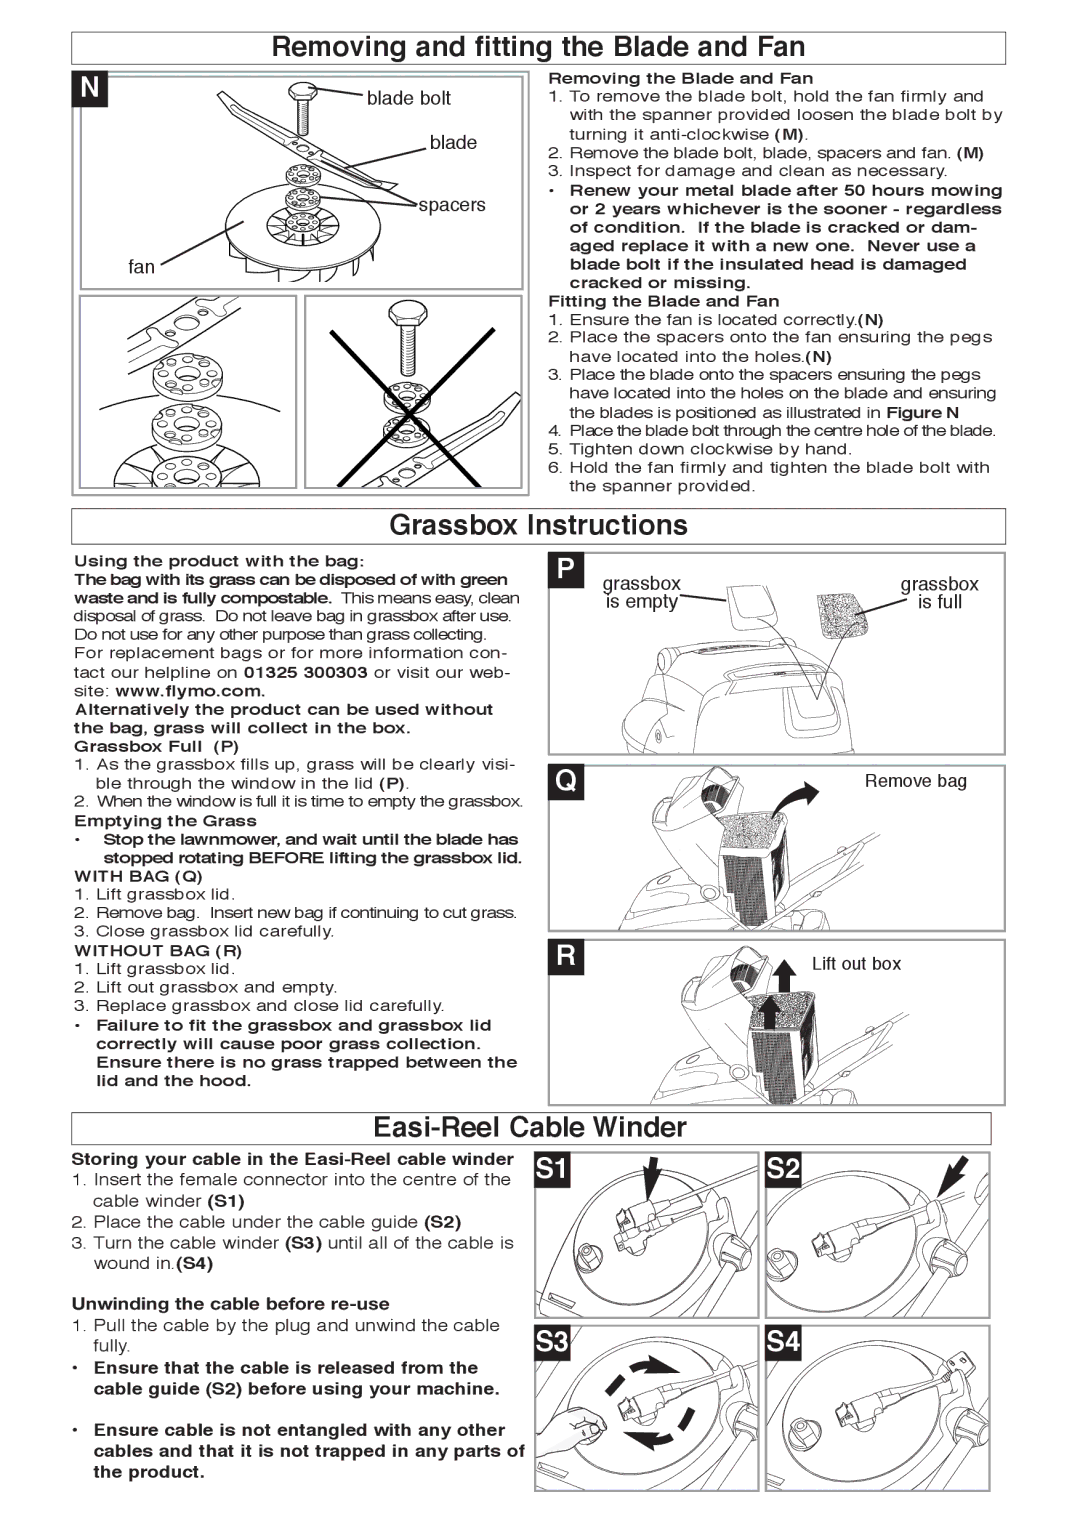
Removing and fitting the Blade and Fan

N

blade bolt


blade


spacers


fan

Removing the Blade and Fan

1.To remove the blade bolt, hold the fan firmly and with the spanner provided loosen the blade bolt by turning it anti-clockwise (M).

2.Remove the blade bolt, blade, spacers and fan. (M)

3.Inspect for damage and clean as necessary.

Renew your metal blade after 50 hours mowing or 2 years whichever is the sooner - regardless of condition. If the blade is cracked or dam- aged replace it with a new one. Never use a

blade bolt if the insulated head is damaged cracked or missing.

Fitting the Blade and Fan

1.Ensure the fan is located correctly.(N)

2.Place the spacers onto the fan ensuring the pegs have located into the holes.(N)

3.Place the blade onto the spacers ensuring the pegs have located into the holes on the blade and ensuring the blades is positioned as illustrated in Figure N

4.Place the blade bolt through the centre hole of the blade.

5.Tighten down clockwise by hand.

6.Hold the fan firmly and tighten the blade bolt with the spanner provided.

Grassbox Instructions

Using the product with the bag:

The bag with its grass can be disposed of with green waste and is fully compostable. This means easy, clean disposal of grass. Do not leave bag in grassbox after use. Do not use for any other purpose than grass collecting. For replacement bags or for more information con- tact our helpline on 01325 300303 or visit our web- site: www.flymo.com.

Alternatively the product can be used without the bag, grass will collect in the box. Grassbox Full (P)

1.As the grassbox fills up, grass will be clearly visi- ble through the window in the lid (P).

2.When the window is full it is time to empty the grassbox.

Emptying the Grass

• Stop the lawnmower, and wait until the blade has stopped rotating BEFORE lifting the grassbox lid.

WITH BAG (Q)

1.Lift grassbox lid.

2.Remove bag. Insert new bag if continuing to cut grass.

3.Close grassbox lid carefully.

WITHOUT BAG (R)

1.Lift grassbox lid.

2.Lift out grassbox and empty.

3.Replace grassbox and close lid carefully.

Failure to fit the grassbox and grassbox lid correctly will cause poor grass collection. Ensure there is no grass trapped between the lid and the hood.

P

grassbox

grassbox


is empty

is full

Q


Remove bag

R

Lift out box

Easi-Reel Cable Winder

Storing your cable in the Easi-Reel cable winder

1.Insert the female connector into the centre of the cable winder (S1)

2.Place the cable under the cable guide (S2)

3.Turn the cable winder (S3) until all of the cable is wound in.(S4)

Unwinding the cable before re-use

1.Pull the cable by the plug and unwind the cable fully.

Ensure that the cable is released from the cable guide (S2) before using your machine.

Ensure cable is not entangled with any other cables and that it is not trapped in any parts of the product.

S1

S2

S3

S4

Page 6
Image 6
Flymo 350 Plus manual Removing and fitting the Blade and Fan, Grassbox Instructions, Easi-Reel Cable Winder

350 Plus specifications

The Flymo 350 Plus is a state-of-the-art robotic lawn mower designed to take the hassle out of lawn maintenance. Combining advanced technology with user-friendly features, it caters to homeowners who desire a beautifully manicured lawn without the labor-intensive effort. This innovative model is particularly suitable for gardens up to 350 square meters, making it ideal for medium-sized lawns.

One of the standout features of the Flymo 350 Plus is its intelligent navigation system. Equipped with boundary wire technology, it can efficiently map out the mowing area while avoiding obstacles such as flower beds, trees, and garden furniture. This ensures that every inch of your garden receives attention, promoting a healthier and more aesthetically pleasing lawn. The mower also features a slope capability of up to 35% incline, allowing it to traverse challenging terrains with ease.

In terms of performance, the Flymo 350 Plus is powered by a robust lithium-ion battery that offers up to 65 minutes of mowing time on a single charge. It possesses a weather-resistant design, allowing it to operate in light rain and adjust its mowing schedule according to weather conditions. This added functionality means you won’t have to worry about missing a mowing session due to unexpected showers.

User convenience is at the forefront of the Flymo 350 Plus design. It includes an intuitive app that allows users to program schedules, adjust cutting heights, and receive notifications directly on their smartphones. With three cutting height settings ranging from 20mm to 50mm, it ensures that you can achieve the perfect lawn length to suit your preferences. The mower's compact design also makes storage a breeze, with minimal space required when not in use.

For maintenance, the Flymo 350 Plus features a sharp pivoting blade, ensuring a clean cut every time and minimizing wear on the grass. Regular maintenance is straightforward, facilitated by an easy-access compartment for blade replacement.

In conclusion, the Flymo 350 Plus embodies the essence of modern lawn care with its mixture of technology, efficiency, and convenience. Its advanced features make it a worthwhile investment for homeowners seeking a high-quality solution for lawn maintenance, allowing them more time to enjoy their gardens instead of laboring in them. Whether it's navigating complex layouts or adapting to changing conditions, the Flymo 350 Plus stands out as a leading choice in robotic lawn mowing solutions.