3

Assembly Instructions cont’

B1

B2

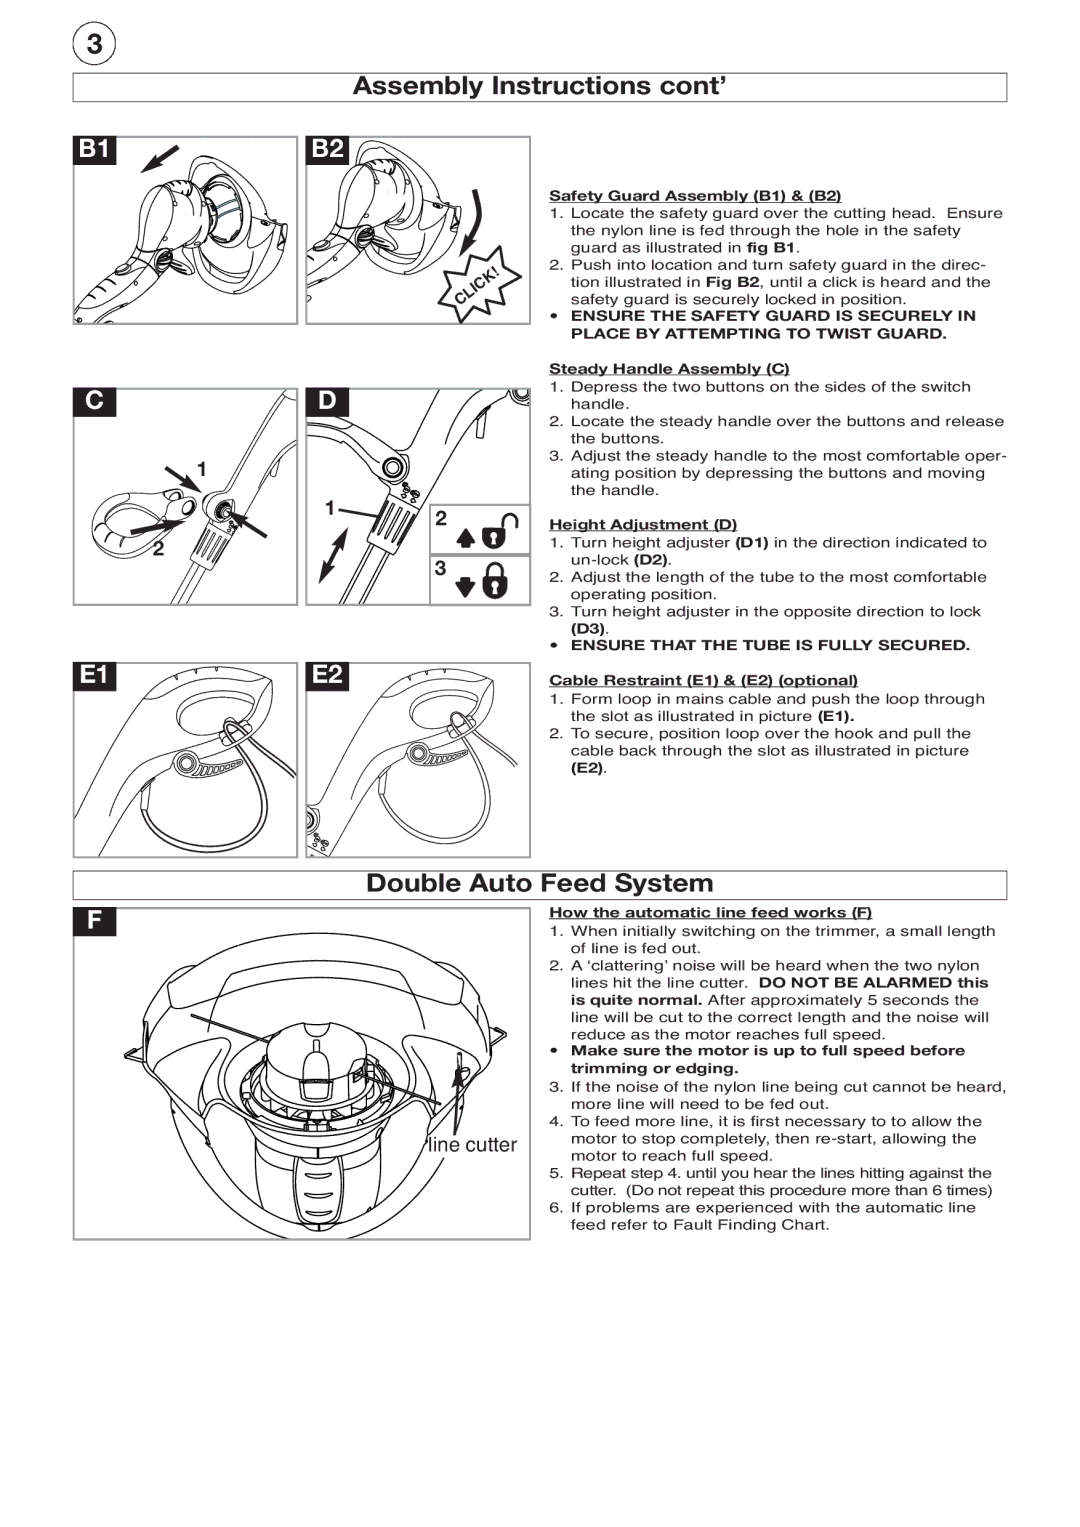
Safety Guard Assembly (B1) & (B2)

1.Locate the safety guard over the cutting head. Ensure the nylon line is fed through the hole in the safety guard as illustrated in fig B1.

2.Push into location and turn safety guard in the direc- tion illustrated in Fig B2, until a click is heard and the

safety guard is securely locked in position.

ENSURE THE SAFETY GUARD IS SECURELY IN PLACE BY ATTEMPTING TO TWIST GUARD.

Steady Handle Assembly (C)

C

1

2

D


1

2


3

1.Depress the two buttons on the sides of the switch handle.

2.Locate the steady handle over the buttons and release the buttons.

3.Adjust the steady handle to the most comfortable oper- ating position by depressing the buttons and moving the handle.

Height Adjustment (D)

1.Turn height adjuster (D1) in the direction indicated to un-lock (D2).

2.Adjust the length of the tube to the most comfortable operating position.

3.Turn height adjuster in the opposite direction to lock

(D3).

• ENSURE THAT THE TUBE IS FULLY SECURED.

E1

F

E2


Cable Restraint (E1) & (E2) (optional)


1.

Form loop in mains cable and push the loop through


the slot as illustrated in picture (E1).


2.

To secure, position loop over the hook and pull the


cable back through the slot as illustrated in picture


(E2).


Double Auto Feed System

How the automatic line feed works (F)

1.

When initially switching on the trimmer, a small length


of line is fed out.

2.

A ʻclatteringʼ noise will be heard when the two nylon


lines hit the line cutter. DO NOT BE ALARMED this


is quite normal. After approximately 5 seconds the


line will be cut to the correct length and the noise will


reduce as the motor reaches full speed.


Make sure the motor is up to full speed before


trimming or edging.

3.

If the noise of the nylon line being cut cannot be heard,


more line will need to be fed out.

4.

To feed more line, it is first necessary to to allow the


motor to stop completely, then re-start, allowing the

line cutter


motor to reach full speed.


5.

Repeat step 4. until you hear the lines hitting against the


cutter. (Do not repeat this procedure more than 6 times)

6.

If problems are experienced with the automatic line


feed refer to Fault Finding Chart.

Page 4
Image 4
Flymo 500 XT manual Assembly Instructions cont’, Double Auto Feed System, Ensure That the Tube is Fully Secured

500 XT specifications

The Flymo 500 XT is a well-regarded lawnmower that combines advanced technology with user-friendly features, making it a popular choice for homeowners with medium to large-sized gardens. Its robust design and innovative engineering deliver an efficient mowing experience, ensuring your lawn looks its best year-round.

One of the standout features of the Flymo 500 XT is its powerful 1500W electric motor, which provides reliable performance while minimizing noise levels. This makes it an ideal option for those who want to maintain their gardens without disturbing the peace of the neighborhood. The lawnmower operates on a conventional electric cord, ensuring a consistent power supply without the need for batteries or fuel, which can be harmful to the environment.

The Flymo 500 XT is equipped with a 20-inch cutting deck, allowing users to cover larger areas in less time. This feature is particularly beneficial for those with expansive lawns, as it reduces the number of passes needed for a neat finish. The mower also offers an adjustable cutting height, ranging from 20mm to 60mm. This versatility makes it suitable for various grass types and conditions, enabling users to achieve their desired lawn height.

Another highlight of the Flymo 500 XT is its unique hover technology, which makes it easier to maneuver across the lawn. This feature allows the mower to float on a cushion of air, providing a smooth gliding experience and making it easier to tackle uneven terrains and obstacles. The ergonomic handles further enhance user comfort, allowing for extended mowing sessions without fatigue.

Additionally, the Flymo 500 XT features a sizeable 20-liter grass collection box, reducing the frequency of emptying during mowing tasks. The grass box is designed for easy removal and emptying, ensuring a hassle-free experience. Furthermore, the compact design of the mower allows for convenient storage, making it an excellent fit for garages or garden sheds.

In conclusion, the Flymo 500 XT is a powerful, user-friendly mower that delivers exceptional performance for maintaining larger lawns. With its advanced hover technology, adjustable cutting heights, and efficient grass collection system, it remains a favorite among gardening enthusiasts seeking quality and reliability in a lawnmower. Whether you're looking to keep your lawn well-groomed or tackle overgrowth, the Flymo 500 XT proves to be a reliable companion for your gardening needs.