|
| Assembly Instructions | ||
A |
|
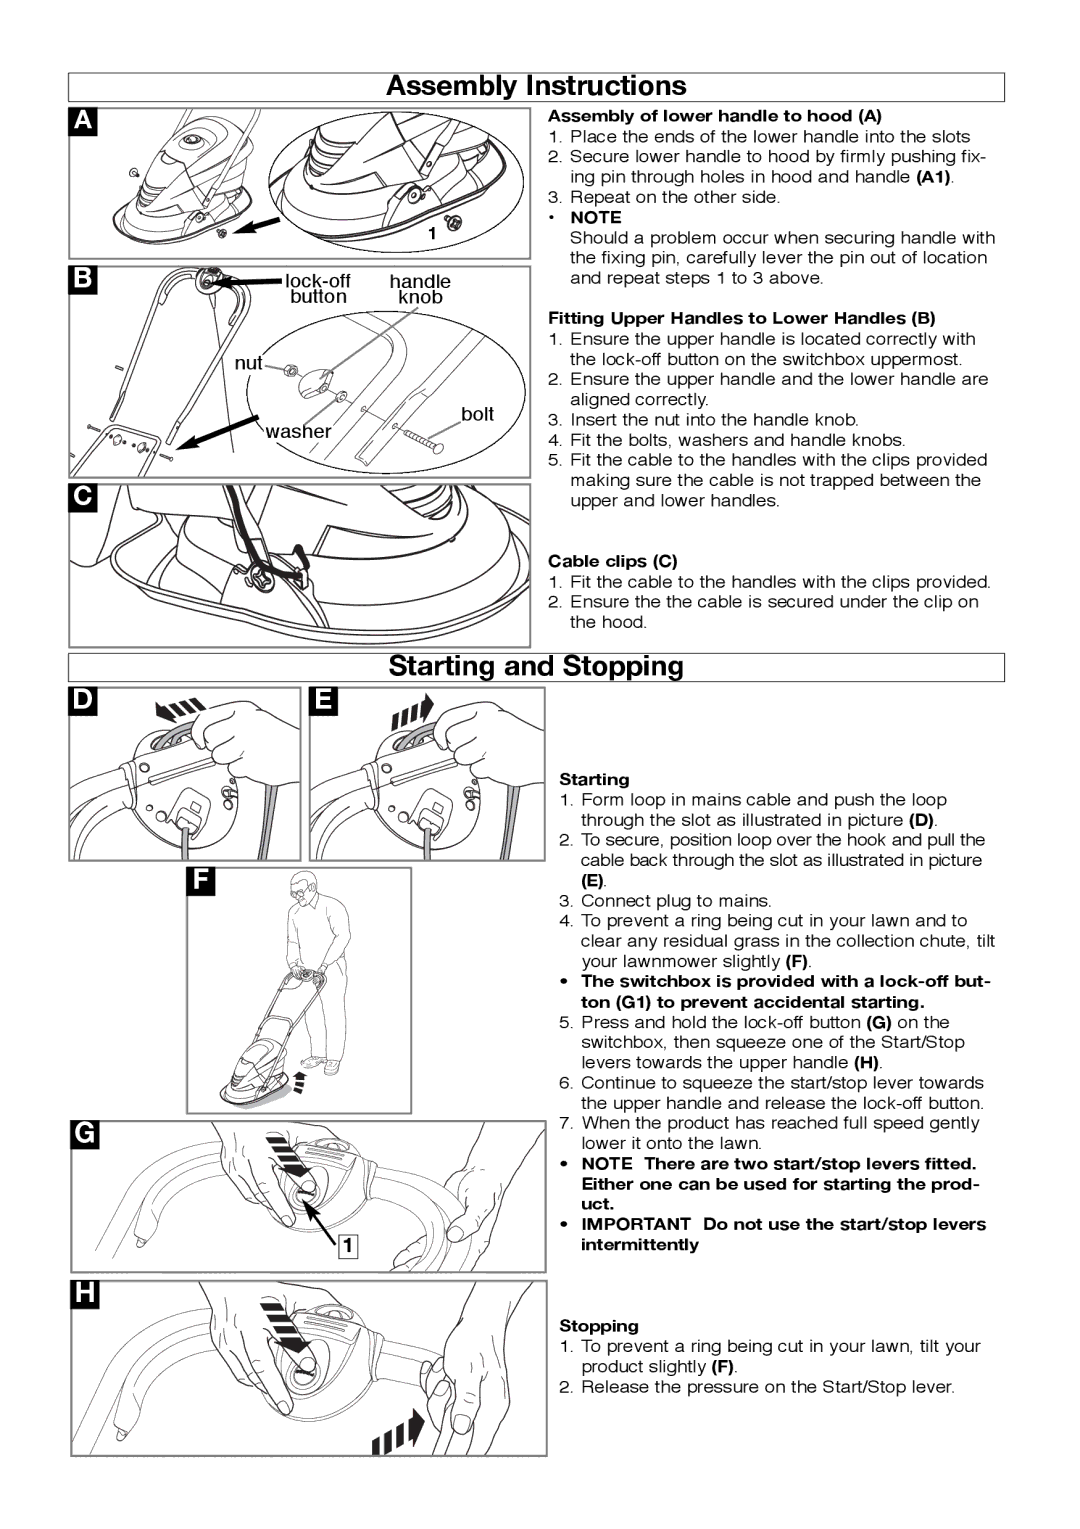
| Assembly of lower handle to hood (A) | |
|
|
| 1. | Place the ends of the lower handle into the slots |
|
|
| 2. | Secure lower handle to hood by firmly pushing fix- |
|
|
|
| ing pin through holes in hood and handle (A1). |
|
|
| 3. | Repeat on the other side. |
|
| 1 | • | NOTE |
|
|
| Should a problem occur when securing handle with | |
B |
|
|
| the fixing pin, carefully lever the pin out of location |
handle |
| and repeat steps 1 to 3 above. | ||
| button | knob |
|
|
|
|
| Fitting Upper Handles to Lower Handles (B) | |
|
|
| 1. | Ensure the upper handle is located correctly with |
| nut |
|
| the |
|
|
| 2. | Ensure the upper handle and the lower handle are |
|
| bolt |
| aligned correctly. |
| washer | 3. | Insert the nut into the handle knob. | |
|
| 4. | Fit the bolts, washers and handle knobs. | |
|
|
| ||
|
|
| 5. | Fit the cable to the handles with the clips provided |
C |
|
|
| making sure the cable is not trapped between the |
|
|
| upper and lower handles. | |
|
|
| Cable clips (C) | |
|
|
| 1. | Fit the cable to the handles with the clips provided. |
|
|
| 2. | Ensure the the cable is secured under the clip on |
|
|
|
| the hood. |
|
| Starting and Stopping | ||
D | E |
|
|
|
|
|
| Starting | |
|
|
| 1. Form loop in mains cable and push the loop | |
|
|
|
| through the slot as illustrated in picture (D). |
|
|
| 2. To secure, position loop over the hook and pull the | |
| F |
|
| cable back through the slot as illustrated in picture |
|
|
| (E). | |
|
|
| 3. Connect plug to mains. | |
|
|
| 4. To prevent a ring being cut in your lawn and to | |
|
|
|
| clear any residual grass in the collection chute, tilt |
|
|
|
| your lawnmower slightly (F). |
|
|
| • | The switchbox is provided with a |
|
|
|
| ton (G1) to prevent accidental starting. |
|
|
| 5. Press and hold the | |
|
|
|
| switchbox, then squeeze one of the Start/Stop |
|
|
|
| levers towards the upper handle (H). |
|
|
| 6. Continue to squeeze the start/stop lever towards | |
|
|
|
| the upper handle and release the |
G |
|
| 7. When the product has reached full speed gently | |
|
|
| lower it onto the lawn. | |
|
|
| • | NOTE There are two start/stop levers fitted. |
|
|
|
| Either one can be used for starting the prod- |
|
|
|
| uct. |
| 1 |
| • | IMPORTANT Do not use the start/stop levers |
|
|
| intermittently | |
H |
|
|
|
|
|
|
| Stopping | |
|
|
| 1. To prevent a ring being cut in your lawn, tilt your | |
|
|
|
| product slightly (F). |
|
|
| 2. Release the pressure on the Start/Stop lever. | |