Quick Start Guide
Tips for Successful Vacuum Packaging
For more usage tips and safety information, please refer to the FoodSaver® Reference Guide.
Tips on Using the Pulse Vacuum Control Feature
Tips for Successful Vacuum Packaging
(continued)
General Tips
QuickStart
V2860-IUK
Use the Pulse Vacuum Control feature to manually con- trol the vacuum process and avoid crushing delicate items.
1.Place item(s) in bag, allowing at least 7.5 cm of space between bag contents and top of bag.
2.Open appliance lid and place open end of bag into Vacuum Channel (J). Close lid and use Latch (E) to lock.
3.Press appropriate Food Setting Button (N) – Moist or Dry.
4.Press appropriate Speed Setting Button (P) – Fast, Normal or Gentle.
5.Push and hold the Pulse Button (R). The vacuum pump will run when the Pulse Button is held down. Release the Pulse Button to stop the vacuum process. Repeat pushing the Pulse Button until desired amount of air has been removed.
NOTE:If the vacuum pump stops engaging after several pushes of the Pulse Button, it means the maximum vacuum has been reached. Do not continue to push the Pulse Button.
6.Press Seal Button (U) to seal the bag and end the Pulse mode.
7.When the Progress Lights (T) turn off, unlock Latch, lift lid and remove bag. Refrigerate or freeze if needed.
1. | Vacuum packaging is NOT a substitute for the |
| heat process of canning. Perishables still need to |
| be refrigerated or frozen. |
2. | For best results, use FoodSaver® Bags and |
| Canisters. |
3. | During the vacuum packaging process, small |
| amounts of liquids, crumbs or food particles can |
| be inadvertently pulled into Vacuum Channel (J), |
| clogging the pump and damaging your appliance. |
| To prevent this, follow these tips: |
| a. For moist and juicy foods such as raw meats: |
| Freeze first and avoid overfilling bags. You can |
6. | To prevent wrinkles in a seal when vacuum |
| packaging bulky items, gently stretch bag flat |
| along Sealing Strip (L) before you close lid. |
7. | If you are unsure your bag was sealed properly, |
| simply reseal bag about 0.5 cm above first seal. |
8. | When you are vacuum packaging items with sharp |
| edges (dry spaghetti, silverware, etc.), protect |
| bag from punctures by wrapping item in soft |
| cushioning material, such as a paper towel. |
9. | When using accessories, remember to leave 2.5 |
| cm of space at top of canister or container, and |
| make sure to lock Latch (E) before vacuuming. |
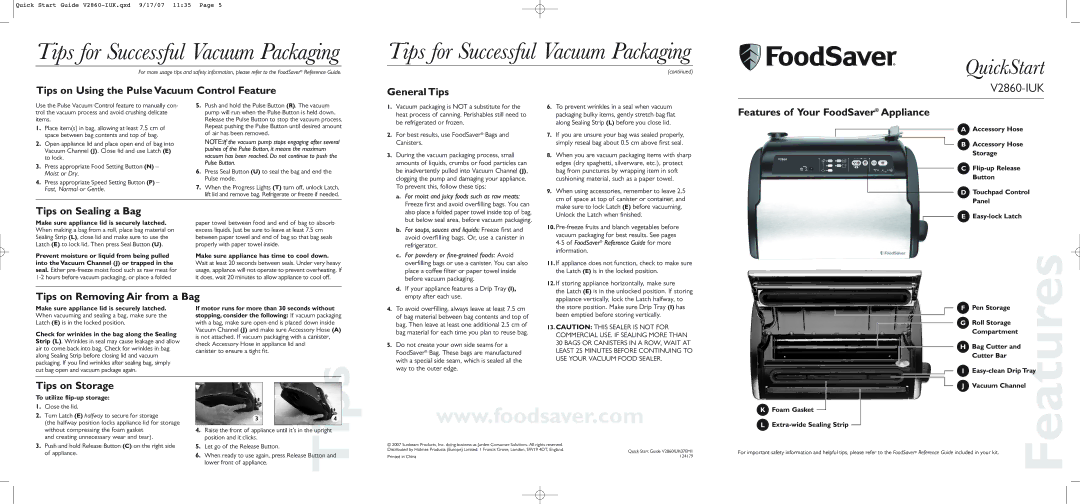
Features of Your FoodSaver® Appliance
A Accessory Hose
B Accessory Hose
Storage
C
Button
D Touchpad Control
Panel
Tips on Sealing a Bag
Make sure appliance lid is securely latched.
When making a bag from a roll, place bag material on Sealing Strip (L), close lid and make sure to use the Latch (E) to lock lid. Then press Seal Button (U).
Prevent moisture or liquid from being pulled into the Vacuum Channel (J) or trapped in the seal. Either
paper towel between food and end of bag to absorb excess liquids. Just be sure to leave at least 7.5 cm between paper towel and end of bag so that bag seals properly with paper towel inside.
Make sure appliance has time to cool down.
Wait at least 20 seconds between seals. Under very heavy usage, appliance will not operate to prevent overheating. If it does, wait 20 minutes to allow appliance to cool off.
also place a folded paper towel inside top of bag, |
but below seal area, before vacuum packaging. |
b. For soups, sauces and liquids: Freeze first and |
avoid overfilling bags. Or, use a canister in |
refrigerator. |
c. For powdery or |
overfilling bags or use a canister. You can also |
place a coffee filter or paper towel inside |
before vacuum packaging. |
d. If your appliance features a Drip Tray (I), |
Unlock the Latch when finished. |
10. |
vacuum packaging for best results. See pages |
|
information. |
11. If appliance does not function, check to make sure |
the Latch (E) is in the locked position. |
12. If storing appliance horizontally, make sure |
the Latch (E) is in the unlocked position. If storing |
E
Tips on Removing Air from a Bag
Make sure appliance lid is securely latched. | If motor runs for more than 30 seconds without | |
When vacuuming and sealing a bag, make sure the | stopping, consider the following: If vacuum packaging | |
Latch (E) is in the locked position. | with a bag, make sure open end is placed down inside | |
Check for wrinkles in the bag along the Sealing | Vacuum Channel (J) and make sure Accessory Hose (A) | |
is not attached. If vacuum packaging with a canister, | ||
Strip (L). Wrinkles in seal may cause leakage and allow | ||
check Accessory Hose in appliance lid and | ||
air to come back into bag. Check for wrinkles in bag | ||
canister to ensure a tight fit. | ||
along Sealing Strip before closing lid and vacuum | ||
| ||
packaging. If you find wrinkles after sealing bag, simply |
| |
cut bag open and vacuum package again. |
| |
Tips on Storage |
| |
To utilize |
| |
1. Close the lid. |
|
| empty after each use. |
4. | To avoid overfilling, always leave at least 7.5 cm |
| of bag material between bag contents and top of |
| bag. Then leave at least one additional 2.5 cm of |
| bag material for each time you plan to reuse bag. |
5. | Do not create your own side seams for a |
| FoodSaver® Bag. These bags are manufactured |
| with a special side seam, which is sealed all the |
| way to the outer edge. |
appliance vertically, lock the Latch halfway, to |
the store position. Make sure Drip Tray (I) has |
been emptied before storing vertically. |
13. CAUTION: THIS SEALER IS NOT FOR |
COMMERCIAL USE. IF SEALING MORE THAN |
30 BAGS OR CANISTERS IN A ROW, WAIT AT |
LEAST 25 MINUTES BEFORE CONTINUING TO |
USE YOUR VACUUM FOOD SEALER. |
F | Pen Storage |
|
G | Roll Storage |
|
| Compartment |
|
H | Bag Cutter and |
|
| Cutter Bar |
|
I | ||
J | Vacuum Channel | |
|
| Features |
2. | Turn Latch (E) halfway to secure for storage |
| 3 | 4 |
| (the halfway position locks appliance lid for storage |
| ||
|
|
|
| |
| without compressing the foam gasket | 4. | Raise the front of appliance until it’s in the upright | |
| and creating unnecessary wear and tear). |
| position and it clicks. |
|
3. | Push and hold Release Button (C) on the right side | 5. | Let go of the Release Button. |
|
| of appliance. | 6. | When ready to use again, press Release Button and | |
|
|
|
| Tips |
lower front of appliance.
www.foodsaver.com
© 2007 Sunbeam Products, Inc. doing business as Jarden Consumer Solutions. All rights reserved. |
|
Distributed by Holmes Products (Europe) Limited. 1 Francis Grove, London, SW19 4DT, England. | Quick Start Guide V2860IUK07EM1 |
| |
Printed in China | 124179 |
K Foam Gasket |
L |
For important safety information and helpful tips, please refer to the FoodSaver® Reference Guide included in your kit.