Quick Start Guide
Features | Getting Started |
The
System, and the touchpad design allows you to easily wipe it clean.
How to Make a Bag from a FoodSaver® Roll
FoodSaver® Accessories
How to Prepare FoodSaver® Accessories for Vacuum Packaging
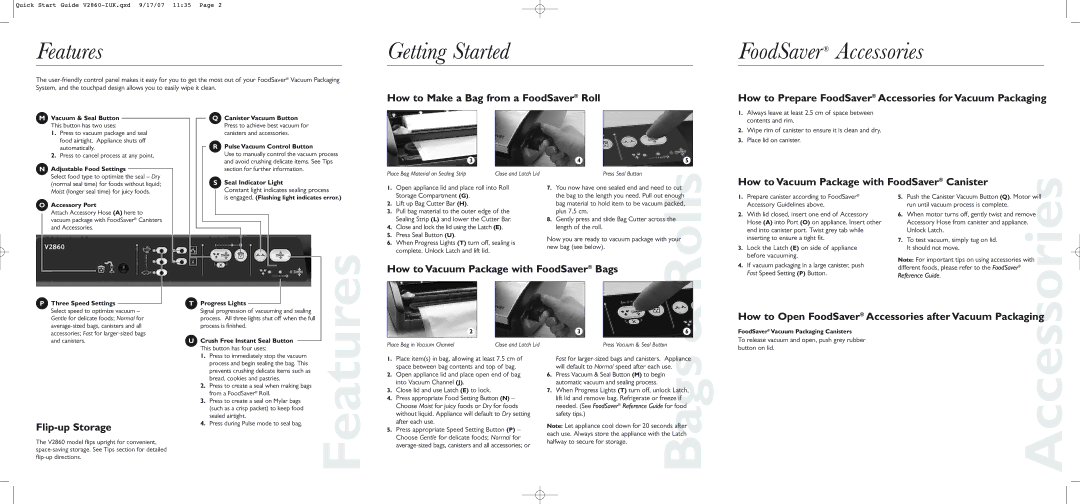
MVacuum & Seal Button This button has two uses:
1.Press to vacuum package and seal food airtight. Appliance shuts off automatically.
2.Press to cancel process at any point.
NAdjustable Food Settings ![]() Select food type to optimize the seal – Dry (normal seal time) for foods without liquid; Moist (longer seal time) for juicy foods.
Select food type to optimize the seal – Dry (normal seal time) for foods without liquid; Moist (longer seal time) for juicy foods.
OAccessory Port
Attach Accessory Hose (A) here to vacuum package with FoodSaver® Canisters and Accessories.
PThree Speed Settings
Select speed to optimize vacuum – Gentle for delicate foods; Normal for
Flip-up Storage
The V2860 model flips upright for convenient,
Q Canister Vacuum Button
Press to achieve best vacuum for canisters and accessories.
R Pulse Vacuum Control Button
Use to manually control the vacuum process and avoid crushing delicate items. See Tips section for further information.
SSeal Indicator Light
Constant light indicates sealing process
is engaged. (Flashing light indicates error.)
|
|
|
|
|
|
|
|
|
| Features |
T | Progress Lights |
|
|
|
| |||||
|
|
|
| |||||||
|
|
|
| |||||||
|
|
| ||||||||
|
| Signal progression of vacuuming and sealing |
| |||||||
|
| process. All three lights shut off when the full |
| |||||||
|
| process is finished. |
| |||||||
U | Crush Free Instant Seal Button |
| ||||||||
|
| This button has four uses: |
| |||||||
|
| 1. | Press to immediately stop the vacuum |
| ||||||
|
|
| process and begin sealing the bag. This |
| ||||||
|
|
| prevents crushing delicate items such as |
| ||||||
|
|
| bread, cookies and pastries. |
| ||||||
|
| 2. | Press to create a seal when making bags |
| ||||||
|
|
| from a FoodSaver® Roll. |
| ||||||
|
| 3. | Press to create a seal on Mylar bags |
| ||||||
|
|
| (such as a crisp packet) to keep food |
| ||||||
|
|
| sealed airtight. |
| ||||||
|
| 4. | Press during Pulse mode to seal bag. |
| ||||||
| 3 |
|
| 4 |
|
| 5 |
|
|
|
|
|
|
| |
Place Bag Material on Sealing Strip | Close and Latch Lid |
|
| Press Seal Button |
| ||
1. | Open appliance lid and place roll into Roll | 7. You now have one sealed end and need to cut |
| ||||
| Storage Compartment (G). |
| the bag to the length you need. Pull out enough |
| |||
2. | Lift up Bag Cutter Bar (H). |
| bag material to hold item to be vacuum packed, |
| |||
3. | Pull bag material to the outer edge of the | plus 7.5 cm. |
| ||||
| Sealing Strip (L) and lower the Cutter Bar. | 8. Gently press and slide Bag Cutter across the |
| ||||
4. | Close and lock the lid using the Latch (E). | length of the roll. |
| ||||
5. | Press Seal Button (U). |
| Now you are ready to vacuum package with your |
| |||
6. | When Progress Lights (T) turn off, sealing is |
| |||||
new bag (see below). |
| ||||||
| complete. Unlock Latch and lift lid. |
|
| ||||
|
|
|
|
|
| ||
How to Vacuum Package with FoodSaver® Bags | Rolls |
| ||||||||
|
|
|
|
|
|
|
| |||
| 2 |
|
| 3 |
|
|
| 6 |
| |
|
|
|
|
|
|
| & |
| ||
Place Bag in Vacuum Channel | Close and Latch Lid |
|
| Press Vacuum & Seal Button |
|
| ||||
1. | Place item(s) in bag, allowing at least 7.5 cm of | Fast for | ||||||||
| space between bag contents and top of bag. | will default to Normal speed after each use. |
|
| ||||||
2. | Open appliance lid and place open end of bag | 6. Press Vacuum & Seal Button (M) to begin |
|
| ||||||
| into Vacuum Channel (J). |
| automatic vacuum and sealing process. |
|
|
| ||||
3. | Close lid and use Latch (E) to lock. |
| 7. When Progress Lights (T) turn off, unlock Latch, | |||||||
4. | Press appropriate Food Setting Button (N) – | lift lid and remove bag. Refrigerate or freeze if |
|
| ||||||
| Choose Moist for juicy foods or Dry for foods | needed. (See FoodSaver® Reference Guide for food | ||||||||
| without liquid. Appliance will default to Dry setting | safety tips.) |
|
|
| |||||
| after each use. |
| Note: Let appliance cool down for 20 seconds after | |||||||
5. | Press appropriate Speed Setting Button (P) – | |||||||||
each use. Always store the appliance with the Latch | ||||||||||
| Choose Gentle for delicate foods; Normal for | |||||||||
| halfway to secure for storage. | Bags | ||||||||
| ||||||||||
|
|
|
| |||||||
|
|
|
|
|
|
| ||||
1.Always leave at least 2.5 cm of space between contents and rim.
2.Wipe rim of canister to ensure it is clean and dry.
3.Place lid on canister.
How to Vacuum Package with FoodSaver® Canister
How to Open FoodSaver® Accessories after Vacuum Packaging
1. | Prepare canister according to FoodSaver® | 5. | Push the Canister Vacuum Button (Q). Motor will | |
| Accessory Guidelines above. |
| run until vacuum process is complete. |
|
2. | With lid closed, insert one end of Accessory | 6. | When motor turns off, gently twist and remove | |
| Hose (A) into Port (O) on appliance. Insert other |
| Accessory Hose from canister and appliance. | |
| end into canister port. Twist grey tab while |
| Unlock Latch. |
|
| inserting to ensure a tight fit. | 7. | To test vacuum, simply tug on lid. |
|
3. | Lock the Latch (E) on side of appliance |
| It should not move. |
|
| before vacuuming. | Note: For important tips on using accessories with | ||
|
| |||
4. | If vacuum packaging in a large canister, push | different foods, please refer to the FoodSaver® | Accessories | |
| Fast Speed Setting (P) Button. | Reference Guide. | ||
|
| |||
|
|
|
| |
FoodSaver® Vacuum Packaging Canisters
To release vacuum and open, push grey rubber button on lid.