Model VF160 Owner's Manual Supplement

Saving a WAV file

In the following description, we assume that the optional CD-1A is installed to the VF160 and an unused CD-RW or

CD-R disc is set.

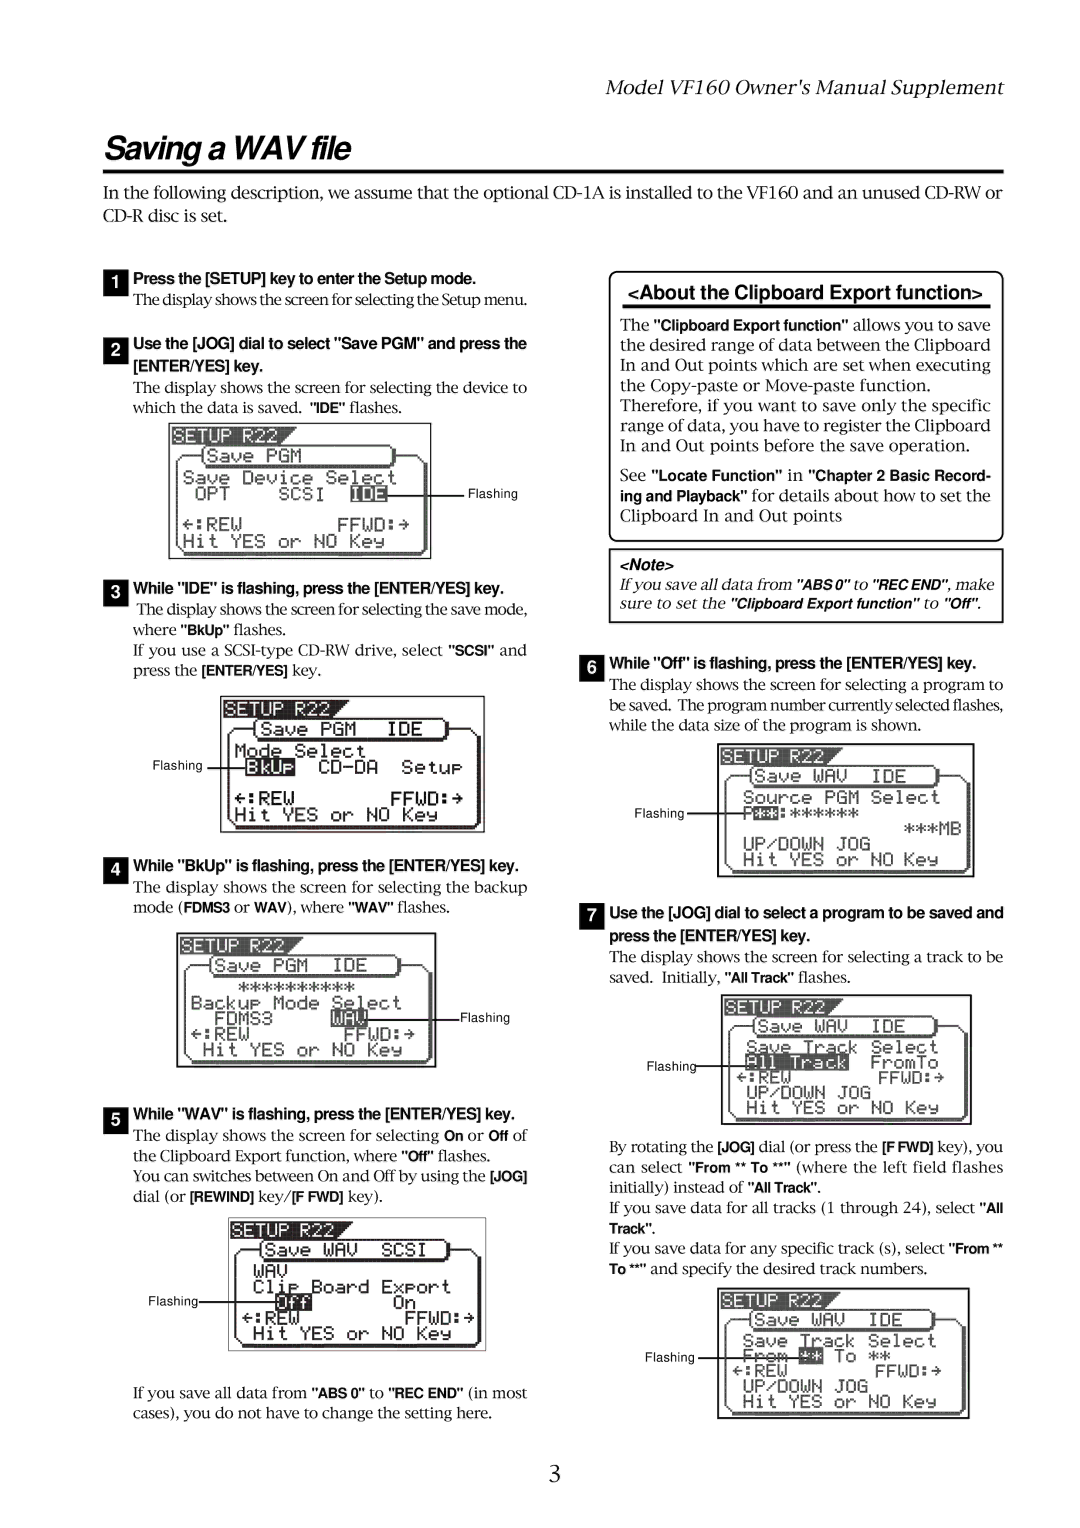
1Press the [SETUP] key to enter the Setup mode.

The display shows the screen for selecting the Setup menu.

2Use the [JOG] dial to select "Save PGM" and press the [ENTER/YES] key.

The display shows the screen for selecting the device to which the data is saved. "IDE" flashes.

<About the Clipboard Export function>

The "Clipboard Export function" allows you to save the desired range of data between the Clipboard In and Out points which are set when executing the Copy-paste or Move-paste function.

Therefore, if you want to save only the specific range of data, you have to register the Clipboard In and Out points before the save operation.

Flashing

See "Locate Function" in "Chapter 2 Basic Record- ing and Playback" for details about how to set the Clipboard In and Out points


<Note>


While "IDE" is flashing, press the [ENTER/YES] key.


If you save all data from "ABS 0" to "REC END", make

3


The display shows the screen for selecting the save mode,


sure to set the "Clipboard Export function" to "Off".


where "BkUp" flashes.


If you use a SCSI-type CD-RW drive, select "SCSI" and


While "Off" is flashing, press the [ENTER/YES] key.


6


press the [ENTER/YES] key.


The display shows the screen for selecting a program to


be saved. The program number currently selected flashes,


while the data size of the program is shown.

Flashing

Flashing

4While "BkUp" is flashing, press the [ENTER/YES] key.

The display shows the screen for selecting the backup mode (FDMS3 or WAV), where "WAV" flashes.

7Use the [JOG] dial to select a program to be saved and press the [ENTER/YES] key.

The display shows the screen for selecting a track to be saved. Initially, "All Track" flashes.

Flashing

Flashing

5 While "WAV" is flashing, press the [ENTER/YES] key.

The display shows the screen for selecting On or Off of

the Clipboard Export function, where "Off" flashes.

By rotating the [JOG] dial (or press the [F FWD] key), you can select "From ** To **" (where the left field flashes

You can switches between On and Off by using the [JOG]

dial (or [REWIND] key/[F FWD] key).

initially) instead of "All Track".

If you save data for all tracks (1 through 24), select "All

Track".

If you save data for any specific track (s), select "From ** To **" and specify the desired track numbers.

Flashing

Flashing

If you save all data from "ABS 0" to "REC END" (in most cases), you do not have to change the setting here.

3

Page 3
Image 3
Fostex VF160 owner manual Saving a WAV file, Press the Setup key to enter the Setup mode, Track

VF160 specifications

The Fostex VF160 is a versatile digital multi-track recorder that caters to musicians, sound engineers, and hobbyists alike. This powerful unit was designed to provide an intuitive and user-friendly interface while offering high-quality audio recording capabilities. With its combination of essential features and robust technology, the VF160 stands out in the crowded landscape of digital recorders.

One of the principal features of the VF160 is its ability to record up to 16 tracks simultaneously. This multi-tracking capability allows musicians to lay down various instruments and vocal lines without the need for multiple recording sessions. Each track can be recorded in 16-bit/44.1 kHz resolution, ensuring high fidelity and precision in sound quality. The unit also offers up to 8 virtual tracks for each physical track, providing a total of 128 virtual tracks, which can be invaluable for experimentation and creative freedom in the recording process.

The VF160 is equipped with a built-in hard drive for storage, supporting audio file management that simplifies the process of storing and retrieving recordings. The standard hard drive offers ample space for long recording sessions, and with the possibility of transferring files via an external USB connection, the VF160 seamlessly integrates into any digital workflow.

In terms of connectivity, the Fostex VF160 features multiple inputs and outputs, including XLR, TRS, and RCA jacks, allowing for a variety of devices to be connected. The inputs are equipped with high-quality preamps, ensuring that the audio signal is captured with clarity and precision. Additionally, the built-in effects processor provides a range of effects such as reverb and chorus, which can be applied to the tracks during the recording or mixing stage, enhancing the creative possibilities.

The user interface of the VF160 is designed for ease of use, featuring a large LCD screen that displays critical information regarding track status, levels, and effects. The control layout is intuitive, making it accessible for both beginners and experienced users. Furthermore, the VF160 includes a set of editing features that allow for precise control over each track, including cutting, copying, and pasting segments of audio, as well as the ability to adjust volume levels and pan settings.

In summary, the Fostex VF160 is a comprehensive digital multi-track recorder that offers a robust set of features, high-quality audio capabilities, and straightforward operation. This makes it an excellent choice for those looking to produce professional-level recordings in a compact and user-friendly package. Whether used in a home studio or for on-the-go projects, the VF160 continues to be a reliable option for audio recording enthusiasts.