Connecting Water Supply

WARNING

To avoid electric shock, which can cause death or severe personal injury, disconnect the refrigerator from electrical power before connecting a water supply line to the refrigerator.

To Connect Water Supply Line To Ice Maker Inlet Valve

1Disconnect refrigerator from electric power source.

2Place end of water supply line into sink or bucket. Turn ON water supply and flush supply line until water is clear. Turn OFF water supply at shutoff valve.

3Remove plastic cap from water valve inlet and discard cap.

CAUTION

To Avoid Property Damage:

Copper or stainless steel braided tubing is recommended for the water supply line. Water supply tubing made of ¼” plastic is not recommended to be used. Plastic tubing greatly increases the potential for water leaks, and the manufacturer will not be responsible for any damage if plastic tubing is used for supply line.

DO NOT install water supply tubing in areas where temperatures fall below freezing.

Chemicals from a malfunctioning softener can damage the ice maker. If the ice maker is connected to soft water, ensure that the softener is maintained and working properly.

IMPORTANT

Ensure that your water supply line connections comply with all local plumbing codes.

Before Installing The Water Supply Line, You Will Need:

Basic Tools: adjustable wrench, flat-blade screwdriver, and PhillipsTM screwdriver.

Access to a household cold water line with water pressure between 30 and 100 psi.

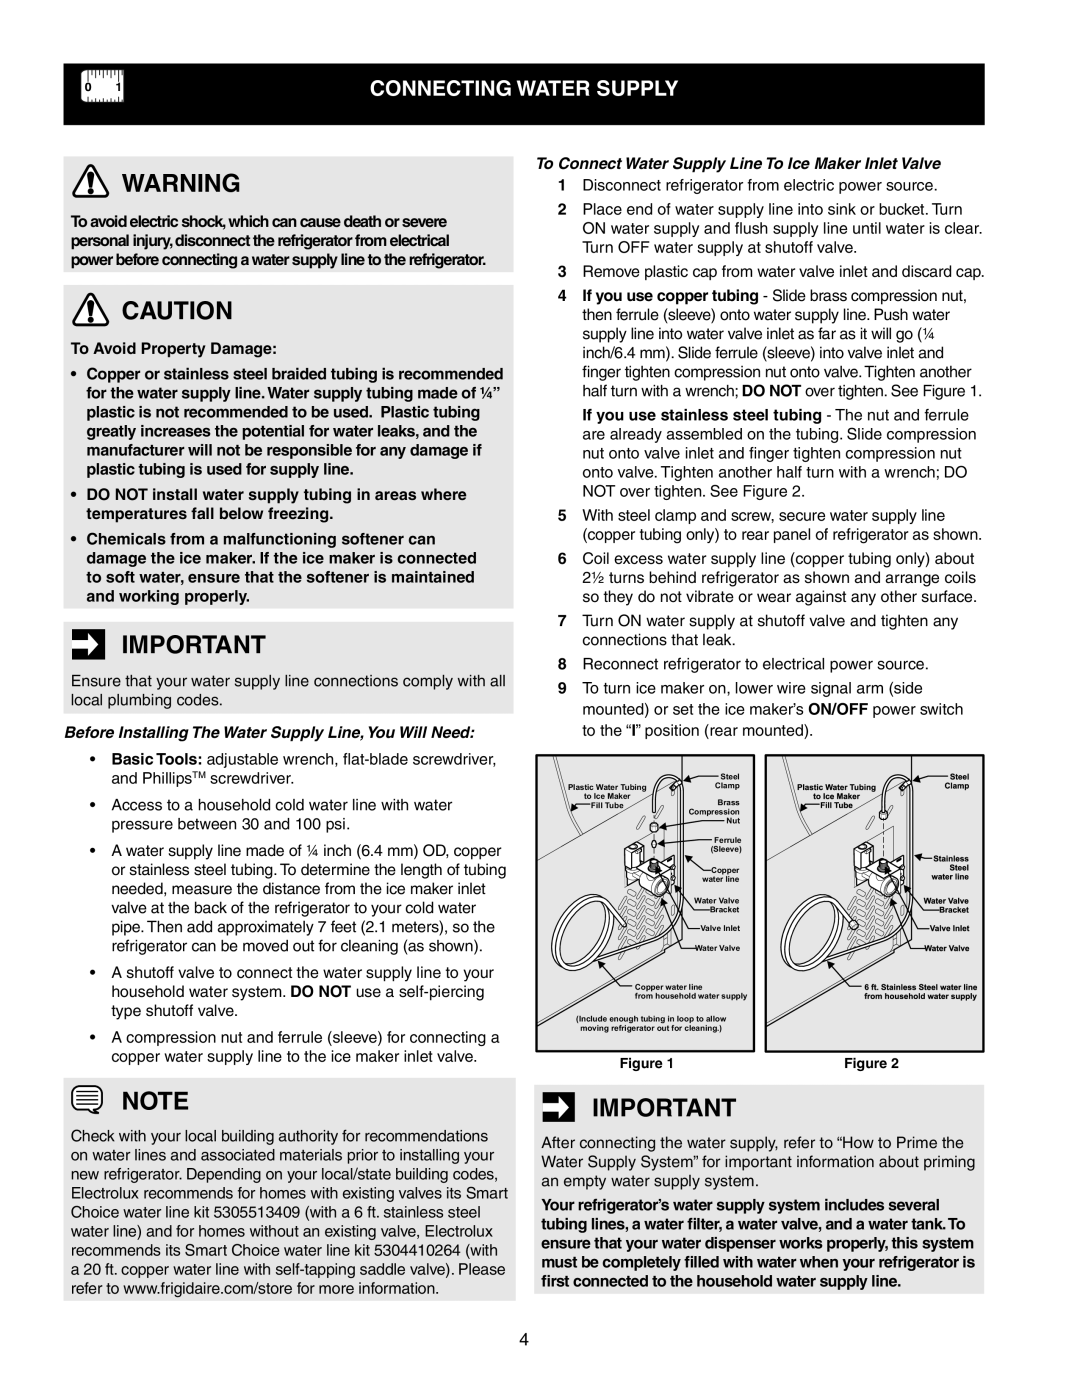
A water supply line made of ¼ inch (6.4 mm) OD, copper or stainless steel tubing. To determine the length of tubing needed, measure the distance from the ice maker inlet valve at the back of the refrigerator to your cold water pipe. Then add approximately 7 feet (2.1 meters), so the refrigerator can be moved out for cleaning (as shown).

A shutoff valve to connect the water supply line to your household water system. DO NOT use a self-piercing type shutoff valve.

A compression nut and ferrule (sleeve) for connecting a copper water supply line to the ice maker inlet valve.

4If you use copper tubing - Slide brass compression nut, then ferrule (sleeve) onto water supply line. Push water supply line into water valve inlet as far as it will go (¼ inch/6.4 mm). Slide ferrule (sleeve) into valve inlet and finger tighten compression nut onto valve. Tighten another half turn with a wrench; DO NOT over tighten. See Figure 1.

If you use stainless steel tubing - The nut and ferrule are already assembled on the tubing. Slide compression nut onto valve inlet and finger tighten compression nut onto valve. Tighten another half turn with a wrench; DO NOT over tighten. See Figure 2.

5With steel clamp and screw, secure water supply line (copper tubing only) to rear panel of refrigerator as shown.

6Coil excess water supply line (copper tubing only) about 2½ turns behind refrigerator as shown and arrange coils so they do not vibrate or wear against any other surface.

7Turn ON water supply at shutoff valve and tighten any connections that leak.

8Reconnect refrigerator to electrical power source.

9To turn ice maker on, lower wire signal arm (side mounted) or set the ice maker’s On/Off power switch to the “I” position (rear mounted).


Steel

Plastic Water Tubing

Clamp

to Ice Maker

Brass

Fill Tube


Compression


Nut


Ferrule


(Sleeve)


Copper


water line


Water Valve


Bracket


Valve Inlet


Water Valve

Copper water line

from household water supply

(Include enough tubing in loop to allow

moving refrigerator out for cleaning.)

Figure 1

Figure 2

NOTE

Check with your local building authority for recommendations on water lines and associated materials prior to installing your new refrigerator. Depending on your local/state building codes, Electrolux recommends for homes with existing valves its Smart Choice water line kit 5305513409 (with a 6 ft. stainless steel water line) and for homes without an existing valve, Electrolux recommends its Smart Choice water line kit 5304410264 (with a 20 ft. copper water line with self-tapping saddle valve). Please refer to www.frigidaire.com/store for more information.

IMPORTANT

After connecting the water supply, refer to “How to Prime the Water Supply System” for important information about priming an empty water supply system.

Your refrigerator’s water supply system includes several tubing lines, a water filter, a water valve, and a water tank.To ensure that your water dispenser works properly, this system must be completely filled with water when your refrigerator is first connected to the household water supply line.

4

Page 4
Image 4
Frigidaire 241856001 Connecting Water Supply, To Connect Water Supply Line To Ice Maker Inlet Valve

241856001 specifications

The Frigidaire 241856001 is a highly regarded refrigerator replacement part known for its reliability and efficiency. Specifically designed for various Frigidaire models, this component plays a vital role in maintaining optimal performance within the refrigerator system.

One of the main features of the 241856001 is its compatibility with a wide range of Frigidaire refrigerator models. This flexibility makes it a popular choice for homeowners and technicians alike, as it can easily replace older or worn-out parts and ensure continued functionality. The part is engineered to meet or exceed original specifications, which guarantees that users benefit from the same quality and performance as the original component.

The 241856001 is built with durable materials that are designed to withstand the rigors of daily use. This durability not only enhances the longevity of the product but also minimizes the need for frequent replacements, making it a cost-effective solution for anyone looking to keep their refrigerator running smoothly.

One notable technology incorporated in this part is its energy-efficient design. In an age where energy consumption is a pressing concern, the Frigidaire 241856001 contributes to lower energy bills by ensuring that the refrigerator operates at its most efficient capacity. This emphasis on energy efficiency aligns with modern consumers’ desires for sustainable and environmentally friendly appliances.

The installation of the 241856001 is straightforward, making it accessible for those who prefer DIY maintenance. Clear instructions are typically included, ensuring that users can confidently replace the component without needing professional assistance. This ease of installation is a significant advantage, as it saves both time and money.

Additionally, the Frigidaire 241856001 boasts a compact design that allows it to fit seamlessly within the confines of the fridge’s architecture. This characteristic ensures that the refrigerator maintains its aesthetic appeal while benefiting from the reliable functionality of this part.

Overall, the Frigidaire 241856001 is a crucial component that enhances the performance of various Frigidaire refrigerator models. With its compatibility, durability, energy efficiency, and easy installation process, it stands out as an excellent choice for those looking to replace or upgrade their refrigerator parts. Whether you are a homeowner or a technician, you can trust the Frigidaire 241856001 to deliver the quality and performance needed for a well-functioning refrigerator.