010

Sound

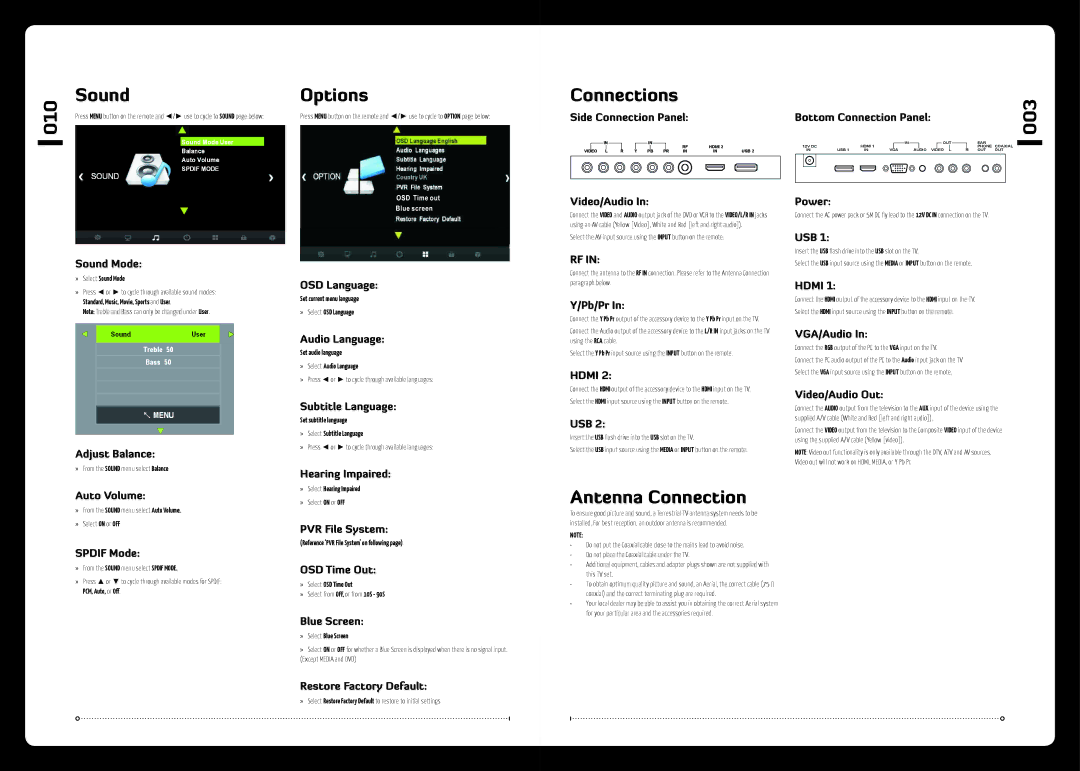
Press MENU button on the remote and ◄/► use to cycle to SOUND page below:

Sound Mode:

»» Select Sound Mode

»» Press ◄ or ► to cycle through available sound modes: Standard, Music, Movie, Sports and User.

Note: Treble and Bass can only be changed under User.

Adjust Balance:

»» From the SOUND menu select Balance

Auto Volume:

»» From the SOUND menu select Auto Volume.

»» Select ON or OFF

SPDIF Mode:

»» From the SOUND menu select SPDIF MODE.

»» Press ▲ or ▼ to cycle through available modes for SPDIF: PCM, Auto, or Off.

Options

Press MENU button on the remote and ◄/► use to cycle to OPTION page below:

OSD Language:

Set current menu language »» Select OSD Language

Audio Language:

Set audio language

»» Select Audio Language

»» Press ◄ or ► to cycle through available languages:

Subtitle Language:

Set subtitle language

»» Select Subtitle Language

»» Press ◄ or ► to cycle through available languages:

Hearing Impaired:

»» Select Hearing Impaired

»» Select ON or OFF

PVR File System:

(Reference ‘PVR File System’ on following page)

OSD Time Out:

»» Select OSD Time Out

»» Select from OFF, or from 10S - 90S

Blue Screen:

»» Select Blue Screen

»» Select ON or OFF for whether a Blue Screen is displayed when there is no signal input. (Except MEDIA and DVD)

Restore Factory Default:

Connections

Side Connection Panel:

IN


IN


Y


RF

HDMI 2


VIDEO L

R

Y

PB

PR

IN

IN

USB 2

Video/Audio In:

Connect the VIDEO and AUDIO output jack of the DVD or VCR to the VIDEO/L/R IN jacks using an AV cable (Yellow [Video], White and Red [left and right audio]).

Select the AV input source using the INPUT button on the remote.

RF IN:

Connect the antenna to the RF IN connection. Please refer to the Antenna Connection paragraph below.

Y/Pb/Pr In:

Connect the Y Pb Pr output of the accessory device to the Y Pb Pr input on the TV.

Connect the Audio output of the accessory device to the L/R IN input jacks on the TV using the RCA cable.

Select the Y Pb Pr input source using the INPUT button on the remote.

HDMI 2:

Connect the HDMI output of the accessory device to the HDMI input on the TV. Select the HDMI input source using the INPUT button on the remote.

USB 2:

Insert the USB flash drive into the USB slot on the TV.

Select the USB input source using the MEDIA or INPUT button on the remote.

Antenna Connection

To ensure good picture and sound, a Terrestrial TV antenna system needs to be installed. For best reception, an outdoor antenna is recommended.

NOTE:

Do not put the Coaxial cable close to the mains lead to avoid noise.

Do not place the Coaxial cable under the TV.

Additional equipment, cables and adapter plugs shown are not supplied with this TV set.

To obtain optimum quality picture and sound, an Aerial, the correct cable (75 Ω coaxial) and the correct terminating plug are required.

Your local dealer may be able to assist you in obtaining the correct Aerial system for your particular area and the accessories required.

Bottom Connection Panel:


003


HDMI 1

IN


OUT


EAR


12V DC


PHONE COAXIAL


IN

USB 1 IN

VGA AUDIO

VIDEO L

R OUT

OUT

Power:

Connect the AC power pack or 5M DC fly lead to the 12V DC IN connection on the TV.

USB 1:

Insert the USB flash drive into the USB slot on the TV.

Select the USB input source using the MEDIA or INPUT button on the remote.

HDMI 1:

Connect the HDMI output of the accessory device to the HDMI input on the TV.

Select the HDMI input source using the INPUT button on the remote.

VGA/Audio In:

Connect the RGB output of the PC to the VGA input on the TV.

Connect the PC audio output of the PC to the Audio input jack on the TV

Select the VGA input source using the INPUT button on the remote.

Video/Audio Out:

Connect the AUDIO output from the television to the AUX input of the device using the supplied A/V cable (White and Red [left and right audio]).

Connect the VIDEO output from the television to the Composite VIDEO input of the device using the supplied A/V cable (Yellow [video]).

NOTE: Video out functionality is only available through the DTV, ATV and AV sources. Video out will not work on HDMI, MEDIA, or Y Pb Pr.

»» Select Restore Factory Default to restore to initial settings

Page 5
Image 5
Fusion MS-TV190LED, MS-TV220LED installation manual Sound, Options, Connections, Antenna Connection, 003

MS-TV190LED, MS-TV220LED specifications

The Fusion MS-TV220LED and MS-TV190LED are two innovative models designed to meet the demand for high-quality marine televisions. These TV units combine advanced technology with user-friendly features, making them ideal companions for boaters and marine enthusiasts who want to enjoy captivating entertainment while cruising the waterways.

Both the MS-TV220LED and MS-TV190LED feature high-definition LED displays that ensure vibrant colors and sharp images, even in bright sunlight. This is crucial for outdoor viewing, where reflections and glare can often reduce visibility. The 22-inch and 19-inch screen options cater to different preferences and space requirements, making them versatile choices for various types of vessels, from yachts to fishing boats.

One of the standout features of these television models is their IP66-rated waterproof design. This characteristic allows the TVs to withstand splashes, rain, and high humidity levels commonly found in marine environments. As a result, boat owners need not worry about exposing their entertainment systems to unpredictable weather conditions.

Additionally, the Fusion MS-TV220LED and MS-TV190LED come equipped with multiple connectivity options, including HDMI, USB, and RCA inputs. This versatility enables users to connect a variety of external devices, such as streaming devices, gaming consoles, and satellite receivers, ensuring that entertainment is always at hand, whether it be movies, music, or games.

Another noteworthy aspect is the built-in digital tuner, which allows for the reception of over-the-air broadcast signals, providing access to local channels without the need for additional equipment. This feature is particularly useful for those who want to catch live sports or keep up with news while at sea.

Fusion's commitment to durability is evident in the solid construction of these models. They are designed to endure the rigors of life on the water, providing a long service life even under constant use.

In summary, the Fusion MS-TV220LED and MS-TV190LED are outstanding choices for marine entertainment, uniting high-definition displays with rugged, waterproof designs. Their connectivity options and built-in digital tuners further enhance their value, making them must-have additions for any vessel looking to elevate the onboard experience. With these televisions, boaters can enjoy their favorite content atop the waves, ensuring entertainment is never out of reach.