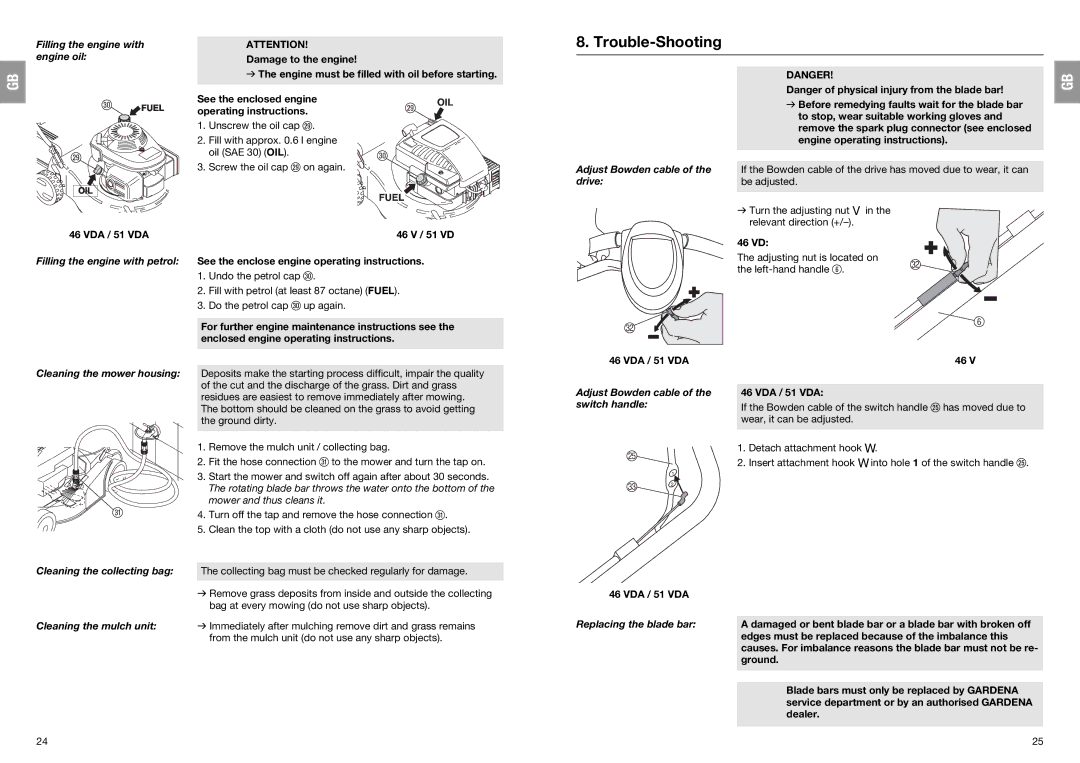
Filling the engine with engine oil:

GB

ATTENTION!

Damage to the engine!

v The engine must be filled with oil before starting.

8. Trouble-Shooting

DANGER!

Danger of physical injury from the blade bar!

GB

ö

l

See the enclosed engine operating instructions.

1.Unscrew the oil cap l.

2.Fill with approx. 0.6 l engine oil (SAE 30) (OIL).

3.Screw the oil cap l on again.

l

ö

Adjust Bowden cable of the drive:

v Before remedying faults wait for the blade bar to stop, wear suitable working gloves and remove the spark plug connector (see enclosed engine operating instructions).

If the Bowden cable of the drive has moved due to wear, it can be adjusted.

v Turn the adjusting nut V in the relevant direction (+/–).

46 VDA / 51 VDA

Filling the engine with petrol:

46 V / 51 VD

See the enclose engine operating instructions.

1.Undo the petrol cap ö.

2.Fill with petrol (at least 87 octane) (FUEL).

3.Do the petrol cap ö up again.

For further engine maintenance instructions see the enclosed engine operating instructions.

V

46 VD:

The adjusting nut is located on the left-hand handle 6.

V

6

Cleaning the mower housing:

ä

Cleaning the collecting bag:

Cleaning the mulch unit:

Deposits make the starting process difficult, impair the quality of the cut and the discharge of the grass. Dirt and grass residues are easiest to remove immediately after mowing. The bottom should be cleaned on the grass to avoid getting the ground dirty.

1.Remove the mulch unit / collecting bag.

2.Fit the hose connection ä to the mower and turn the tap on.

3.Start the mower and switch off again after about 30 seconds. The rotating blade bar throws the water onto the bottom of the mower and thus cleans it.

4.Turn off the tap and remove the hose connection ä.

5.Clean the top with a cloth (do not use any sharp objects).

The collecting bag must be checked regularly for damage.

v Remove grass deposits from inside and outside the collecting bag at every mowing (do not use sharp objects).

v Immediately after mulching remove dirt and grass remains from the mulch unit (do not use any sharp objects).

46 VDA / 51 VDA

Adjust Bowden cable of the switch handle:

O

1

W 2

46 VDA / 51 VDA

Replacing the blade bar:

46 V

46 VDA / 51 VDA:

If the Bowden cable of the switch handle g has moved due to wear, it can be adjusted.

1.Detach attachment hook W.

2.Insert attachment hook W into hole 1 of the switch handle g.

A damaged or bent blade bar or a blade bar with broken off edges must be replaced because of the imbalance this causes. For imbalance reasons the blade bar must not be re- ground.

Blade bars must only be replaced by GARDENA service department or by an authorised GARDENA dealer.

24

25

Page 6
Image 6
Gardena 4061, 4047, 4046, 4044 manual Trouble-Shooting

4044, 4061, 4046, 4047 specifications

Gardena is a well-known brand in the realm of garden tools and irrigation systems, providing a wide range of products designed to enhance the gardening experience. Among its popular offerings are the Gardena 4046, 4047, 4044, and 4061 models, each boasting unique features, technologies, and characteristics that cater to different gardening needs.

The Gardena 4046 is a reliable, robust lawn mower known for its precision and efficiency. It features a powerful electric motor, making it suitable for residential lawns. One of its standout technologies is the innovative grass comb, which allows for cutting right up to the edges of your lawn, ensuring a clean finish. The adjustable cutting height provides flexibility, allowing users to choose the perfect length for their grass. Its lightweight design ensures that maneuvering around garden furniture and obstacles is effortless.

In contrast, the Gardena 4047 offers a more compact option for those with smaller gardens or limited storage space. This model retains the same quality of cut as the 4046 but is specifically engineered for ease of use. It is equipped with a foldable handle, making it easy to store in tight spaces. Additionally, it's designed with a noise-reduction feature, making mowing less disruptive to the surrounding environment.

The Gardena 4044, on the other hand, is a versatile tool, functioning as both a lawn mower and a mulcher. This dual functionality is made possible by its unique blade design, which chops grass into fine pieces, thereby enriching the soil and promoting healthier growth. The 4044 also incorporates a user-friendly interface, making it accessible for gardeners of all skill levels.

Finally, the Gardena 4061 stands out as a high-end model that combines advanced technology with user-centered design. It features sensor technology that adjusts the cutting pattern based on the grass's growth rate, ensuring optimal performance. The 4061 also showcases a larger cutting width, allowing for faster mowing of larger areas. Additionally, the model is equipped with a smart connectivity feature, enabling users to control the mower remotely via a mobile app.

In summary, the Gardena 4046, 4047, 4044, and 4061 models are all designed to cater to various gardening preferences and needs, ranging from precision and compactness to dual-functionality and smart technology. By combining innovative features with user-friendly designs, Gardena continues to be a leader in the gardening tools market.