4. Initial Operation
7. Troubleshooting
Starting the Floating
Skimmer Set working:
GB
3 40 cm
Before using the Floating Skimmer Set in the pond the air distributor air outlets 2 must be turned outwards and the ties 3 must be fixed to the eyelets 4 (see 3. Assembly).
1. | Put the Floating Skimmer Set into the pond and submerge it |
| until it is completely full of water. |
2. | Use the ties 3 to fix the Floating Skimmer Set to the edge of |
| the pond in the prevailing wind direction. |
3. | To turn the pump on: |
| Plug the pump plug into a mains socket. |
| Beware: The pump will start immediately. |
4. | To turn the pump off: |
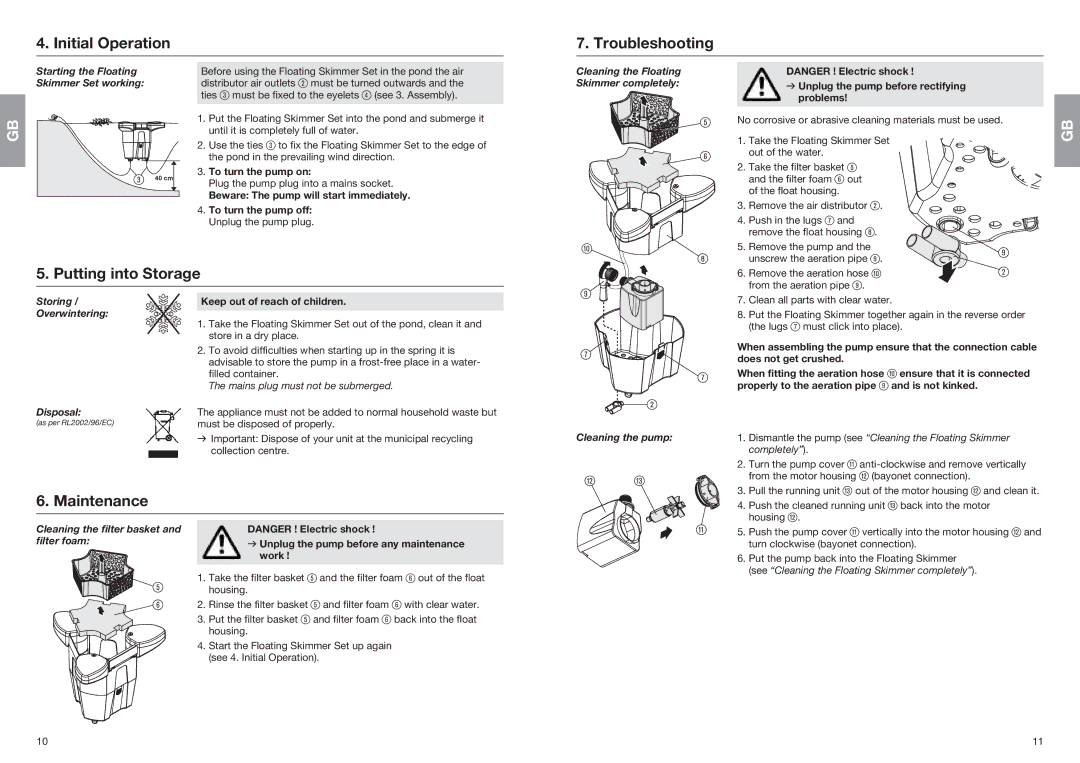
Cleaning the Floating | DANGER ! Electric shock ! |
Skimmer completely: | v Unplug the pump before rectifying |
| problems! |
5No corrosive or abrasive cleaning materials must be used.
1. Take the Floating Skimmer Set
6out of the water.
2. Take the filter basket 5 and the filter foam 6 out of the float housing.
3. Remove the air distributor 2.
GB
Unplug the pump plug. |
0
4. | Push in the lugs 7 and |
| ||
| remove | the float housing 8. |
| |
5. | Remove the pump and the | 9 | ||
8 | unscrew the aeration pipe 9. | |||
| ||||
5. Putting into Storage
Storing / | Keep out of reach of children. | |
Overwintering: | 1. Take the Floating Skimmer Set out of the pond, clean it and | |
| ||
| store in a dry place. | |
| 2. To avoid difficulties when starting up in the spring it is | |
| advisable to store the pump in a | |
| filled container. | |
| The mains plug must not be submerged. | |
Disposal: | The appliance must not be added to normal household waste but | |
(as per RL2002/96/EC) | must be disposed of properly. | |
| v Important: Dispose of your unit at the municipal recycling | |
| collection | centre. |
6. Maintenance
9![]()
7
2
Cleaning the pump:
we
6. Remove the aeration hose 0 | 2 |
from the aeration pipe 9. |
|
7.Clean all parts with clear water.
8.Put the Floating Skimmer together again in the reverse order (the lugs 7 must click into place).
When assembling the pump ensure that the connection cable does not get crushed.
7When fitting the aeration hose 0 ensure that it is connected properly to the aeration pipe 9 and is not kinked.
1.Dismantle the pump (see “Cleaning the Floating Skimmer
completely”).
2.Turn the pump cover q
3.Pull the running unit e out of the motor housing w and clean it.
4.Push the cleaned running unit e back into the motor housing w.
Cleaning the filter basket and filter foam:
5
6
DANGER ! Electric shock !
vUnplug the pump before any maintenance work !
1.Take the filter basket 5 and the filter foam 6 out of the float housing.
2.Rinse the filter basket 5 and filter foam 6 with clear water.
3.Put the filter basket 5 and filter foam 6 back into the float housing.
4.Start the Floating Skimmer Set up again (see 4. Initial Operation).
q5. Push the pump cover q vertically into the motor housing w and turn clockwise (bayonet connection).
6.Put the pump back into the Floating Skimmer (see “Cleaning the Floating Skimmer completely”).
10 | 11 |