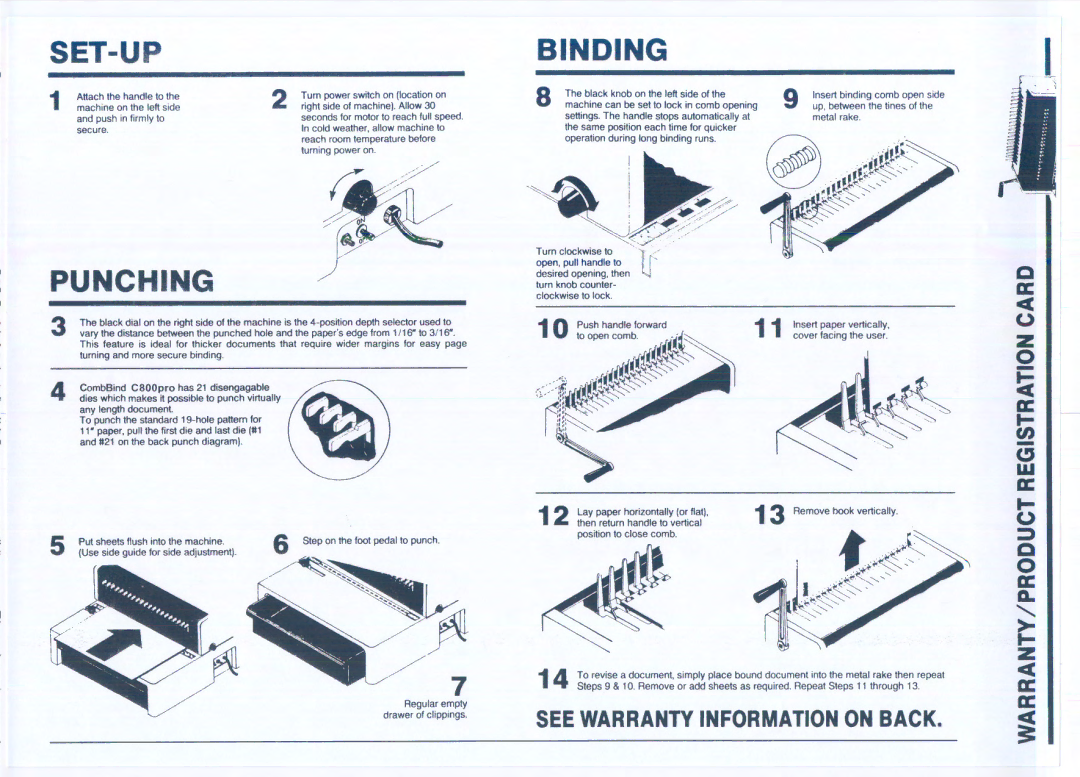
SET-UP
1 | Allach lhe handle 10 lhe | 2 | Tum power switch on (Iocalion on | |
machine on lhe left side | righl side of machine). Allow 30 | |||
| and push in firmly 10 |
| seconds for molor 10 reach full speed. | |
| secure. |
| In cold wealher, allow machine 10 | |
|
|
| reach | room lemperalure before |
|
|
| luming | power on. |
PUNCHING
3 The black dial on lhe right side of lhe machine is lhe
4 CombBind C800pro has 21 disengagable dies which makes it possible 10 punch virtually any length documenl
To punch lhe standard
11- paper, pull lhe first die and last die (#1 and #21 on lhe back punch diagraml.
5 | Put sheels flush inlo lhe machine. | 6 | Slep on lhe fool pedal 10 punch. |
(Use side guide for side adjuslment). |
|
Regular empty drawer of clippings.
BINDING
8 | The black | knob | on lhe left side of lhe | 9 | Insert binding comb open side | |||
machine | can be sei 10 lock | in comb opening | up, between lhe lines of lhe | |||||
| settings. The handle | stops | automalically ai |
| melal rake. | |||
| lhe same posilion each lime for quicker |
|
| |||||
| operalion during long binding runs. |
|
| |||||
|
|
|
|
|
| ~"/' |
|
|
|
| : | ~~ |
| ~// |
|
| |
|
|
| , |
|
| |||
| ~.;; | , |
|
| ||||
Tum | ' |
| ~ | ...- |
|
| ||
clock |
| . | / |
|
|
|
| |
oWlse 10
dpeeSlred.n,pullo'handle 10 lJ lum knobpeOlng,Ihen 1 I clock'wlse 10counlerlock. -
1 O ioU~h handle forward |
| Insert paper vertically, | |
| 11 cover facing lhe user. | ||
| pencomb'.~{{i!f;, |
| |
...~.. | .' {..~~ | ~ |
|
' | ~.~i~'~~""~. |
| |
(;>:ff |
|
| |
~ |
|
| |
.. | ~~ |
|
|
;::' . ~
1'''1 ~,.~~.
~",:~
12 | Lay | paper | horizonlally (or nall, | 13 | Remove I>ook vertically. |
Ihen | relurn | handle 10 vertical |
|
posilion 10close comb.
14 To revise a documenl, simply place bound documenl inlo lhe melal rake Ihen repeal Sleps 9 & 10. Remove or add sheels as required. Repeal Sleps 11 Ihrough 13.
SEE WARRANTY INFORMATION ON BACK.
L
-
-
.
.
.