Manuals
/
GE
/
Kitchen Appliance
/
Refrigerator
GE
197D3354P003 About the automatic icemaker, Instructions, Tips, Icemaker Accessory Kit
Models:
197D3354P003
1
10
96
96
Download
96 pages
24.93 Kb
7
8
9
10
11
12
13
14
Troubleshooting
Install
Warranty
Problem
Icemaker Accessory Kit
Control Settings
Cleaning the Outside
How to
Emplacement Du Réfrigérateur
Safety Precautions
Page 10
Image 10
Page 9
Page 11
Page 10
Image 10
Page 9
Page 11
Contents
Troubleshooting Tips
Care and Cleaning
Installation Instructions
Owner’s Manual and Installation Instructions
SAFETY PRECAUTIONS
IMPORTANT SAFETY INFORMATION READ ALL INSTRUCTIONS BEFORE USING
Safety Instructions
USE OF EXTENSION CORDS
Installation Instructions Troubleshooting Tips Consumer Support
PROPER DISPOSAL OF THE REFRIGERATOR
Operating Instructions
Troubleshooting Tips
HOW TO CONNECT ELECTRICITY
READ AND FOLLOW THIS SAFETY INFORMATION CAREFULLY
SAVE THESE INSTRUCTIONS
Control Settings
About the controls on the refrigerator
About the shelves and bins
Instructions Operating Instructions Safety Instructions
Troubleshooting Tips Installation
Support
Adjustable Bins on the Door
Safety
Installation
Tips Consumer Support
About the crispers and pans
Adjustable Humidity Crisper on some models
Fruit and Vegetable Crispers
Instructions Operating Instructions Installation
About the additional features
Instructions Troubleshooting
About crisper removal
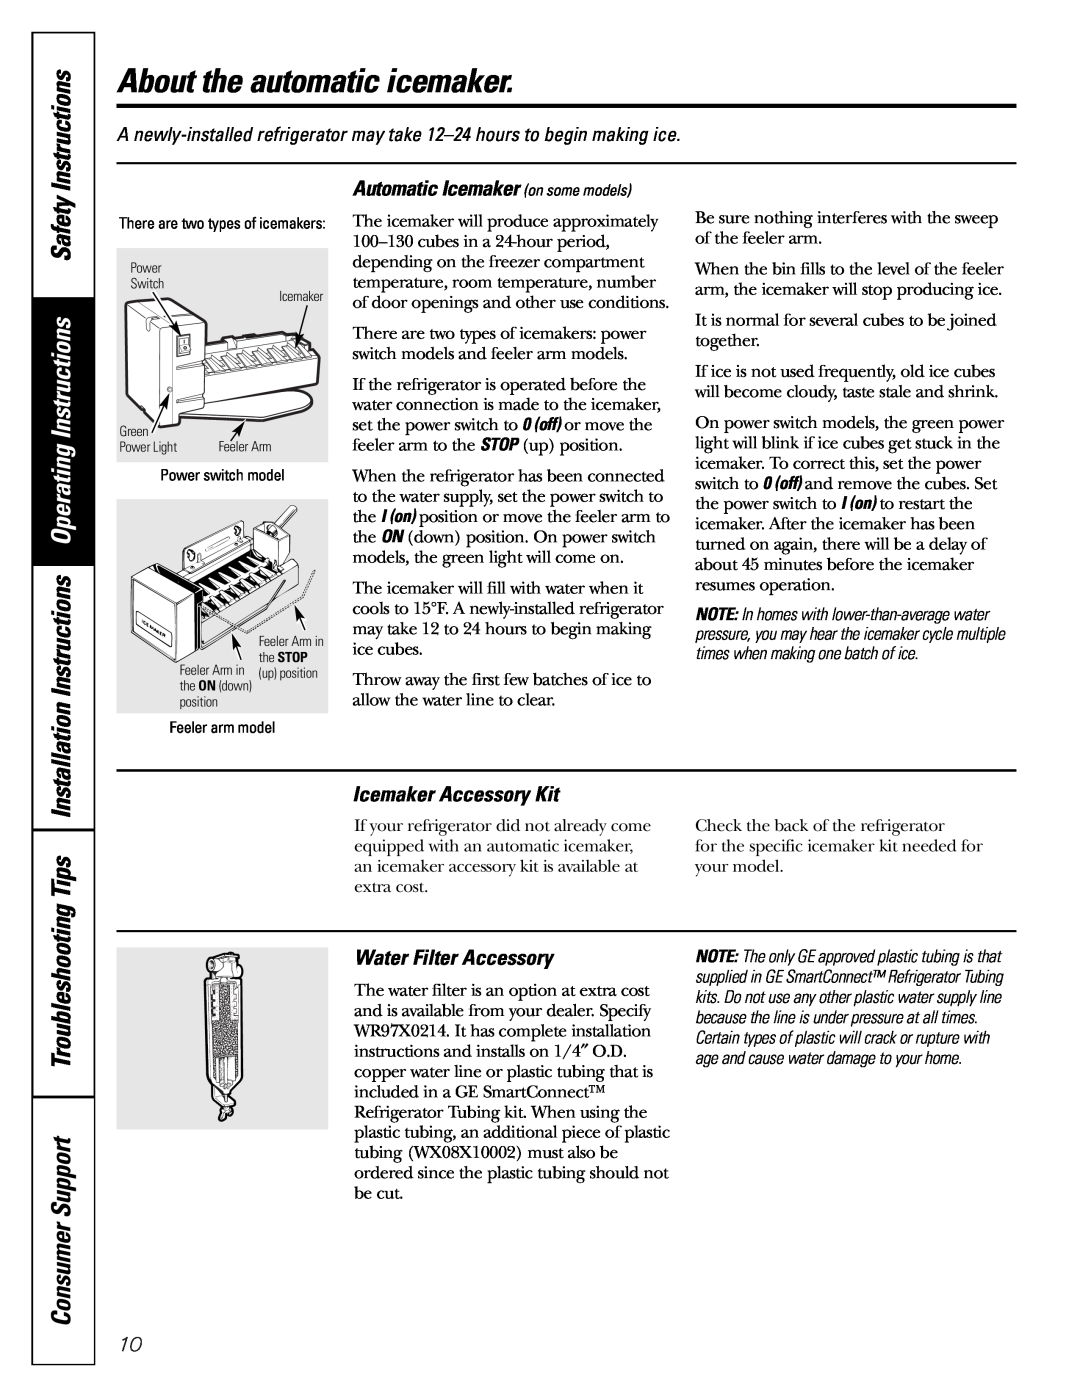
Icemaker Accessory Kit
Consumer Support Troubleshooting
Installation Instructions Operating Instructions Safety
Water Filter Accessory
Instructions Troubleshooting Tips
Care and cleaning of the refrigerator
Instructions Installation
Cleaning the Outside
Instructions Operating
Instructions Safety
Replacing the light bulbs
Preparing for Vacation
BEFORE YOU BEGIN
Installation Instructions
Refrigerator
Models 18 and
BEFORE YOU BEGIN
Installation Instructions INSTALLING THE WATER LINE ON SOME MODELS
WHAT YOU WILL NEED
1 SHUT OFF THE MAIN WATER SUPPLY
Installation Instructions
WHAT YOU WILL NEED CONT
2 CHOOSE THE VALVE LOCATION
5 TIGHTEN THE PIPE CLAMP
Installation Instructions INSTALLING THE WATER LINE CONT
4 FASTEN THE SHUTOFF VALVE
6 ROUTE THE TUBING
11 PLUG IN THE REFRIGERATOR
CONNECT THE TUBING TO THE REFRIGERATOR
10 TURN THE WATER ON AT THE SHUTOFF VALVE
START THE ICEMAKER
TOOLS YOU WILL NEED
Installation Instructions REVERSING THE DOOR SWING
IMPORTANT NOTES
1 REMOVE THE FREEZER DOOR
TRANSFER TOP HINGE TO THE LEFT
2 REMOVE THE REFRIGERATOR DOOR
Do not tighten screws on hinge side at this time
5 TRANSFER CENTER HINGE BRACKET TO THE LEFT
Installation Instructions REVERSING THE DOOR SWING CONT
4 TRANSFER BOTTOM HINGE BRACKET TO THE LEFT
6 TRANSFER DOOR STOPS
7 TRANSFER REFRIGERATOR DOOR HANDLE TO THE RIGHT
7 TRANSFER REFRIGERATOR DOOR HANDLE TO THE RIGHT CONT
8 TRANSFER FREEZER DOOR HANDLE TO THE RIGHT
9 REHANG THE REFRIGERATOR DOOR
Be sure the washer is in place
REHANG THE FREEZER DOOR
Lower the freezer door onto the center hinge pin
Lift the top hinge so the pin fits into the door socket
Consumer Support Troubleshooting Tips
Before you call for service…
Installation Instructions Operating Instructions Safety
Normal operating sounds
Instructions Operating
refrigerator when doors
Moisture collects inside
General Electric Company
GE Service Protection Plus
Warranty Registration Department P.O. Box Louisville, KY
No Matter What Brand
Serial Number
Follow these three steps to protect your new appliance investment
Model Number
Consumer Product Ownership Registration
WHAT IS NOT COVERED
CONSUMER WARRANTY
TERMS AND CONDITIONS
GE Will Replace
Operating Instructions Safety Instructions
Consumer Support Troubleshooting Tips Installation
What GE Will Not Cover
Safety Instructions
Installation Instructions
Soutien au
Mesures de sécurité Fonctionnement Installation Conseils de dépannage
Instructions d’installation
consommateur
INSTRUCTIONS IMPORTANTES DE SÉCURITÉ
Fonctionnement Installation Conseils de dépannage
AVERTISSEMENT
LISEZ TOUTES LES INSTRUCTIONS AVANT
UTILISATION DE RALLONGES ÉLECTRIQUES
Installation Conseils de dépannage
LISEZ TOUTES LES INSTRUCTIONS AVANT D’UTILISER VOTRE RÉFRIGÉRATEUR
Fonctionnement
UTILISATION DE FICHES INTERMÉDIAIRES OU D’ADAPTATION
BRANCHEMENT ÉLECTRIQUE
CONSERVEZ CES INSTRUCTIONS
Conseils de dépannage
Mesures de sécurité
Réglages de votre réfrigérateur
Réglages de votre réfrigérateur
Fonctionnement
Clayettes anti-déversement sur certains modèles
Les clayettes et les bacs
Disposition des clayettes
Tous les modèles n’ont pas toutes ces caractéristiques
Clayette coulissante anti-déversement sur certains modèles
de sécurité
Conseils de dépannage
Bacs réglables de porte
Bacs à fruits et légumes
Bacs à légumes
Bac à légumes à humidité réglable sur certains modèles
dépannage
Enlèvement du bacs à légumes
Caractéristiques additionnelles
Conseils de
Machine à glaçons automatique
Trousse accessoire de machine à glaçons
Accessoire de filtre à eau
sécurité
consommateur
Soins et nettoyage de votre réfrigérateur
Mesures de
Nettoyage de l’extérieur
Préparation de départ en vacances
Remplacement des ampoules électriques
Installation
Préparation de déménagement
Réfrigérateur
Instructions d’installation
EMPLACEMENT DU RÉFRIGÉRATEUR
AVANT DE COMMENCER
AVANT DE COMMENCER
Instructions d’installation
ROULETTES SUITE
AVANT DE COMMENCER SUITE
CE DONT VOUS AUREZ BESOIN
Instructions d’installation INSTALLATION DE LA CONDUITE D’EAU SUITE
SUITE
4 FIXEZ LE ROBINET D’ARRÊT
2 CHOISISSEZ L’EMPLACEMENT DU ROBINET
3 PERCEZ UN TROU POUR LE ROBINET
5 SERREZ LE COLLIER DE SERRAGE
8 PURGEZ LE TUYAU
7 BRANCHEZ LE TUYAU AU ROBINET
BRANCHEZ LE TUYAU À VOTRE RÉFRIGÉRATEUR
Presse-joint
11 BRANCHEZ VOTRE RÉFRIGÉRATEUR
10 FERMEZ L’EAU AU NIVEAU DU ROBINET D’ARRÊT
METTEZ EN MARCHE LA MACHINE À GLAÇONS
OUTILS REQUIS
Instructions d’installation INVERSION DU SENS D’OUVERTURE DES PORTES
NOTES IMPORTANTES
1 ENLEVEZ LA PORTE DU COMPARTIMENT CONGÉLATION
FAITES PASSER LA CHARNIÈRE SUPÉRIEURE À GAUCHE
2 ENLEVEZ LA PORTE DU COMPARTIMENT RÉFRIGÉRATION
Ne serrez pas les vis du côté de la charnière lors de cette opération
6 FAITES PASSER LES BUTÉES DE PORTE À GAUCHE
INVERSION DU SENS D’OUVERTURE DES PORTES SUITE
GAUCHE
4 FAITES PASSER LE SUPPORT DE CHARNIÈRE INFÉRIEURE À
SUITE
RÉFRIGÉRATION À DROITE
7 FAITES PASSER LA POIGNÉE DE PORTE DU COMPARTIMENT
9 ACCROCHEZ À NOUVEAU LA PORTE DU COMPARTIMENT RÉFRIGÉRATION SUITE
CONGÉLATION À DROITE SUITE
9 ACCROCHEZ À NOUVEAU LA PORTE DU COMPARTIMENT RÉFRIGÉRATION
10 ACCROCHEZ À NOUVEAU LA PORTE DU COMPARTIMENT CONGÉLATION
Bruits normaux de fonctionnement
Fonctionnement Installation
Conseils de dépannage
Solutions
Mesures de sécurité Fonctionnement Installation
Avant d’appeler un réparateur…
En cas de panne
Conseils de dépannage
Mesures de sécurité Fonctionnement Installation
Solutions
consommateur
Avant d’appeler un réparateur…
MODALITÉS
GARANTIE DU CONSOMMATEUR
CE QUI N’EST PAS COUVERT
Soutien au consommateur
Service de réparations
Pièces et accessoires
Site Web appareils électroménagers GE
Soutien au consommateur
seguridad
problemas
Información de
Instrucciones de
IMPORTANTE INFORMACIÓN DE SEGURIDAD
problemas
¡ADVERTENCIA
PRECAUCIONES DE SEGURIDAD
ELIMINACIÓN APROPIADA DEL REFRIGERADOR
¡PELIGRO! RIESGO DE QUE LOS NIÑOS SE QUEDEN ATRAPADOS
LEA TODAS LAS INSTRUCCIONES ANTES DE SU USO
USO DE CABLES DE EXTENSIÓN
LEA Y SIGA CUIDADOSAMENTE ESTA INFORMACIÓN DE SEGURIDAD
CÓMO CONECTAR LA ELECTRICIDAD
USO DE ENCHUFES ADAPTADORES
CONSERVE ESTAS INSTRUCCIONES
Instrucciones de
Sobre los controles del refrigerador
Niveles de los controles
operación
Instrucciones para instalación
Sobre los estantes y compartimientos
consumidor
seguridad
Soporte al consumidor
problemas
Instrucciones para la instalación
Estante deslizante a prueba de salpicaduras en algunos modelos
Gaveta preservadora de frutas y vegetales
Sobre las gavetas de almacenamiento
Instrucciones para
Gaveta preservadora de humedad ajustable en algunos modelos
Instrucciones
Sobre retirar la gaveta preservadora de alimentos
Sobre las características adicionales
Soporte al consumidor
Kit de accesorios de la máquina de hielos
Sobre la máquina de hielos automática
Información
Accesorio del filtro de agua
Instruccionespara la instalación
Cuidado y limpieza del refrigerador
Información de
Limpieza exterior
Cómo prepararse para las vacaciones
Cómo reemplazar las bombillas
Instrucciones
Cómo prepararse para trasladarse
ANTES DE INICIAR
Instrucciones para la Instalación
Refrigerador
Modelos 18 y
ON SOME MODELS
Instrucciones para la instalación CÓMO INSTALAR LA TUBERÍA DEL AGUA
QUÉ NECESITA
QUÉ NECESITA CONT
Instrucciones para la instalación
CÓMO INSTALAR LA TUBERÍA DEL AGUA CONT
2 SELECCIONE LA UBICACIÓN DE LA VÁLVULA
5 APRIETE LA ABRAZADERA DEL TUBO
4 INSTALE LA VÁLVULA DE CIERRE
7 CONECTE LA TUBERÍA A LA VÁLVULA
6 DIRIJA LA TUBERÍA
11 CONECTE EL REFRIGERADOR
9 CONECTE LA TUBERÍA AL REFRIGERADOR
10 ABRA LA LLAVE DEL AGUA EN LA VÁLVULA DE CIERRE
INICIE LA MÁQUINA DE HIELOS
HERRAMIENTAS REQUERIDAS
CÓMO INVERTIR EL VAIVÉN DE LA PUERTA
NOTAS IMPORTANTES
1 RETIRE LA PUERTA DEL CONGELADOR
TRASLADE LA BISAGRA SUPERIOR A LA IZQUIERDA
CÓMO INVERTIR EL VAIVÉN DE LA PUERTA CONT
2 RETIRE LA PUERTA DEL REFRIGERADOR
No apriete los tornillos en el lado de la bisagra en este momento
4 TRASLADE EL SOPORTE DE LA BISAGRA INFERIOR A LA
IZQUIERDA
6 TRASLADE LOS TOPES DE LA PUERTA
5 TRASLADE EL SOPORTE DE LA BISAGRA CENTRAL HACIA LA
HACIA LA DERECHA CONT
7 TRASLADE LA MANIJA DE LA PUERTA HACIA LA DERECHA
7 TRASLADE LA MANIJA DE LA PUERTA DEL REFRIGERADOR
TRASLADE LA MANIJA DE LA PUERTA DEL CONGELADOR A LA DERECHA
9 VUELVA A COLGAR LA PUERTA DEL REFRIGERADOR
10 VUELVA A COLGAR LA PUERTA DEL CONGELADOR
instalación
problemas
Sonidos normales de operación
para la
Instruccionespara la instalación
problemas
Antes de llamar a solicitar servicio…
Soporte al consumidor
para la de problemas
solución
Consejos para la
solución de problemas
Notas
Instrucciones para la instalación
solución de problemas
Consejos para la
solución de problemas
Notas
Instrucciones para la instalación
Información de
solución de problemas
Notas
Instrucciones de
Consejos para la
solución de problemas
Notas
Instrucciones para la instalación
Información de
GE reemplazará
Garantía del Refrigerador
Durante
Lo que GE no cubrirá
Solicite una reparación
Soporte al Consumidor
Página Web de GE Appliances
Garantías ampliadas
Consumer Support
Schedule Service
Parts and Accessories
GE Appliances Website
Top
Page
Image
Contents