We bring good things to life.
IMPORTANT INFORMATION
NOTICE: This product meets the applicable Industry Canada technical specifications.
The equipment must be installed using an acceptable method of connection. The customer should be aware that compliance with the above conditions may not prevent degradation of service in some situations.
Repairs to certified equipment should be made by an authorized Canadian maintenance facility designated by the supplier. Any repairs or alterations made by the user to this equipment, or equipment malfunctions, may give the telecommunications company cause to request the user to disconnect the equipment.
Users should ensure for their own protection that the electrical ground connections of the power utility, telephone lines and internal metallic water pipe systems, if present, are connected together. This precaution may be particularly important in rural areas.
CAUTION: Users should not attempt to make such connections themselves, but should contact the appropriate electric inspection authority, or electrician, as appropriate.
NOTES: This equipment may not be used on coin service provided by the telephone company.
INTERFERENCE INFORMATION
This equipment generates and uses radio frequency energy which may interfere with residential radio and television reception if not properly installed and used in accordance with instructions contained in this manual. Reasonable protection against such interference is ensured, although there is no guarantee this will not occur in a given installation. If interference is suspected and verified by switching this equipment on and off, the user is encouraged to try to correct the interference by one or more of the following measures: Reorient the radio/television receiverÕs antenna, relocate the equipment with respect to the receiver, plug the equipment and receiver into separate circuit outlets. The user may also wish to consult a qualified radio/television technician for additional suggestions. This equipment has been fully tested and complies with all limits for Class B computing devices pursuant to part 15 FCC Rules and Regulations. This apparatus does not exceed the class B limits for RF noise emissions specified in the RFI regulations of the Industry Canada.
REN NUMBER IS LOCATED ON THE CABINET BOTTOM
INTRODUCTION
CAUTION: When using telephone equipment, there are basic safety instructions that should always be followed. Refer to the IMPORTANT SAFETY INSTRUCTIONS provided with this product and save them for future reference.
Your Caller ID phone stores and displays specific information, provided by your local telephone company, to subscribers of Caller ID or similar caller identification services.
Your Caller ID phone enables you to:
¥Identify callers before you answer the phone.
¥View the time and date of each incoming call.
¥Record up to 50 Caller ID messages sequentially.
¥Know who called while you were away.
To get the most from your new phone, we suggest that you take a few minutes right now to read through this userÕs guide.
IMPORTANT: In order to use all the features of this unit, you must subscribe to the standard Name/Number Caller ID Service or Call Waiting Caller ID Service available from your local telephone company. To know who is calling while you are on the phone, you must subscribe to Call Waiting Caller ID Service.
To use this phone, you need an RJ11C (CA11A) type | |
modular telephone jack, which might look like the | Telephone |
one pictured here, installed in your home. If you | line jack |
donÕt have a modular jack, call your local phone company to find out how to get one installed.
IMPORTANT INSTALLATION INFORMATION
CAUTION: Disconnect the phone cord from the wall outlet before installing or replacing the batteries.
¥Never install telephone wiring during a lightning storm.
¥Never touch non-insulated telephone wires or terminals, unless the telephone line has been disconnected at the network interface.
¥Use caution when installing or modifying telephone lines.
¥Never install telephone jacks in wet locations unless the jack is specifically designed for wet locations.
INSTALLING THE BATTERIES
IMPORTANT: You will have approximately 60 seconds to replace the batteries before the memories stored in the handset are lost. Please read the instructions before replacing the batteries and have the batteries ready to be inserted beforehand. As a precaution, you may want to write down any stored information you do not want erased.
Battery compartment
Your Caller ID phone uses 4 AA-size alkaline batteries for receiving and storing Caller ID records and for the numbers you use for memory dialing.
1.If both the straight and coiled line cords are already connected, disconnect them from the base unit. Place the handset aside.
2.Use a ballpoint pen or other tool to open the battery compartment door.
3.Insert 4 AA-size alkaline batteries (not included) as shown on the diagram inside the compartment.
4.Replace the battery compartment door.
5.Re-attach the line cords to the unit and check your memory locations. If installation takes longer than 90 seconds, you should re-set your memory locations.
IMPORTANT: If you’re not going to use the telephone for more than 30 days, remove the batteries because they can leak and damage the unit.
INSTALLING THE PHONE
Choose the best location to install your telephone.Your telephone should be placed on a level surface, such as a desk or table top, or you may mount it on the wall.
3
2
1
CONNECTING THE TELEPHONE LINE
1.Plug the coiled cord into the jack on the handset.
2.Plug the long straight line cord into a modular wall telephone jack.
3.Set the RINGER switch on the base to HI.
 = HI - Sound will be loudest.
 = LOW - Sound will be lower.
  = OFF - Telephone will not ring.
4.Place the handset in the cradle.
NOTE: The unit is properly installed if you pick up the handset and hear the dial tone. Otherwise, recheck all the installation steps.
WALLMOUNTING THE PHONE
Your telephone may also be mounted on the wall (wall plate not included).
NOTE: To prevent the handset from falling out of the cradle while the phone is hanging on the wall, you must reverse the handset hook (located on the base).
| 4ghi | 5jkl | 6mno | delete | | | |
| 7rspq | 8tuv | 9yzwx | | + | |
store | *tone | 0oper | # | button | d | o | options |
sn |
| | | | | te | t | |
| | | | | pi | |
| | | | | e | dial | |
| | | | | l | |
| | | | | e | o | button |
button | | | | | | - |
store | mem | redial | | | | |
| | flash | | redial button | | | |
mem | | | | | | | arrow |
button | | | | flash button | | |
| | | | | buttons |
| | | | | | |
SETTING UP THE CALLER ID MENU
IMPORTANT: Do not plug the telephone into the wall jack while setting up the Caller ID menu because an incoming call may invalidate the information not yet saved.
1. | Place the handset in the cradle on the base. |
2. | Press the options button. SET | OR | appears in the display. |
3.Press either REVIEW up or down button to scroll among the 7 menu screens, which are:
¥ SET OR
¥LOCAL AREA CODE (default - - -)
¥REGIONAL ACÕS-1(default - - - - - - - - -)
¥CID LANGUAGE (default English)
¥SELECT CONTRAST (default 3)
¥T/P DIAL MODE (default tone)
¥EXIT SETUP
NOTE: You may press dial anytime to exit the Caller ID Set Up menu.
If no buttons are pressed within 10 seconds, the phone automatically exists the Caller ID Set Up menu and returns to the NO CALLS summary screen.
LOCAL AREA CODE
The telephone uses the programmed area code to determine the number format to display when a valid Caller ID signal is received. It is also used for the Dialback feature.
1. | Press the options button. SET OR appears in the display. |
2. | Press the (+) button until LOCAL AREA CODE:_ _ _ appears in the display. |
3.To enter or change the area code, press the options button. The display shows the area code stored in memory. The left-most digit, or a minus sign (-) flashes, indicating the unit is ready to accept the area code entry.
4. | Press (-) and select a number from 9-0 for the first digit. |
5. | When the desired digit is flashing, press (+) to advance to the |
| next digit. |
6.Repeat steps 4 and 5 until all the digits for your area code are correct.
NOTE: If you make a mistake, you can simply repeat the previous steps until your area code is set.
7.Press options to store the area code and return to the LOCAL AREA COSE display.
REGIONAL AREA CODES FOR 10-DIGIT DIALING
Like the Local Area Code, the telephone uses the programmed area codes to determine the number format to display when a valid Caller ID signal is received. Calls that match any of the programmed regional area codes are displayed as 10 digits. This is helpful in areas that have multiple or overlapping area codes and require 10-digit dialing.
1. Press the options button. SET OR appears in the display.
2. Press the (+) button until REGIONAL ACÕS-1:_ _ _ _ _ _ _ _ _ shows in the display.
3.To enter or change the area code, press the options button. The display shows the area code stored in memory. The left-most digit, or minus sign (-), flashes, indicating the unit is ready to accept the area code entry.
4. Press the (-) button, and select a number from 9-0 for the first digit of the area code.
5. When the desired digit is flashing, press the (+) button to advance to the next digit.
6.Press the options button again to enter the next three-digit regional area code and repeat steps 4 and 5 until all the REGIONAL AC'S-1 (RAC#1) and REGIONAL AC'S-2 (RAC#1) are entered. A total of 6 sets of Regional Area Codes may be entered.
7.Press the options button to store the setting and return to the REGIONAL ACÕS display.
8.Press dial to exit.
CID LANGUAGE
This setting allows you to display Caller ID messages in English, French or Spanish.
1. | Press the options button. SET OR appears in the display. |
2. | Press the (+) button until CID LANGUAGE appears in the display. |
3.Press the options button to show the current language setting.The default is English.
4. Press the (+) or (-) button to change the language.
5.Press options to store the language and return to the CID LANGUAGE display.
SELECT CONTRAST
ADJUSTING THE VOLUME
You may control the listening level with the VOLUME switch, which has three levels.
It remains at the last level set until you change it.
REDIALING A NUMBER
If you want to call the last number you dialed again (up to 32 digits), use the redial feature.
1.Pick up the handset.
2.Press the redial button.
3.The last number called is automatically redialed.
USING ONE TOUCH REDIAL
If the last call you dialed was busy, you can redial it immediately by just pressing the redial button and without hanging up the handset.
MEMORY
Before you store a telephone number in memory, make sure the dialing mode is correctly set for the type of service you have. The default dialing mode is tone (touch-tone), so if you have pulse (rotary) service, you must first change the dialing mode. See ÒTo Set the Dial Mode.Ó The following buttons can be stored into any memory location: 0-9.
STORING FREQUENTLY CALLED NUMBERS
1.Pick up the handset.
2.Press the store button.
3.Push the desired memory location button.
4.Press the store button.
5.Use the handset number keys to enter the telephone number (up to 16-digits) and press the store button.
6.Hang up the handset.
NOTE: If you make a mistake, use the delete button to delete wrong digits.
CHANGING A STORED NUMBER
Repeat the storage sequence above. The new number replaces the old number at the memory location.
ERASING A STORED NUMBER
1.Pick up the handset.
2.Press the store button.
3.Press the memory location (0-9) to be erased.
4.Press delete for three seconds until the number in the display is erased.
5.Hang up the handset.
DIALING FREQUENTLY CALLED NUMBERS
1.Pick up the handset and press the mem button.
2.Press 0-9 for the memory location. The number dials automatically.
OR
1.Pick up the handset and press the dial button.
2.Press the review button for the desired memory location.
3.Press the dial button to dial the number.
OR
1.Press dial button while the handset is still in the cradle.
2.Press the review button for the desired memory location, lift the handset and the number dials automatically.
REVIEWING NUMBERS STORED IN MEMORY
1.Press the store button.
2.Press 0-9 for the memory location. The number shows on the display.
COPY CALLER ID MEMORY TO USER MEMORY
1. | Pickup the handset. |
2. | Press either review ( or ) button to display the number you want |
| to copy. |
3.Press the store button.
4.Press 0-9 for the memory location. The display flashes if the memory location is occupied.
5.Press the store button twice to replace the new information with the old,
or press either review ( or ) button to select an empty location.The number is automatically stored.
6. Press the hook switch to exit.
COPY REDIAL MEMORY TO USER MEMORY
1.Pickup the handset.
2.Press store.
3.Press 0-9 for the memory location.The display flashes if the memory
location is occupied. Press either review ( or ) button to select a different location.The display flashes if the memory location is occupied.
4.Press the store button again to confirm.
5.Press the redial button, and then press the store button again.
6.Press the flash button or the hook switch to exit.
STORING A PAUSE IN MEMORY
The redial button has dual functionality. It becomes a pause button if the store button is pressed first. It is valid only when storing a number into memory. Use the redial button to insert a pause when a delay is needed in an automatic dialing sequence. For example, when you must dial a 9 to get an outside line, or when you enter codes to access your
require an extra monthly fee. If you subscribe to any of these services, please refer to the phone companyÕs instructions on how to use flash.
To answer an incoming call while having a conversation:
¥After you hear the Call Waiting tone, press and release the flash button. The first call is placed on hold while the second call can be answered.
To return to your first call and put the second call on hold:
¥Press and release flash again. The first call can continue while the second call is put on hold.
USING TEMPORARY TONE DIALING
If you have pulse service, you can temporarily change from pulse to tone service. After dialing the telephone number, press and release the *TONE button on the telephone. This allows access to phone services that require a tone, such as banking and long-distance services. After you hang up the handset, the telephone automatically returns to pulse service.
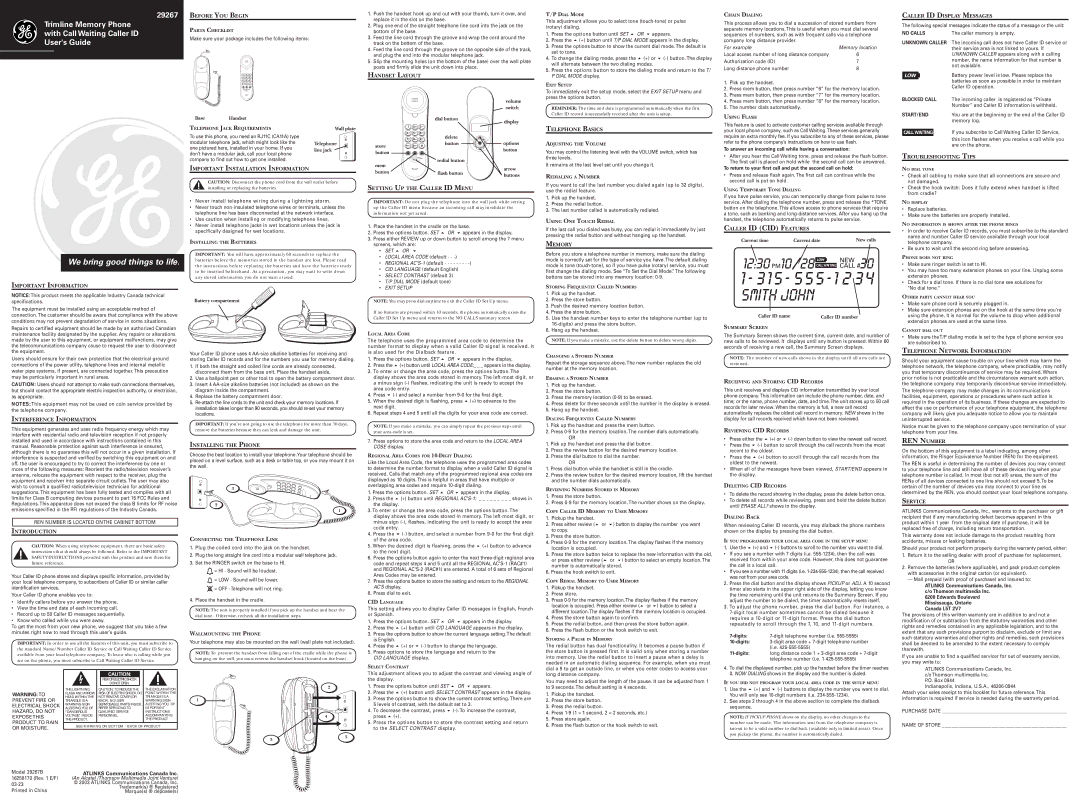
CALLER ID (CID) FEATURES
Current time Current dateNew calls
1 - 3 1 5 - 5 5 5 - 1 2 3 4
SMITH JOHN
Caller ID name | Caller ID number |
SUMMARY SCREEN
The Summary Screen shows the current time, current date, and number of new calls to be reviewed. It displays until any button is pressed. Within 60 seconds of receiving a new call, the Summary Screen displays.
NOTE: The number of new calls shows in the display until all new calls are reviewed.
RECEIVING AND STORING CID RECORDS
This unit receives and displays CID information transmitted by your local phone company.This information can include the phone number, date, and time; or the name, phone number, date, and time.The unit stores up to 50 call records for later review. When the memory is full, a new call record automatically replaces the oldest call record in memory. NEW shows in the display for call records received which have not been reviewed.
REVIEWING CID RECORDS
¥ | Press either the (+) or (-) down button to view the newest call record. |
¥ | Press the | (-) button to scroll through the call records from the most |
| recent to the oldest. |
¥ | Press the | (+) button to scroll through the call records from the |
| oldest to the newest. |
¥When all of the messages have been viewed, START/END appears in the display.
DELETING CID RECORDS
¥To delete the record showing in the display, press the delete button once.
¥To delete all records while reviewing, press and hold the delete button until ERASE ALL? shows in the display.
DIALING BACK
When reviewing Caller ID records, you may dialback the phone numbers shown on the display by pressing the dial button.
IF YOU PROGRAMMED YOUR LOCAL AREA CODE IN THE SETUP MENU
1. Use the (+) and (-) buttons to scroll to the number you want to dial.
¥If you see a number with 7 digits (i.e. 555-1234), then the call was received from within your area code. However, this does not guarantee the call is a local call.
¥If you see a number with 11 digits (i.e. 1-234-555-1234), then the call received was not from your area code.
2.Press the dial button and the display shows PICKUP or ADJ. A 10 second timer also starts in the upper right side of the display, letting you know the time remaining until the unit returns to the Summary Screen. If you adjust the number to be dialed, the timer automatically resets itself.
3.To adjust the phone number, press the dial button. For instance, a 7-digit local number sometimes cannot be dialed because it requires a 10-digit or 11-digit format. Press the dial button repeatedly to scroll through the 7, 10, and 11-digit numbers.
7-digits:7-digit telephone number (i.e. 555-5555)
10-digits:3-digit area code + 7-digit telephone number (i.e. 425-555-5555)
11-digits:long distance code 1 + 3-digit area code + 7-digit telephone number (i.e. 1-425-555-5555)
4. To dial the displayed number, pick up the handset before the timer reaches |
CALL WAITING | If you subscribe to Call Waiting Caller ID Service, |
| this icon flashes when you receive a call while you |
| are on the phone. |
TROUBLESHOOTING TIPS
NO DIAL TONE
¥Check all cabling to make sure that all connections are secure and not damaged.
¥Check the hook switch: Does it fully extend when handset is lifted from cradle?
NO DISPLAY
¥Replace batteries.
¥Make sure the batteries are properly installed.
NO INFORMATION IS SHOWN AFTER THE PHONE RINGS
¥In order to receive Caller ID records, you must subscribe to the standard name and number Caller ID service available through your local telephone company.
¥Be sure to wait until the second ring before answering.
PHONE DOES NOT RING
¥Make sure ringer switch is set to HI.
¥You may have too many extension phones on your line. Unplug some extension phones.
¥Check for a dial tone. If there is no dial tone see solutions for "No dial tone."
OTHER PARTY CANNOT HEAR YOU
¥Make sure phone cord is securely plugged in.
¥Make sure extension phones are on the hook at the same time you're using the phone. It is normal for the volume to drop when additional extension phones are used at the same time.
CANNOT DIAL OUT
¥Make sure the T/P dialing mode is set to the type of phone service you are subscribed to.
TELEPHONE NETWORK INFORMATION
Should your equipment cause trouble on your line which may harm the telephone network, the telephone company, where practicable, may notify you that temporary discontinuance of service may be required. Where prior notice is not practicable and the circumstances warrant such action, the telephone company may temporarily discontinue service immediately.
The telephone company may make changes in its communications facilities, equipment, operations or procedures where such action is required in the operation of its business. If these changes are expected to affect the use or performance of your telephone equipment, the telephone company will likely give you adequate notice to allow you to maintain uninterrupted service.
Notice must be given to the telephone company upon termination of your telephone from your line.
REN NUMBER
On the bottom of this equipment is a label indicating, among other information, the Ringer Equivalence Number (REN) for the equipment.
The REN is useful in determining the number of devices you may connect to your telephone line and still have all of these devices ring when your telephone number is called. In most (but not all) areas, the sum of the RENs of all devices connected to one line should not exceed 5. To be certain of the number of devices you may connect to your line as determined by the REN, you should contact your local telephone company.
SERVICE
ATLINKS Communications Canada, Inc., warrants to the purchaser or gift recipient that if any manufacturing defect becomes apparent in this product within 1 year from the original date of purchase, it will be replaced free of charge, including return transportation.
This warranty does not include damage to the product resulting from accidents, misuse or leaking batteries.
Should your product not perform properly during the warranty period, either:
1.Return it to the selling dealer with proof of purchase for replacement,
OR
2.Remove the batteries (where applicable), and pack product complete with accessories in the original carton (or equivalent).
ÑMail prepaid (with proof of purchase) and insured to:
ATLINKS Communications Canada, Inc. c/o Thomson multimedia Inc.
6200 Edwards Boulevard Mississauga, Ontario Canada L5T 2V7
The provisions of this written warranty are in addition to and not a modification of or subtraction from the statutory warranties and other rights and remedies contained in any applicable legislation, and to the extent that any such provisions purport to disclaim, exclude or limit any such statutory warranties and other rights and remedies, such provisions shall be deemed to be amended to the extent necessary to comply therewith.
If you are unable to find a qualified servicer for out of warranty service, you may write to:
ATLINKS Communications Canada, Inc.