Cómo usar la Carácterística del Apoyatapa
This appliance has a polarized plug (one blade is wider than the other). To reduce the risk of electric shock, this plug is intended to fit into a polarized outlet only one way. If plug does not fit
approximately 160° to 180°F. The indicator light will cycle on and off when this setting is in use to indicate that the skillet is maintaining the desired temperature.
1.Sujete la tapa a un ángulo
de 45 grados. Insertar el traba para el
apoyatapa (en la tapa)
dentro de la ranura del lado dla asa
SIN SONDA.
para prevenir salpicaduras mientras se cocina.
5. O se puede levantar la tapa y permitir que
fully into the outlet, reverse the plug. If it still does not fit, contact a qualified electrician. Do not attempt to modify the plug in any way.
Keep Warm Setting
The temperature control probe has a “Keep Warm” range setting of
Important
Check the handles/legs of your skillet periodically for looseness. If needed,
Overtightening can result in stripping of screws or cracking of handles and base.
2.El traba del apoyatapa debe insertarse entra la orilla de la asa y la asa en sí.
3.Si no se inserta el apoyatapa apropiadamente, no se levantará o bajará correctamente.
4.Una vez que se la ha insertado, la tapa se puede bajar sobre la sartén
descanse en la asa para poder mezclar o revolver la comida, sin tener que poner la tapa con grasa o agua sobre el mostrador. NOTA: La tapa descansará apropiadamente si el traba del apoyatapa no se ha insertado apropiadamente en el lado de la asa.
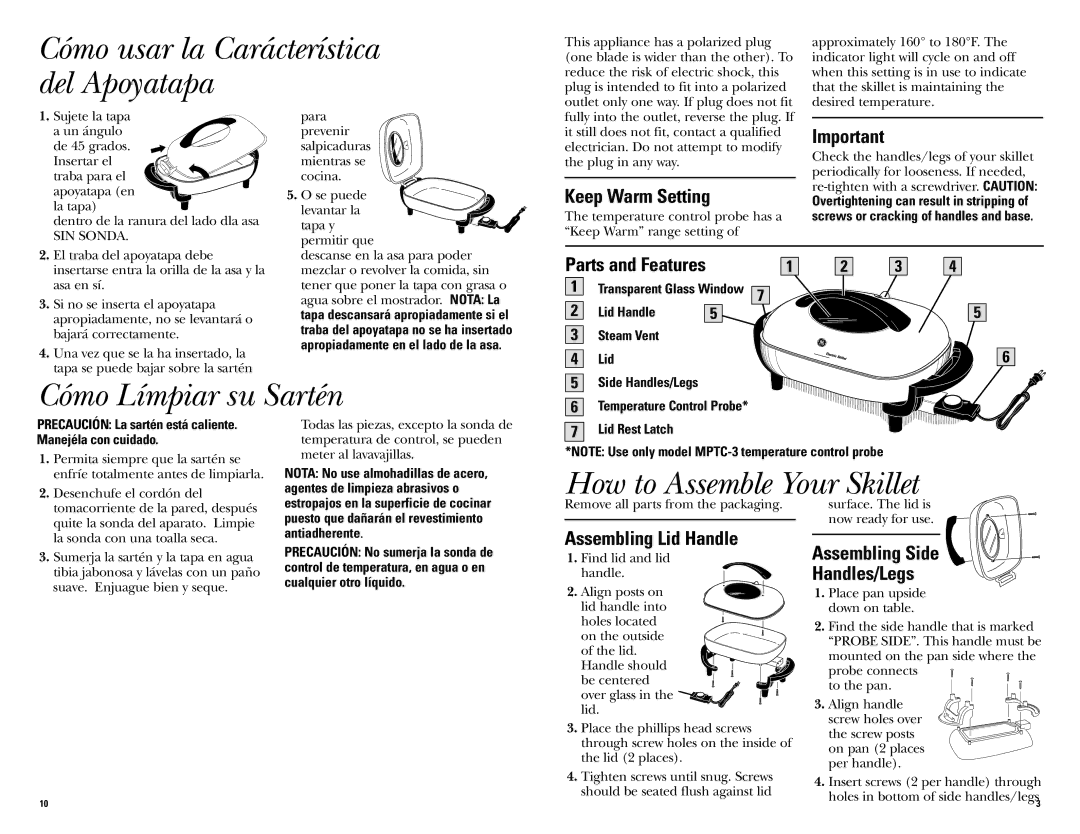
Parts and Features |
| 1 | 2 | 3 | 4 | |
1 | Transparent Glass Window | 7 |
|
|
| |
2 | Lid Handle | 5 |
|
|
| 5 |
3 | Steam Vent |
|
|
|
|
|
4 | Lid |
|
|
|
| 6 |
5 | Side Handles/Legs |
|
|
|
|
|
Cómo Límpiar su Sartén
6 | Temperature Control Probe* |
PRECAUCIÓN: La sartén está caliente. Manejéla con cuidado.
1. | Permita siempre que la sartén se |
| enfríe totalmente antes de limpiarla. |
2. | Desenchufe el cordón del |
Todas las piezas, excepto la sonda de temperatura de control, se pueden meter al lavavajillas.
NOTA: No use almohadillas de acero, agentes de limpieza abrasivos o
7 | Lid Rest Latch |
*NOTE: Use only model
How to Assemble Your Skillet
tomacorriente de la pared, después |
quite la sonda del aparato. Limpie |
la sonda con una toalla seca. |
3. Sumerja la sartén y la tapa en agua |
tibia jabonosa y lávelas con un paño |
suave. Enjuague bien y seque. |
estropajos en la superficie de cocinar puesto que dañarán el revestimiento antiadherente.
PRECAUCIÓN: No sumerja la sonda de control de temperatura, en agua o en cualquier otro líquido.
Remove all parts from the packaging.
Assembling Lid Handle
1.Find lid and lid
handle.
2. Align posts on ![]() lid handle into holes located on the outside of the lid.
lid handle into holes located on the outside of the lid.![]()
![]() Handle should
Handle should ![]() be centered
be centered![]() over glass in the
over glass in the ![]()
![]()
![]()
![]() lid.
lid.
3. | Place the phillips head screws |
| through screw holes on the inside of |
| the lid (2 places). |
4. | Tighten screws until snug. Screws |
| should be seated flush against lid |
surface. The lid is now ready for use.
Assembling Side
Handles/Legs
1.Place pan upside down on table.
2.Find the side handle that is marked
“PROBE SIDE”. This handle must be mounted on the pan side where the probe connects ![]()
![]()
to the pan.
3. Align handle screw holes over the screw posts on pan (2 places per handle).
4. Insert screws (2 per handle) through
10
holes in bottom of side handles/legs
3