and align screws in holes in the pan.
5.Tighten screws with a screwdriver until snug. Screws should be seated flush against handle.
6.Repeat steps 3 through 5 with the
7.Once both handles are tightened securely, place skillet upright onto its legs. Assembly is complete.
CAUTION: Do not operate skillet prior to assembly of side handles/legs and lid handle.
tapa. Ahora puede usar la tapa.
Armado De Las Asas Laterales/ Patas
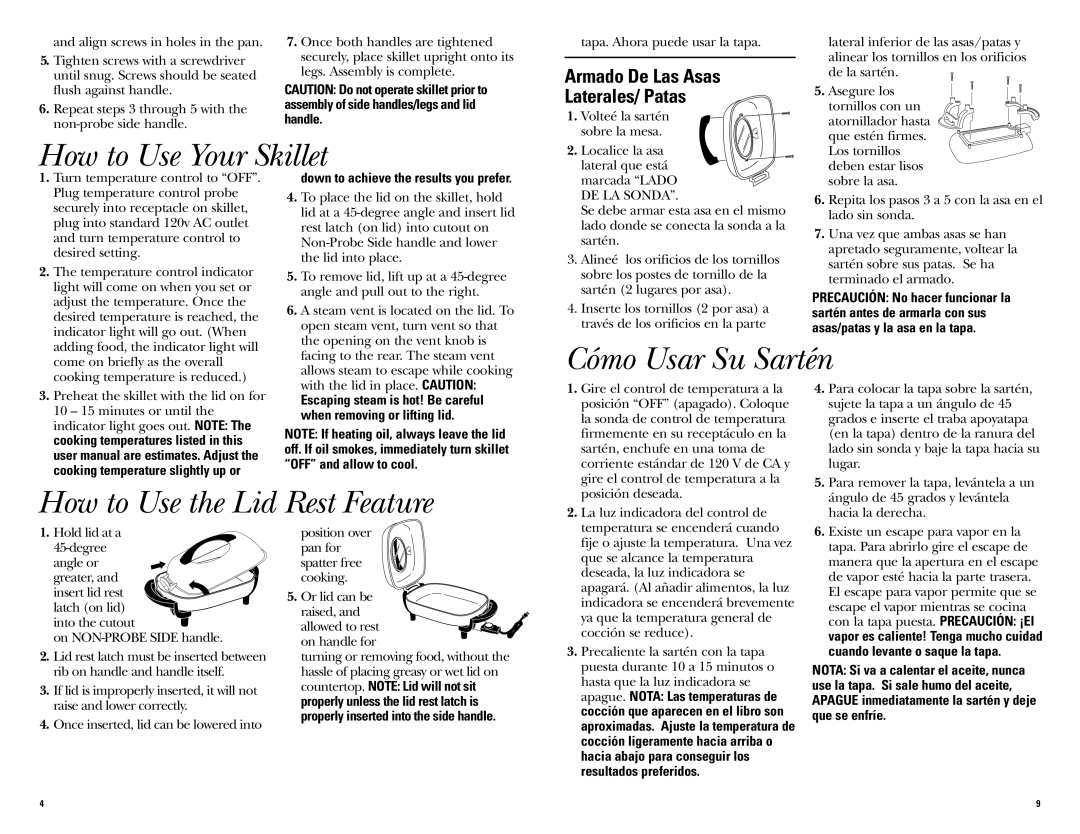
1. Volteé la sartén sobre la mesa.
lateral inferior de las asas/patas y alinear los tornillos en los orificios de la sartén.
5. Asegure los tornillos con un atornillador hasta que estén firmes.
How to Use Your Skillet
2. Localice la asa lateral que está
Los tornillos deben estar lisos
1. Turn temperature control to “OFF”. |
Plug temperature control probe |
securely into receptacle on skillet, |
plug into standard 120v AC outlet |
and turn temperature control to |
desired setting. |
2. The temperature control indicator |
light will come on when you set or |
adjust the temperature. Once the |
desired temperature is reached, the |
indicator light will go out. (When |
adding food, the indicator light will |
down to achieve the results you prefer.
4. | To place the lid on the skillet, hold |
| lid at a |
| rest latch (on lid) into cutout on |
| |
| the lid into place. |
5. | To remove lid, lift up at a |
| angle and pull out to the right. |
6. | A steam vent is located on the lid. To |
| open steam vent, turn vent so that |
| the opening on the vent knob is |
marcada “LADO
DE LA SONDA”.
Se debe armar esta asa en el mismo lado donde se conecta la sonda a la sartén.
3.Alineé los orificios de los tornillos sobre los postes de tornillo de la sartén (2 lugares por asa).
4.Inserte los tornillos (2 por asa) a través de los orificios en la parte
sobre la asa.
6.Repita los pasos 3 a 5 con la asa en el lado sin sonda.
7.Una vez que ambas asas se han apretado seguramente, voltear la sartén sobre sus patas. Se ha terminado el armado.
PRECAUCIÓN: No hacer funcionar la sartén antes de armarla con sus asas/patas y la asa en la tapa.
come on briefly as the overall |
cooking temperature is reduced.) |
facing to the rear. The steam vent |
allows steam to escape while cooking |
Cómo Usar Su Sartén
3. Preheat the skillet with the lid on for |
10 – 15 minutes or until the |
indicator light goes out. NOTE: The |
cooking temperatures listed in this |
user manual are estimates. Adjust the |
cooking temperature slightly up or |
with the lid in place. CAUTION: |
Escaping steam is hot! Be careful |
when removing or lifting lid. |
NOTE: If heating oil, always leave the lid off. If oil smokes, immediately turn skillet “OFF” and allow to cool.
1. Gire el control de temperatura a la |
posición “OFF” (apagado). Coloque |
la sonda de control de temperatura |
firmemente en su receptáculo en la |
sartén, enchufe en una toma de |
corriente estándar de 120 V de CA y |
gire el control de temperatura a la |
4. | Para colocar la tapa sobre la sartén, |
| sujete la tapa a un ángulo de 45 |
| grados e inserte el traba apoyatapa |
| (en la tapa) dentro de la ranura del |
| lado sin sonda y baje la tapa hacia su |
| lugar. |
5. | Para remover la tapa, levántela a un |
How to Use the Lid Rest Feature
posición deseada. |
2. La luz indicadora del control de |
ángulo de 45 grados y levántela |
hacia la derecha. |
1.Hold lid at a
angle or greater, and insert lid rest
latch (on lid) into the cutout
on
2.Lid rest latch must be inserted between rib on handle and handle itself.
3.If lid is improperly inserted, it will not raise and lower correctly.
4.Once inserted, lid can be lowered into
position over pan for spatter free cooking.
5. Or lid can be raised, and allowed to rest on handle for
turning or removing food, without the hassle of placing greasy or wet lid on countertop. NOTE: Lid will not sit properly unless the lid rest latch is properly inserted into the side handle.
temperatura se encenderá cuando |
fije o ajuste la temperatura. Una vez |
que se alcance la temperatura |
deseada, la luz indicadora se |
apagará. (Al añadir alimentos, la luz |
indicadora se encenderá brevemente |
ya que la temperatura general de |
cocción se reduce). |
3. Precaliente la sartén con la tapa |
puesta durante 10 a 15 minutos o |
hasta que la luz indicadora se |
apague. NOTA: Las temperaturas de |
cocción que aparecen en el libro son |
aproximadas. Ajuste la temperatura de |
cocción ligeramente hacia arriba o |
hacia abajo para conseguir los |
resultados preferidos. |
6. Existe un escape para vapor en la |
tapa. Para abrirlo gire el escape de |
manera que la apertura en el escape |
de vapor esté hacia la parte trasera. |
El escape para vapor permite que se |
escape el vapor mientras se cocina |
con la tapa puesta. PRECAUCIÓN: ¡El |
vapor es caliente! Tenga mucho cuidad |
cuando levante o saque la tapa. |
NOTA: Si va a calentar el aceite, nunca use la tapa. Si sale humo del aceite, APAGUE inmediatamente la sartén y deje que se enfríe.
4 | 9 |