Using the surface units.

www.GEAppliances.com

Throughout this manual, features and appearance may vary from your model.

Safety

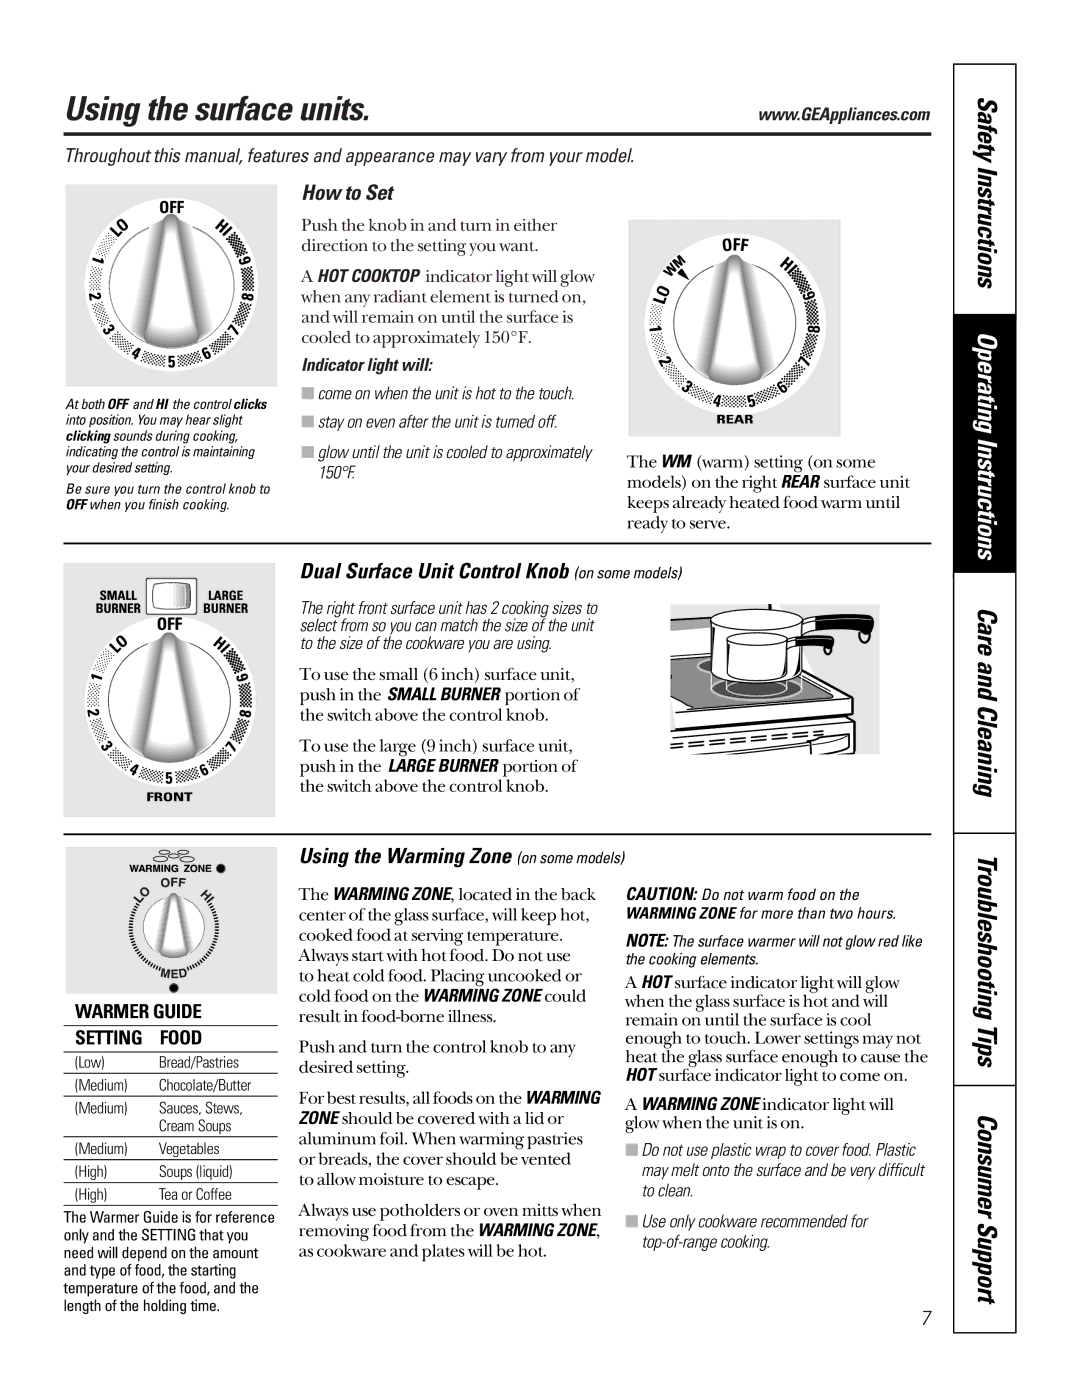
At both OFF and HI the control clicks into position. You may hear slight clicking sounds during cooking, indicating the control is maintaining your desired setting.

Be sure you turn the control knob to OFF when you finish cooking.

How to Set

Push the knob in and turn in either direction to the setting you want.

AHOT COOKTOP indicator light will glow when any radiant element is turned on, and will remain on until the surface is cooled to approximately 150°F.

Indicator light will:

come on when the unit is hot to the touch.

stay on even after the unit is turned off.

glow until the unit is cooled to approximately 150°F.

The WM (warm) setting (on some models) on the right REAR surface unit keeps already heated food warm until ready to serve.

Instructions Operating Instructions

Dual Surface Unit Control Knob (on some models)

The right front surface unit has 2 cooking sizes to select from so you can match the size of the unit to the size of the cookware you are using.

To use the small (6 inch) surface unit, push in the SMALL BURNER portion of the switch above the control knob.

To use the large (9 inch) surface unit, push in the LARGE BURNER portion of the switch above the control knob.

Using the Warming Zone (on some models)

Care and Cleaning

WARMER GUIDE

SETTING

FOOD

(Low)

Bread/Pastries

(Medium)

Chocolate/Butter

(Medium)

Sauces, Stews,


Cream Soups

(Medium)

Vegetables

(High)

Soups (liquid)

(High)

Tea or Coffee

The Warmer Guide is for reference only and the SETTING that you need will depend on the amount and type of food, the starting temperature of the food, and the length of the holding time.

The WARMING ZONE, located in the back center of the glass surface, will keep hot, cooked food at serving temperature.

Always start with hot food. Do not use to heat cold food. Placing uncooked or cold food on the WARMING ZONE could result in food-borne illness.

Push and turn the control knob to any desired setting.

For best results, all foods on the WARMING ZONE should be covered with a lid or aluminum foil. When warming pastries or breads, the cover should be vented to allow moisture to escape.

Always use potholders or oven mitts when removing food from the WARMING ZONE, as cookware and plates will be hot.

CAUTION: Do not warm food on the WARMING ZONE for more than two hours.

NOTE: The surface warmer will not glow red like the cooking elements.

AHOT surface indicator light will glow when the glass surface is hot and will remain on until the surface is cool enough to touch. Lower settings may not heat the glass surface enough to cause the HOT surface indicator light to come on.

AWARMING ZONE indicator light will glow when the unit is on.

Do not use plastic wrap to cover food. Plastic may melt onto the surface and be very difficult to clean.

Use only cookware recommended for top-of-range cooking.

Troubleshooting Tips Consumer Support

7

Page 7
Image 7
GE JBP70 Using the surface units, Troubleshooting Tips Consumer Support, How to Set, Using the Warming Zone on some models

JBP70, EER2000 specifications

The GE JBP series, including the JBP66, JBP78, JBP65, and JBP64, along with the EER2000, showcases a range of innovative cooking solutions designed to cater to diverse culinary needs while emphasizing efficiency and user-friendly features.

The GE JBP66 is known for its exceptional versatility, offering a combination of advanced cooking technologies that enhance meal preparation. With features like a smooth cooktop and precise temperature controls, it ensures even heating, allowing for perfectly cooked meals every time. The four burners provide ample space for simultaneous cooking, while the additional oven settings facilitate baking and roasting, making it a favorite in many kitchens.

The JBP78 takes it a step further by integrating smart technology. It features Wi-Fi connectivity, allowing users to control the oven remotely through their smartphones. This model also includes advanced self-cleaning options that save time and effort, letting users maintain a pristine cooking environment with minimal hassle. The rich broil function adds to its versatility, enabling users to achieve that perfect browning on their favorite dishes.

The JBP65 focuses on energy efficiency without compromising on performance. It boasts an environmentally friendly design that reduces energy consumption while delivering powerful cooking capabilities. The durable enamel finish not only enhances its aesthetic appeal but also ensures easy cleaning, making maintenance a breeze. Its powerful oven performance means users can reliably prepare a variety of dishes, making it a great value for any household.

The JBP64 is designed with the home cook in mind, offering a user-friendly interface that simplifies the cooking process. Featuring a spacious oven and multiple cooking modes, it provides the flexibility needed for various recipes. Its intuitive control knobs empower users to make precise adjustments, ensuring their dishes meet exact preferences every time.

The GE EER2000 stands out with its focus on energy efficiency and sustainable cooking practices. It employs advanced insulation technologies that minimize heat loss, allowing for energy savings without sacrificing performance. The EER2000 features intuitive controls and a sleek design that fits seamlessly into modern kitchens, making it a prime choice for environmentally conscious consumers.

In summary, the GE JBP series and EER2000 cater to a wide array of cooking preferences with their innovative technologies, user-centric designs, and energy efficiency. Each model offers unique features aimed at enhancing convenience and performance, making them reliable companions in any culinary journey.