GE ZGU375NS, ZGU375LS owner manual To remove the burner parts, To replace the burner parts

Models: ZGU375LS ZGU375NS

1 20
Download 20 pages 13.76 Kb
Page 14
Image 14

Care and Cleaning

Gas Cooktop

Burner sub-assemblies

Slits

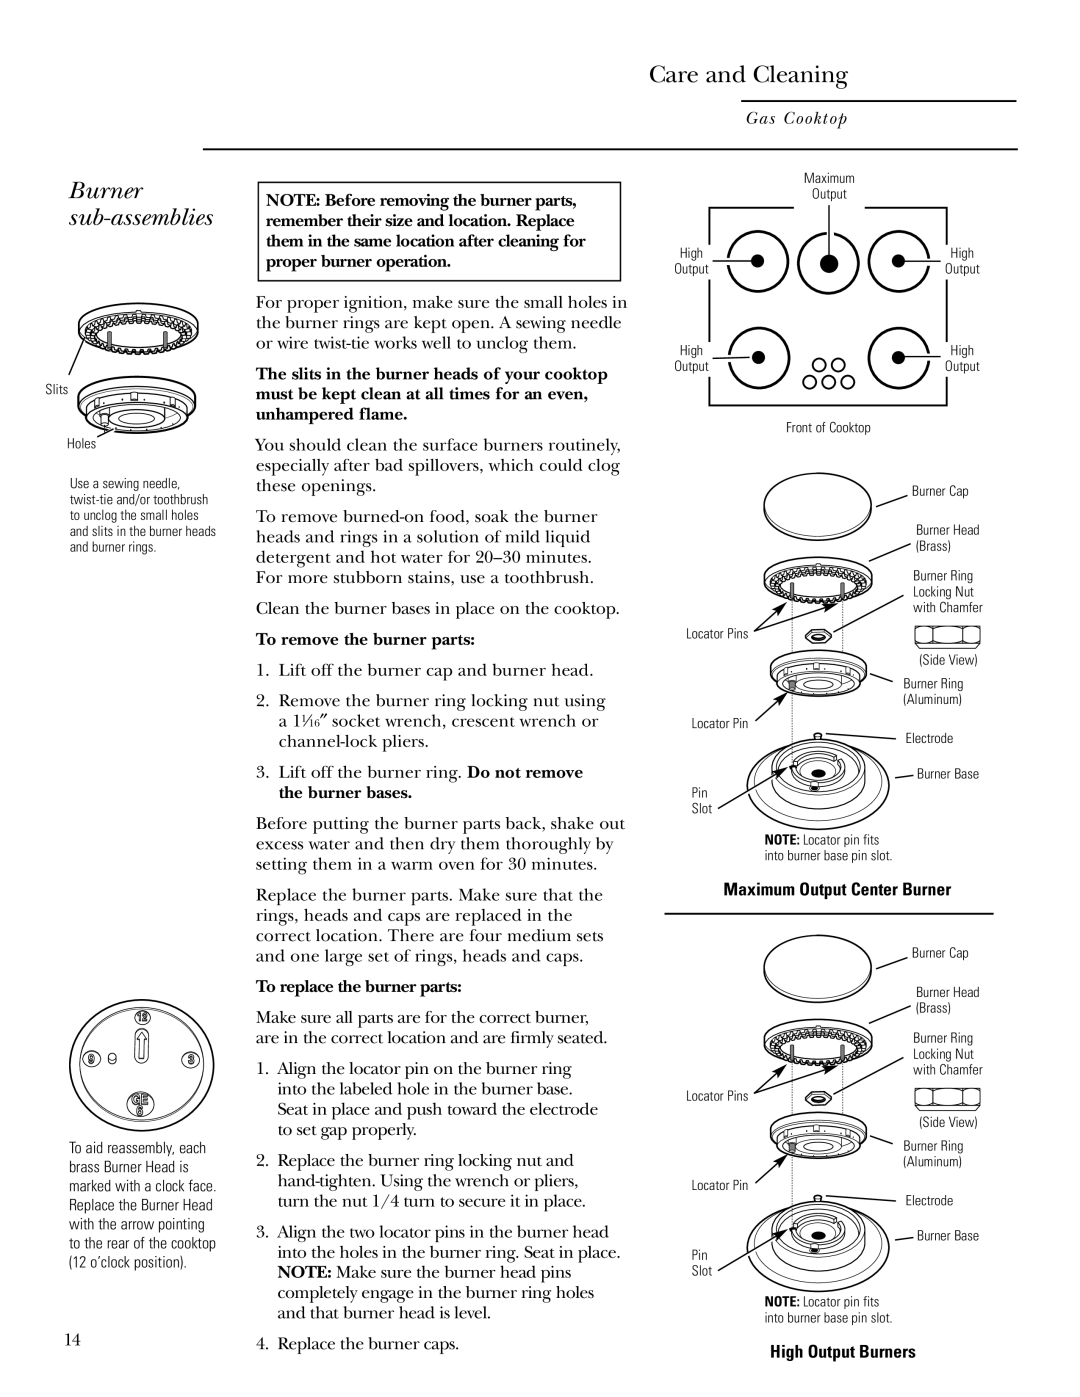
NOTE: Before removing the burner parts, remember their size and location. Replace them in the same location after cleaning for proper burner operation.

For proper ignition, make sure the small holes in the burner rings are kept open. A sewing needle or wire twist-tie works well to unclog them.

The slits in the burner heads of your cooktop must be kept clean at all times for an even, unhampered flame.

Maximum

Output

High

High

Output

Output

High

High

Output

Output

Front of Cooktop

Holes

Use a sewing needle, twist-tie and/or toothbrush to unclog the small holes and slits in the burner heads and burner rings.

To aid reassembly, each brass Burner Head is marked with a clock face. Replace the Burner Head with the arrow pointing to the rear of the cooktop (12 o’clock position).

You should clean the surface burners routinely, especially after bad spillovers, which could clog these openings.

To remove burned-on food, soak the burner heads and rings in a solution of mild liquid detergent and hot water for 20–30 minutes. For more stubborn stains, use a toothbrush.

Clean the burner bases in place on the cooktop.

To remove the burner parts:

1.Lift off the burner cap and burner head.

2.Remove the burner ring locking nut using a 1116″ socket wrench, crescent wrench or channel-lock pliers.

3.Lift off the burner ring. Do not remove the burner bases.

Before putting the burner parts back, shake out excess water and then dry them thoroughly by setting them in a warm oven for 30 minutes.

Replace the burner parts. Make sure that the rings, heads and caps are replaced in the correct location. There are four medium sets and one large set of rings, heads and caps.

To replace the burner parts:

Make sure all parts are for the correct burner, are in the correct location and are firmly seated.

1.Align the locator pin on the burner ring into the labeled hole in the burner base. Seat in place and push toward the electrode to set gap properly.

2.Replace the burner ring locking nut and hand-tighten. Using the wrench or pliers, turn the nut 1/4 turn to secure it in place.

3.Align the two locator pins in the burner head into the holes in the burner ring. Seat in place. NOTE: Make sure the burner head pins completely engage in the burner ring holes and that burner head is level.

Burner Cap

Burner Head

(Brass)

Burner Ring

Locking Nut with Chamfer

Locator Pins

(Side View)

Burner Ring (Aluminum)

Locator Pin

Electrode

Burner Base

Pin

Slot

NOTE: Locator pin fits into burner base pin slot.

Maximum Output Center Burner

Burner Cap

Burner Head

(Brass)

Burner Ring

Locking Nut with Chamfer

Locator Pins

(Side View)

Burner Ring (Aluminum)

Locator Pin

Electrode

Burner Base

Pin

Slot

NOTE: Locator pin fits into burner base pin slot.

14

4. Replace the burner caps.

High Output Burners


Page 14
Image 14
GE ZGU375NS, ZGU375LS owner manual To remove the burner parts, To replace the burner parts

ZGU375LS, ZGU375NS specifications

The GE ZGU375NS and ZGU375LS are two premium cooking ranges that stand out in the world of kitchen appliances, offering a blend of cutting-edge technology, user-friendly features, and stylish design. These ranges are designed for home chefs who demand high performance and modern conveniences in their cooking equipment.

One of the main features of both models is their powerful gas cooktop, which includes five sealed burners designed to provide precise temperature control. The high-heat burner cooks meals quickly and efficiently, while a low simmer burner is perfect for delicate sauces and soups. Each burner is equipped with a continuous grating surface that allows for easy movement of pots and pans across the cooking area, enhancing the cooking experience.

In addition to their robust cooktops, the ZGU375NS and ZGU375LS boast an expansive oven capacity, providing ample space for multiple dishes to be cooked simultaneously. With a conventional oven design, both models ensure even heat distribution, producing consistent baking results. Convection cooking is another significant feature available in these models, which circulates hot air throughout the oven, ensuring food cooks evenly and retains moisture for juicy, flavorful results.

User experience is greatly enhanced through thoughtful technology integration. The ovens include a self-clean option, saving users from the laborious task of manual cleaning while keeping the interior sparkling. Furthermore, both ranges come with a delay bake feature that allows the chef to set the oven to start cooking at a later time, proving to be a handy tool for busy schedules.

The design of the GE ZGU375NS and ZGU375LS does not go unnoticed. With a sleek stainless steel finish and professional appearance, they seamlessly fit into modern kitchens, adding a touch of elegance. Additionally, the ranges are equipped with heavy-duty oven racks that glide smoothly in and out, making it easy to access deliciously baked goods.

Safety is a key characteristic woven into both models, featuring automatic burner shutoff technology, ensuring peace of mind when cooking. Overall, the GE ZGU375NS and ZGU375LS provide a sophisticated cooking experience, combining high performance, advanced technology, and trendy aesthetics to meet the demands of today's culinary enthusiasts.