Installation

36" Stainless Steel Refrigerators, Freezers

Step 3

Install

Side Panels

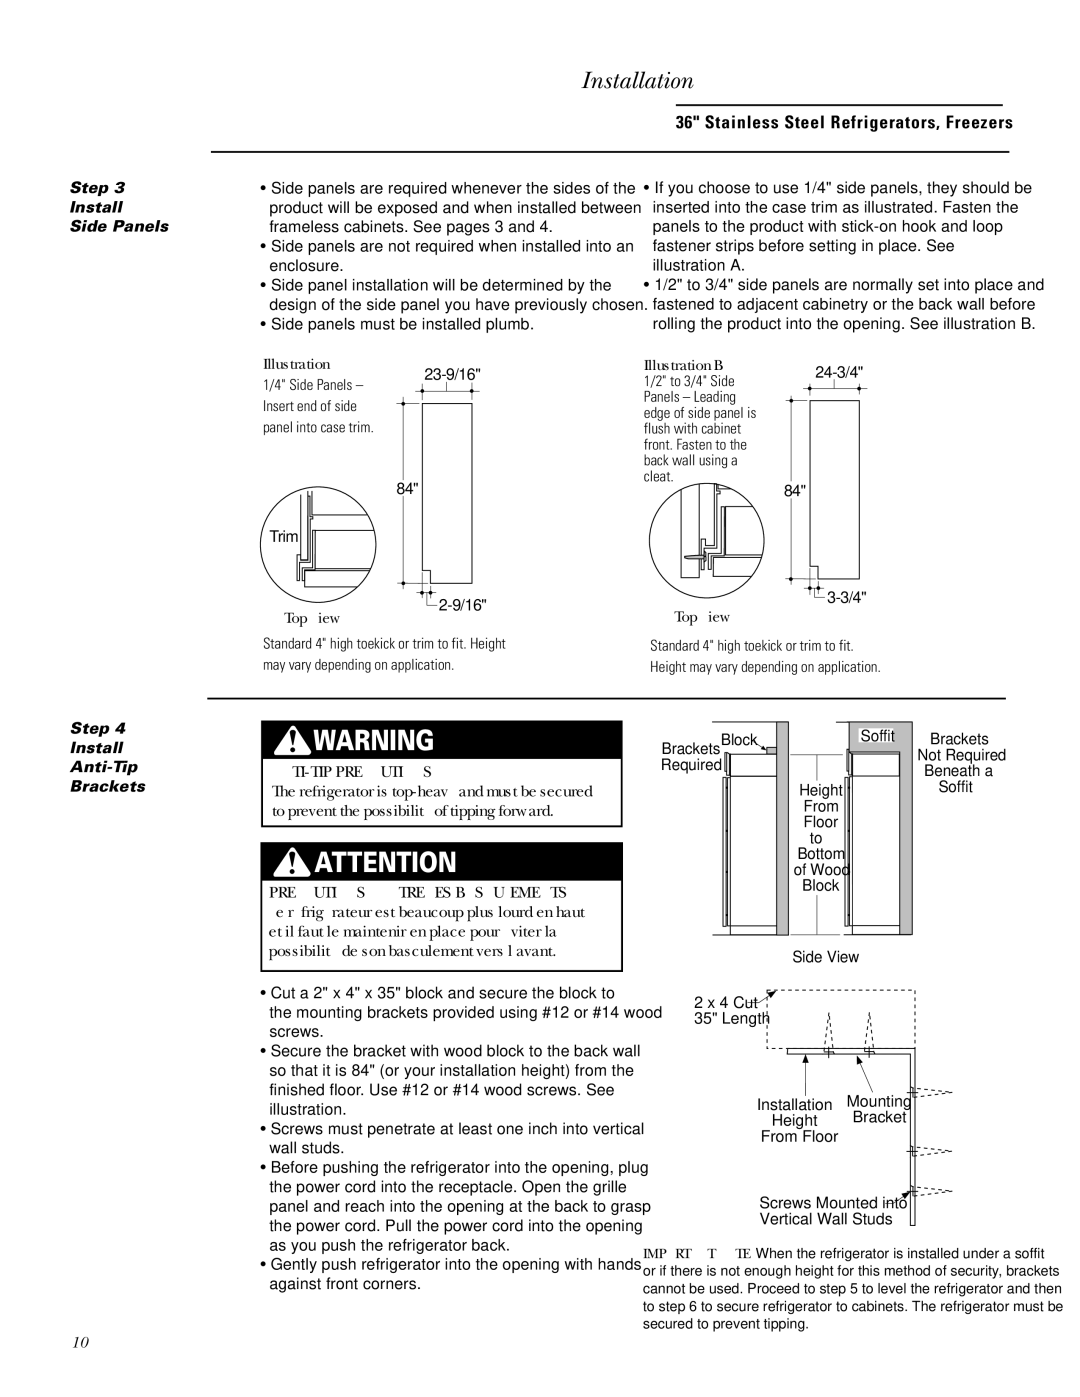
Side panels are required whenever the sides of the product will be exposed and when installed between frameless cabinets. See pages 3 and 4.

Side panels are not required when installed into an enclosure.

Side panel installation will be determined by the design of the side panel you have previously chosen.

Side panels must be installed plumb.

Illustration A

23-9/16"

1/4" Side Panels – Insert end of side panel into case trim.

84"

Trim

2-9/16"

Top View

Standard 4" high toekick or trim to fit. Height may vary depending on application.

If you choose to use 1/4" side panels, they should be inserted into the case trim as illustrated. Fasten the panels to the product with stick-on hook and loop fastener strips before setting in place. See illustration A.

1/2" to 3/4" side panels are normally set into place and fastened to adjacent cabinetry or the back wall before rolling the product into the opening. See illustration B.

Illustration B

24-3/4"

1/2" to 3/4" Side


Panels – Leading


edge of side panel is


flush with cabinet


front. Fasten to the


back wall using a


cleat.


84"

3-3/4"

Top View

Standard 4" high toekick or trim to fit.

Height may vary depending on application.

Step 4 Install

WARNING

Brackets

Block

Soffit

Brackets

Not Required

Anti-Tip Brackets

ANTI-TIP PRECAUTIONS

The refrigerator is top-heavy and must be secured to prevent the possibility of tipping forward.

ATTENTION

PRECAUTIONS CONTRE LES BASCULEMENTS Le réfrigérateur est beaucoup plus lourd en haut et il faut le maintenir en place pour éviter la possibilité de son basculement vers l’avant.

• Cut a 2" x 4" x 35" block and secure the block to

the mounting brackets provided using #12 or #14 wood

screws.

• Secure the bracket with wood block to the back wall

so that it is 84" (or your installation height) from the

finished floor. Use #12 or #14 wood screws. See

Required

2 x 4 Cut 35" Length

Height

From

Floor

to

Bottom

of Wood

Block

Side View

Beneath a

Soffit

illustration.

• Screws must penetrate at least one inch into vertical

wall studs.

• Before pushing the refrigerator into the opening, plug

the power cord into the receptacle. Open the grille

panel and reach into the opening at the back to grasp

the power cord. Pull the power cord into the opening

as you push the refrigerator back.

• Gently push refrigerator into the opening with hands

against front corners.

Installation Mounting

Height Bracket

From Floor

Screws Mounted into

Vertical Wall Studs

IMPORTANT NOTE: When the refrigerator is installed under a soffit or if there is not enough height for this method of security, brackets cannot be used. Proceed to step 5 to level the refrigerator and then to step 6 to secure refrigerator to cabinets. The refrigerator must be secured to prevent tipping.

10

Page 10
Image 10
GE ZIFS36N LH, ZIRS36N RH, ZIFS36N RH, ZIRS36N LH installation instructions Step Install Side Panels, Anti-Tip Brackets

ZIRS36N LH, ZIFS36N LH, ZIFS36N RH, ZIRS36N RH specifications

The GE ZIRS36N RH, ZIFS36N RH, ZIFS36N LH, and ZIRS36N LH are part of General Electric's innovative line of side-by-side refrigerators, designed to meet the needs of modern households while providing exceptional performance and convenience. These models are characterized by a sleek and stylish exterior, making them an attractive addition to any kitchen.

One of the standout features of these refrigerators is their advanced cooling technology. They incorporate a multi-air flow system that ensures even distribution of cold air throughout the refrigerator and freezer compartments. This technology helps maintain optimal temperature levels, keeping food fresher for longer, while also minimizing temperature fluctuations that can lead to spoilage.

These models are equipped with energy-efficient LED lighting that illuminates the interior, making it easy to find items even in low light conditions. The LED lights consume less energy compared to traditional incandescent bulbs, contributing to lower electricity bills and a more sustainable operation.

The GE ZIRS36N and ZIFS36N series also feature adjustable shelving, allowing users to customize the interior layout to accommodate various food items and containers. This flexibility is essential for maximizing storage space and ensuring that everything fits perfectly. Additionally, spill-proof shelves are included, which are designed to contain spills for easy cleanup and to prevent messes from spreading to other compartments.

For added convenience, these refrigerators are designed with a fresh food compartment that includes humidity-controlled crispers. These crispers help maintain the freshness of fruits and vegetables by regulating humidity levels, which is vital for preserving their quality.

Security and access are also a priority, as these models come with external water and ice dispensers. This feature provides instant access to cold water and ice without having to open the refrigerator door, promoting energy efficiency and convenience in daily routines.

In terms of design, the GE ZIRS36N RH, ZIFS36N RH, ZIFS36N LH, and ZIRS36N LH models are finished in high-quality stainless steel, giving them a modern and professional look that enhances any kitchen décor. Their reversible doors offer flexibility for kitchen layouts, allowing the user to configure the fridge to suit their space.

Overall, the GE ZIRS36N RH, ZIFS36N RH, ZIFS36N LH, and ZIRS36N LH refrigerators combine modern technology, user-friendly features, and a stylish design, making them ideal choices for families seeking functionality and efficiency in their kitchen appliances.