Amplifier setup continued

Volume display

Mode

Volume

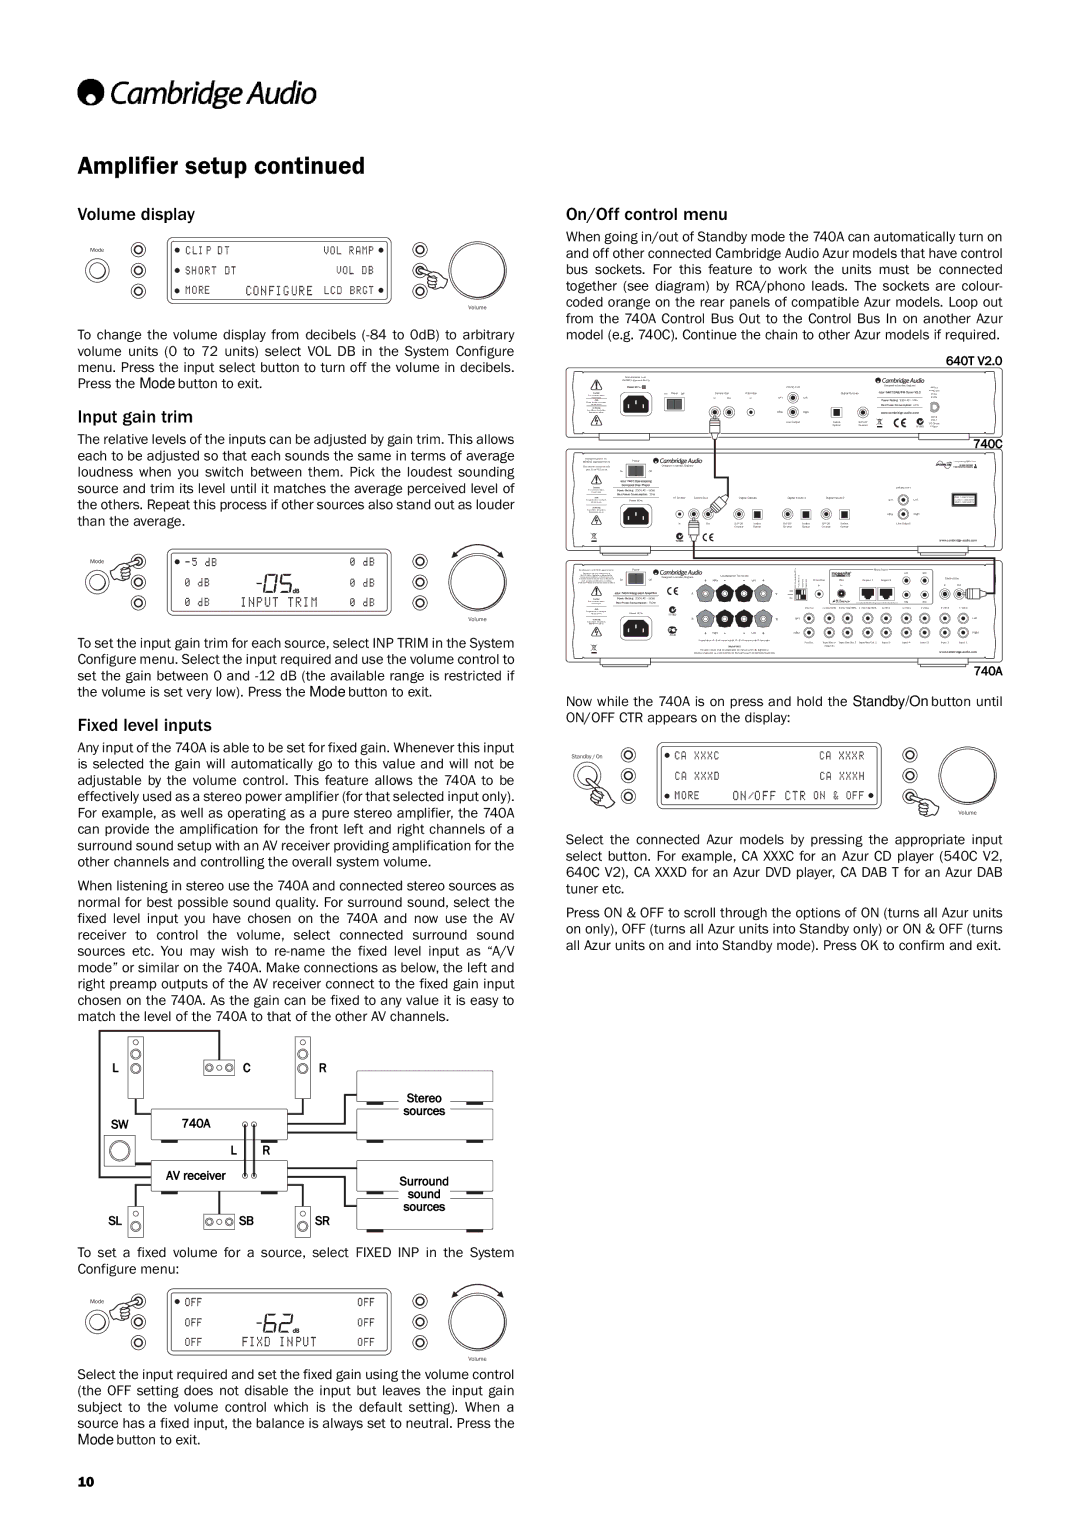
To change the volume display from decibels (-84 to 0dB) to arbitrary volume units (0 to 72 units) select VOL DB in the System Configure menu. Press the input select button to turn off the volume in decibels. Press the Mode button to exit.

Input gain trim

The relative levels of the inputs can be adjusted by gain trim. This allows each to be adjusted so that each sounds the same in terms of average loudness when you switch between them. Pick the loudest sounding source and trim its level until it matches the average perceived level of the others. Repeat this process if other sources also stand out as louder than the average.

Mode

Volume

To set the input gain trim for each source, select INP TRIM in the System Configure menu. Select the input required and use the volume control to set the gain between 0 and -12 dB (the available range is restricted if the volume is set very low). Press the Mode button to exit.

Fixed level inputs

Any input of the 740A is able to be set for fixed gain. Whenever this input is selected the gain will automatically go to this value and will not be adjustable by the volume control. This feature allows the 740A to be effectively used as a stereo power amplifier (for that selected input only). For example, as well as operating as a pure stereo amplifier, the 740A can provide the amplification for the front left and right channels of a surround sound setup with an AV receiver providing amplification for the other channels and controlling the overall system volume.

When listening in stereo use the 740A and connected stereo sources as normal for best possible sound quality. For surround sound, select the fixed level input you have chosen on the 740A and now use the AV receiver to control the volume, select connected surround sound sources etc. You may wish to re-name the fixed level input as “A/V mode” or similar on the 740A. Make connections as below, the left and right preamp outputs of the AV receiver connect to the fixed gain input chosen on the 740A. As the gain can be fixed to any value it is easy to match the level of the 740A to that of the other AV channels.

On/Off control menu

When going in/out of Standby mode the 740A can automatically turn on and off other connected Cambridge Audio Azur models that have control bus sockets. For this feature to work the units must be connected together (see diagram) by RCA/phono leads. The sockets are colour- coded orange on the rear panels of compatible Azur models. Loop out from the 740A Control Bus Out to the Control Bus In on another Azur model (e.g. 740C). Continue the chain to other Azur models if required.

640T V2.0

Manufactured in an

ISO9002 approved facility


tput uO Line


Designed in London, England

eyp T-F

Caution

On Power Off

Control Bus

IR Emitter


Digital Outputs

azur 640T DAB/FM Tuner V2.0

Ohms 50


put

In

Avis


In

Out

In

Left

Left


Power Rating: 230V AC ~ 50Hz

erialA


Max Power Consumption: 15W


Achtung


Right

Right


www.cambridge-audio.com


Aerial


Line Output

Toslink

S/P DIF


Input


50 Ohms


Optical

Co-axial

N1863

F-Type

740C

Manufactured in an


Power


ISO9002 approved facility


Incorporating Q5 from:

This device complies with


Designed in London, England


ANAGRAM


TECHNOLOGIES

part 15 of FCC rules

On

Off


azur 740C Upsampling


Caution

Compact Disc Player


put

tuO Line


Power Rating: 230V AC ~ 50Hz


Max Power Consumption: 25W


Avis


IR Emitter

Control Bus

Digital Outputs

Digital Inputs 1

Digital Inputs 2


Left

Class 1 Laser Product


Power AC


Left


Luokan 1 Laserplaite


Klass 1 Laserapparat

Achtung


Right


Right


In

In

Out

S/P DIF

Toslink

S/P DIF

Toslink

S/P DIF

Toslink

Line Output


Co-axial

Optical

Co-axial

Optical

Co-axial

Optical


AЯ46


www.cambridge-audio.com


Power


Loudspeaker Terminals


PassThru

IR


Multi-Room


IR1

IR3


On

Off

Designed in London, England


Control Bus

Front Panel

Reserved

Reserved

IR Emitter

PSU

Keypad 1

Keypad 2


Control Bus


Right

Left


In

In


In

Out


azur 740A Integrated Amplifier


A


A

Off


Caution

Power Rating: 230V AC ~ 50Hz


On


Max Power Consumption: 750W


IR2

IR4


Avis


t uO Pre

In Rec / epTa

2 t uO Rec/ epTa

1 tu O Rec/e pTa

5 tpuIn

4 t puIn

3 t puIn

2 tpuIn

1 tpuIn


Power AC

N1863


Achtung


B


B

Left


Left


AЯ46

Right

Left


Right


Right


Impedance 4 - 8 ohms one pair, 6 - 8 ohms per pair if two pairs


Pre Out

Tape/Rec In

Tape/Rec Out 2

Tape/Rec Out 1

Input 5

Input 4

Input 3

Input 2

Input 1


Important


(Input 6)


Please ensure that loudspeaker terminals are fully tightened


www.cambridge-audio.com


Veuillez s'assurer que les bornes de l'enceinte sont entièrement serrées


740A

Now while the 740A is on press and hold the Standby/On button until ON/OFF CTR appears on the display:

Standby/On

Volume

Select the connected Azur models by pressing the appropriate input select button. For example, CA XXXC for an Azur CD player (540C V2, 640C V2), CA XXXD for an Azur DVD player, CA DAB T for an Azur DAB tuner etc.

Press ON & OFF to scroll through the options of ON (turns all Azur units on only), OFF (turns all Azur units into Standby only) or ON & OFF (turns all Azur units on and into Standby mode). Press OK to confirm and exit.

L

SW

SL

C

740A

L R

AV receiver

SB

R

Stereo

sources

Surround

sound sources

SR

To set a fixed volume for a source, select FIXED INP in the System Configure menu:

Mode

Volume

Select the input required and set the fixed gain using the volume control (the OFF setting does not disable the input but leaves the input gain subject to the volume control which is the default setting). When a source has a fixed input, the balance is always set to neutral. Press the Mode button to exit.

10

Page 10
Image 10
Genius 740A user manual Volume display, Input gain trim, Fixed level inputs, On/Off control menu

740A specifications

The Genius 740A is a versatile and innovative product known for its reliability and performance, making it a popular choice among professionals and enthusiasts alike. Designed to meet the demands of various applications, the Genius 740A is equipped with advanced technologies and features that set it apart from its competitors.

One of the standout characteristics of the Genius 740A is its powerful processing capability. With a high-performance processor, users can expect rapid data processing and smooth operation even when multitasking with demanding applications. This makes the Genius 740A ideal for users who require speed and efficiency, such as graphic designers, video editors, and engineers.

The Genius 740A also boasts impressive connectivity options. It includes multiple USB ports, HDMI outputs, and wireless connectivity features such as Wi-Fi and Bluetooth. This array of connectivity options allows users to easily connect to a wide range of devices, from printers to external monitors, enhancing productivity and flexibility in various work environments.

Another key feature of the Genius 740A is its user-friendly interface. The device is equipped with a responsive touchscreen display, providing an intuitive experience that simplifies navigation and operation. This is complemented by customizable settings that allow users to tailor the device to their specific needs, ensuring a personalized experience.

Durability is another focus of the Genius 740A. Built with high-quality materials, it is designed to withstand the rigors of daily use, making it a reliable choice for both professional settings and personal use. Its compact design also contributes to its portability, allowing users to take it on the go without hassle.

In addition to its hardware capabilities, the Genius 740A comes pre-installed with a range of software tools designed to enhance user experience. These tools support a variety of tasks, from creative projects to data analysis, ensuring that users have everything they need to succeed right from the start.

In conclusion, the Genius 740A is a remarkable product that combines advanced technology, user-friendly features, and robust performance. Its powerful processing, extensive connectivity options, customizable interface, and durability make it an excellent choice for a variety of users seeking efficiency and reliability in their devices. Whether for professional use or personal projects, the Genius 740A stands out as a top-tier solution in today’s fast-paced digital landscape.