Exploring the Q-FlashTMutility screen

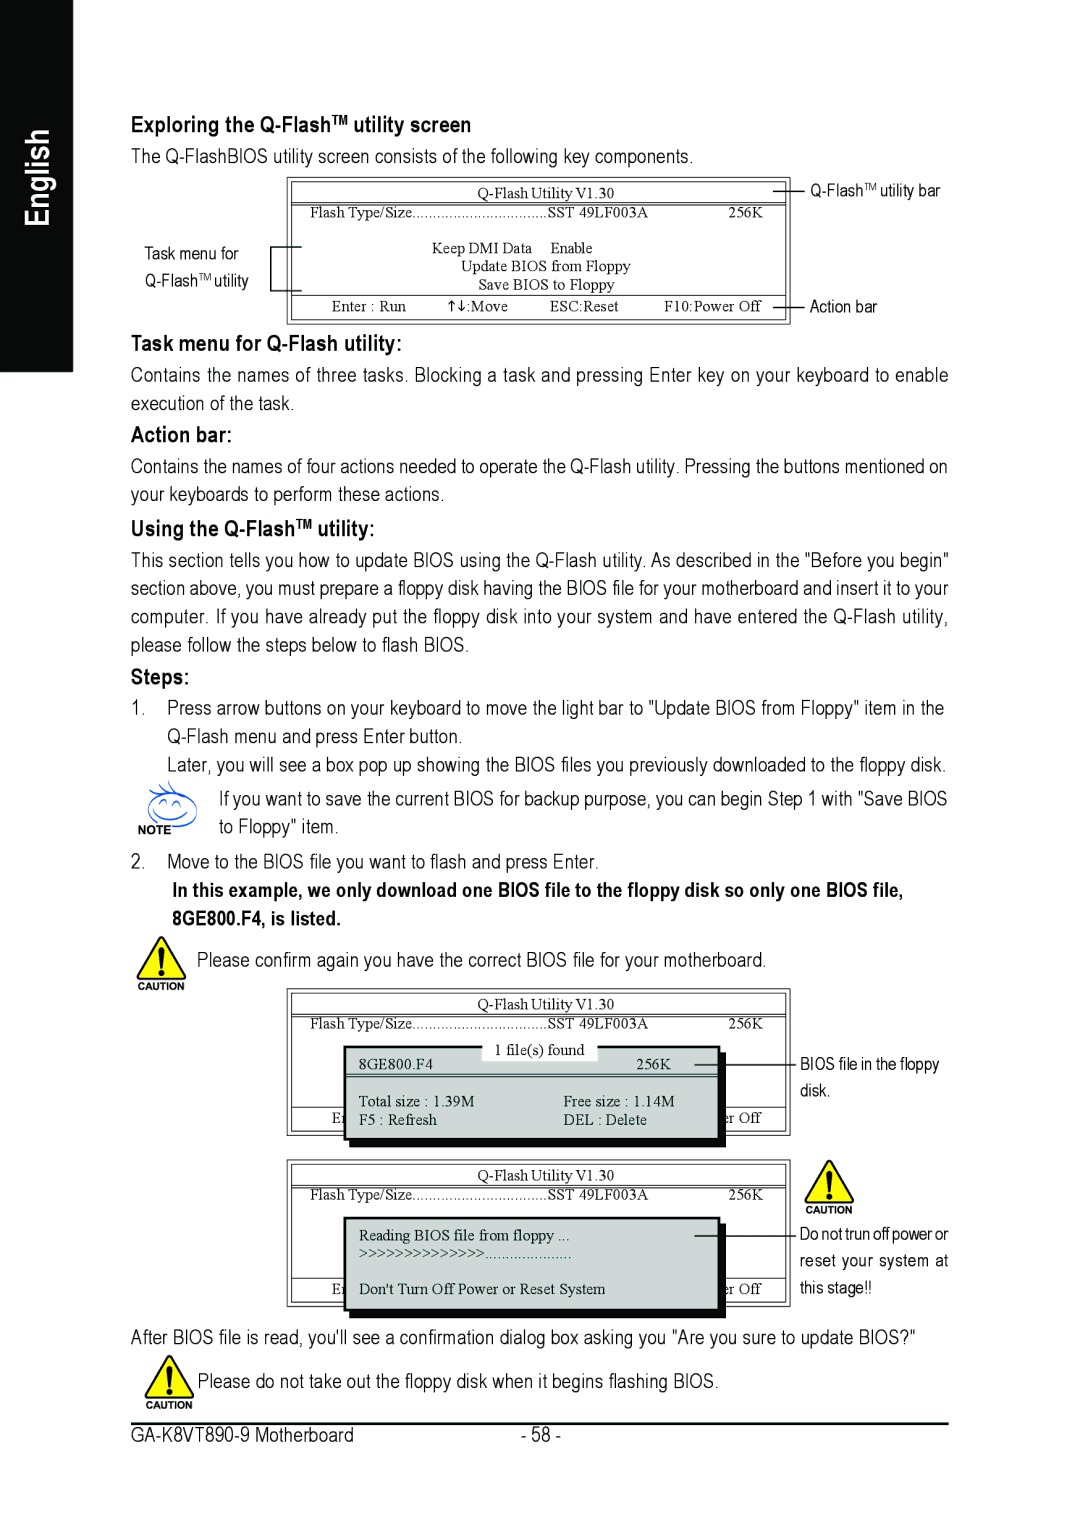
The Q-FlashBIOS utility screen consists of the following key components.

English

Task menu for Q-FlashTMutility


Q-FlashTMutility bar


Q-Flash Utility V1.30


Flash Type/Size

.................................

SST 49LF003A

256K


Keep DMI Data

Enable


Update BIOS from Floppy


Save BIOS to Floppy


Action bar


Enter : Run

:Move

ESC:Reset

F10:Power Off


Task menu for Q-Flash utility:

Contains the names of three tasks. Blocking a task and pressing Enter key on your keyboard to enable execution of the task.

Action bar:

Contains the names of four actions needed to operate the Q-Flash utility. Pressing the buttons mentioned on your keyboards to perform these actions.

Using the Q-FlashTMutility:

This section tells you how to update BIOS using the Q-Flash utility. As described in the "Before you begin" section above, you must prepare a floppy disk having the BIOS file for your motherboard and insert it to your computer. If you have already put the floppy disk into your system and have entered the Q-Flash utility, please follow the steps below to flash BIOS.

Steps:

1.Press arrow buttons on your keyboard to move the light bar to "Update BIOS from Floppy" item in the Q-Flash menu and press Enter button.

Later, you will see a box pop up showing the BIOS files you previously downloaded to the floppy disk.

If you want to save the current BIOS for backup purpose, you can begin Step 1 with "Save BIOS to Floppy" item.

2.Move to the BIOS file you want to flash and press Enter.

In this example, we only download one BIOS file to the floppy disk so only one BIOS file, 8GE800.F4, is listed.

Please confirm again you have the correct BIOS file for your motherboard.


Q-Flash Utility V1.30


Flash Type/Size


SST 49LF003A


256K


1 file(s) found


8GE800.F4Keep DMI


256K


BIOS file in the floppy


Update BIOS from Floppy


disk.


Total size : 1.39M

Save BIOS to Floppy


Free size : 1.14M


EnterF5: Run: Refresh

:Move

ESC:ResetDELDelete

F10:Power


Off


Q-Flash Utility V1.30


Flash Type/Size


SST 49LF003A


256K


Keep DMI Data

Enable


Do not trun off power or


Reading BIOS file from floppy ...


Update BIOS from Floppy


>>>>>>>>>>>>>>


reset your system at


Save BIOS to Floppy


EnterDon't: RunTurn Off Power:Moveor ResetESystemC:Reset

F10:Power


Off

this stage!!


After BIOS file is read, you'll see a confirmation dialog box asking you "Are you sure to update BIOS?" Please do not take out the floppy disk when it begins flashing BIOS.

GA-K8VT890-9 Motherboard

- 58 -

Page 58
Image 58
Gigabyte GA-K8VT890-9 user manual Exploring the Q-FlashTMutility screen, English

GA-K8VT890-9 specifications

The Gigabyte GA-K8VT890-9 is a noteworthy motherboard known for its performance and robust feature set, designed primarily for AMD Athlon 64 processors. As part of the Socket 754 platform, it supports a variety of AMD CPUs, making it versatile for users looking to build or upgrade their systems around the 64-bit architecture.

One of the main features of the GA-K8VT890-9 is its utilization of the Via K8T890 chipset, which provides reliable performance for both gaming and general computing needs. The motherboard supports DDR memory with a maximum capacity of up to 4GB running at 400MHz. This allows for efficient multitasking and enhances the overall speed and responsiveness of the system.

In terms of expansion capabilities, the motherboard offers multiple PCI slots, including PCI Express x16 for graphics cards, allowing users to take advantage of modern GPUs for enhanced graphical performance. Additionally, there are PCI Express x1 and standard PCI slots for other peripherals, ensuring there's ample opportunity for system upgrades.

Storage options are comprehensive, with support for SATA 1.5 Gb/s connections. The GA-K8VT890-9 comes with several SATA ports for connecting hard drives and SSDs, promoting faster data transfer rates compared to traditional IDE interfaces. Moreover, it includes RAID support, extending its functionality for users who require data redundancy or improved performance from their storage solutions.

On the connectivity front, this motherboard features integrated audio with Realtek ALC655 codec for 5.1-channel sound output, allowing users to enjoy high-quality audio without the need for an additional sound card. Networking capabilities are provided through an integrated 10/100 Mbps Ethernet controller, ensuring reliable internet and network connectivity for online activities.

The GA-K8VT890-9 also showcases a user-friendly BIOS that allows for easy adjustments to system settings, making it suitable for novice users and overclocking enthusiasts alike. With its combination of performance, expandability, and user-friendly features, the Gigabyte GA-K8VT890-9 stands out as a solid foundation for building a capable AMD-based system suitable for various applications. Overall, it is a dependable choice for users looking to harness the power of the AMD platform while still enjoying modern technological benefits.