Fitting and removing the battery pack

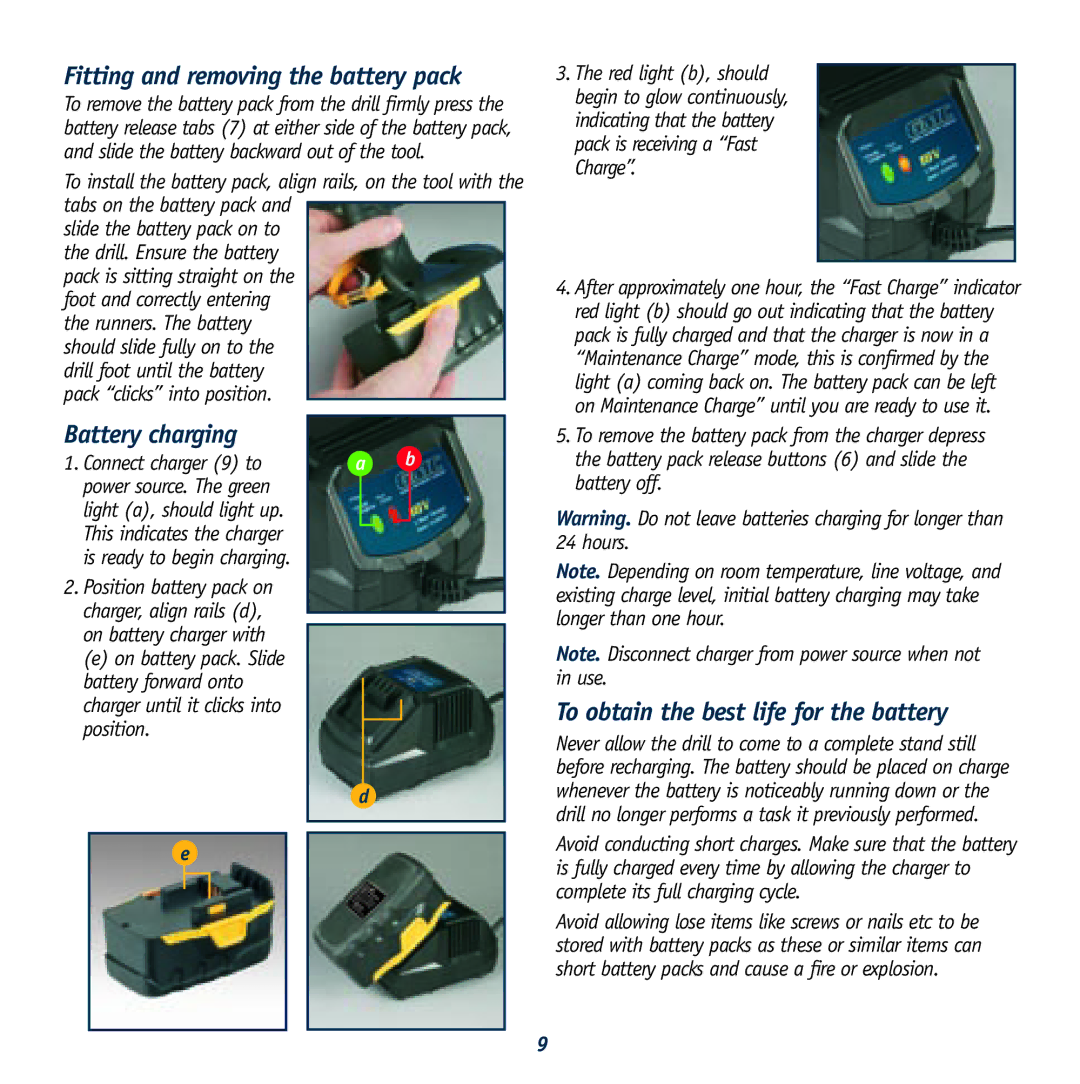
To remove the battery pack from the drill firmly press the battery release tabs (7) at either side of the battery pack, and slide the battery backward out of the tool.

To install the battery pack, align rails, on the tool with the tabs on the battery pack and

slide the battery pack on to the drill. Ensure the battery pack is sitting straight on the foot and correctly entering the runners. The battery should slide fully on to the drill foot until the battery pack “clicks” into position.

Battery charging


b

1. Connect charger (9) to

a

power source. The green


light (a), should light up.


This indicates the charger


is ready to begin charging.


2.Position battery pack on charger, align rails (d), on battery charger with

(e) on battery pack. Slide battery forward onto charger until it clicks into position.

d

e

3.The red light (b), should begin to glow continuously, indicating that the battery pack is receiving a “Fast Charge”.

4.After approximately one hour, the “Fast Charge” indicator red light (b) should go out indicating that the battery pack is fully charged and that the charger is now in a “Maintenance Charge” mode, this is confirmed by the light (a) coming back on. The battery pack can be left on Maintenance Charge” until you are ready to use it.

5.To remove the battery pack from the charger depress the battery pack release buttons (6) and slide the battery off.

Warning. Do not leave batteries charging for longer than 24 hours.

Note. Depending on room temperature, line voltage, and existing charge level, initial battery charging may take longer than one hour.

Note. Disconnect charger from power source when not in use.

To obtain the best life for the battery

Never allow the drill to come to a complete stand still before recharging. The battery should be placed on charge whenever the battery is noticeably running down or the drill no longer performs a task it previously performed.

Avoid conducting short charges. Make sure that the battery is fully charged every time by allowing the charger to complete its full charging cycle.

Avoid allowing lose items like screws or nails etc to be stored with battery packs as these or similar items can short battery packs and cause a fire or explosion.

9

Page 9
Image 9
Global Machinery Company GTX18250, GTX24250 instruction manual Fitting and removing the battery pack, Battery charging

GTX18250, GTX24250 specifications

Global Machinery Company has established its reputation in the industrial machinery sector with the introduction of its advanced models, the GTX18250 and the GTX24250. These machines represent the pinnacle of engineering and innovation, tailored to meet the diverse needs of today’s manufacturing landscape.

The GTX18250 is designed to provide exceptional performance for medium to large-scale operations. It is powered by a high-efficiency, low-emission engine that ensures optimal fuel consumption while reducing environmental impact. The machine boasts a robust construction, featuring high-strength materials that enhance durability and withstand the rigors of continuous use. Key features include a precision hydraulic system that enables smooth operation and improved control, which is critical for tasks that require fine detailing.

On the other hand, the GTX24250 offers enhanced capabilities suitable for larger industrial applications. Its engine is designed for high output, allowing it to tackle heavy-duty work with ease. The GTX24250 incorporates state-of-the-art technology, including an intelligent monitoring system that provides real-time data on performance metrics. This feature helps operators optimize operations and ensures timely maintenance, which ultimately extends the machine's lifespan.

Both models are equipped with advanced safety mechanisms, such as automatic shutdown systems and reinforced guarding, ensuring operator safety in various environments. Additionally, they include user-friendly interfaces with touchscreen controls, simplifying the operation process for all skill levels.

A hallmark of both the GTX18250 and GTX24250 is their modular design, allowing for easy upgrades and part replacements. This flexibility means that companies can adapt their machinery to evolving needs without significant additional investment. Furthermore, the machines have options for various attachments, increasing their versatility in handling different tasks.

In conclusion, the GTX18250 and GTX24250 by Global Machinery Company exemplify the perfect blend of power, efficiency, and innovation. With their advanced features, cutting-edge technology, and commitment to safety and durability, these models are poised to set new standards in the industrial machinery market, empowering businesses to achieve their operational goals effectively.