Infant Use


Utilisation par un bébé


For newborns and infants up


Pour les nouveau-nés et

to 6.8 kg (15 lbs.)


les bébés jusqu’à 6,8 kg


(15 livres).

Uso con bebés de corta edad

Para recién nacidos y bebés de corta edad de hasta 6,8 kg (15 libras) de peso.

TO ASSEMBLE CUDDLE

ASSEMBLAGE DU FILET

ENSAMBLAJE DE LA RED:

NET:

ENVELOPPANT :


Fig. 1

Attachment

Bar

Side

Panel

Foot

Bar

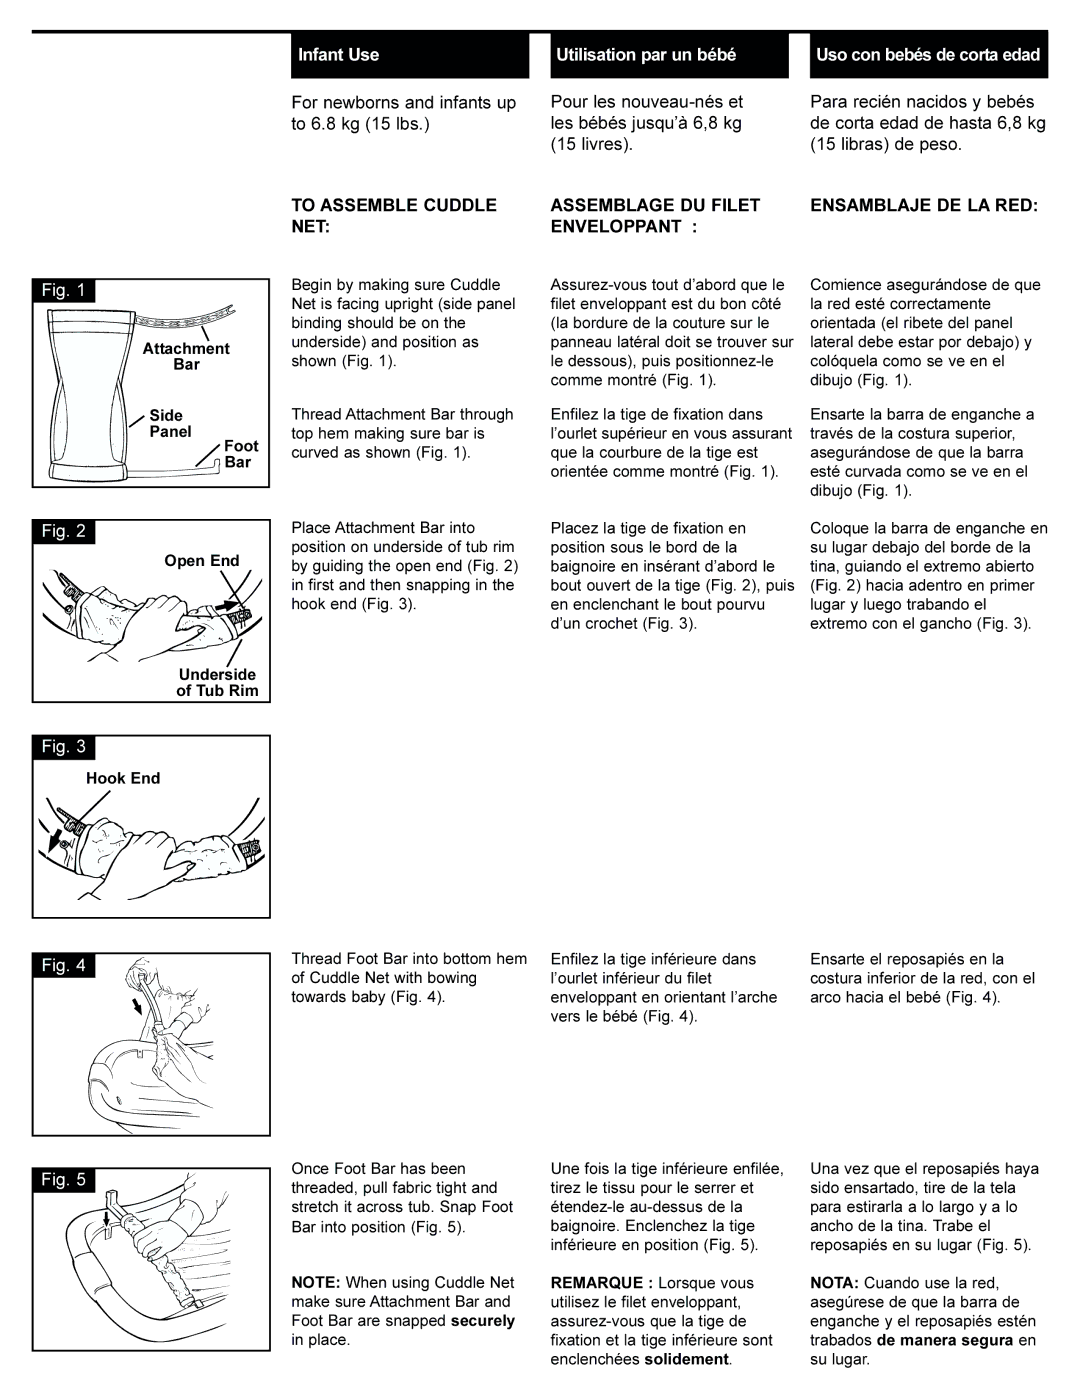
Begin by making sure Cuddle Net is facing upright (side panel binding should be on the underside) and position as shown (Fig. 1).

Thread Attachment Bar through top hem making sure bar is curved as shown (Fig. 1).

Assurez-vous tout d’abord que le filet enveloppant est du bon côté (la bordure de la couture sur le panneau latéral doit se trouver sur le dessous), puis positionnez-le comme montré (Fig. 1).

Enfilez la tige de fixation dans l’ourlet supérieur en vous assurant que la courbure de la tige est orientée comme montré (Fig. 1).

Comience asegurándose de que la red esté correctamente orientada (el ribete del panel lateral debe estar por debajo) y colóquela como se ve en el dibujo (Fig. 1).

Ensarte la barra de enganche a través de la costura superior, asegurándose de que la barra esté curvada como se ve en el dibujo (Fig. 1).

Fig. 2

Open End

Underside

of Tub Rim

Place Attachment Bar into position on underside of tub rim by guiding the open end (Fig. 2) in first and then snapping in the hook end (Fig. 3).

Placez la tige de fixation en position sous le bord de la baignoire en insérant d’abord le bout ouvert de la tige (Fig. 2), puis en enclenchant le bout pourvu d’un crochet (Fig. 3).

Coloque la barra de enganche en su lugar debajo del borde de la tina, guiando el extremo abierto (Fig. 2) hacia adentro en primer lugar y luego trabando el extremo con el gancho (Fig. 3).

Fig. 3

Hook End

Fig. 4

Thread Foot Bar into bottom hem of Cuddle Net with bowing towards baby (Fig. 4).

Enfilez la tige inférieure dans l’ourlet inférieur du filet enveloppant en orientant l’arche vers le bébé (Fig. 4).

Ensarte el reposapiés en la costura inferior de la red, con el arco hacia el bebé (Fig. 4).

Fig. 5

Once Foot Bar has been threaded, pull fabric tight and stretch it across tub. Snap Foot Bar into position (Fig. 5).

NOTE: When using Cuddle Net make sure Attachment Bar and Foot Bar are snapped securely in place.

Une fois la tige inférieure enfilée, tirez le tissu pour le serrer et étendez-le au-dessus de la baignoire. Enclenchez la tige inférieure en position (Fig. 5).

REMARQUE : Lorsque vous utilisez le filet enveloppant, assurez-vous que la tige de fixation et la tige inférieure sont enclenchées solidement.

Una vez que el reposapiés haya sido ensartado, tire de la tela para estirarla a lo largo y a lo ancho de la tina. Trabe el reposapiés en su lugar (Fig. 5).

NOTA: Cuando use la red, asegúrese de que la barra de enganche y el reposapiés estén trabados de manera segura en su lugar.

Page 2
Image 2
Graco 2560, 2562 manual Attachment, Bar, Side, Panel, Foot, Open End Underside Tub Rim, Hook End

2562, 2560 specifications

Graco is a well-respected name in the world of fluid management, and their Graco 2560 and 2562 models illustrate the company’s commitment to innovation and quality. These high-performance airless paint sprayers are designed for both professional contractors and serious DIY enthusiasts, offering a range of features that enhance efficiency and reliability.

One of the standout features of the Graco 2560 and 2562 models is their robust ProConnect system. This innovative technology allows users to easily swap out the pump without the need for tools, minimizing downtime and maximizing productivity. This is particularly important on large job sites where time is of the essence. Both models are equipped with powerful motors that ensure a consistent flow of material, enabling users to tackle various projects with ease.

The Graco 2560 and 2562 also feature the SmartControl technology, which provides precise pressure control. This allows users to adjust the pressure to match the application requirements, whether it’s a fine finish on a detailed trim or a heavier application on a larger wall surface. The ability to fine-tune the pressure reduces overspray and improves the overall finish quality, making the sprayers versatile for different materials and surfaces.

Another characteristic that sets these models apart is their compatibility with a wide range of materials, from thin varnishes to thick latex paints. This versatility is complemented by Graco’s MaxLife technology, which extends the life of the sprayer through improved wear and tear resistance. It’s designed to reduce maintenance needs and allow for extended usage on various job applications.

The Graco 2560 and 2562 also come with convenient features such as a built-in filter to minimize clogs and a flexible suction tube that allows for the capability to spray directly from a 1-gallon container. This enhances portability and ease of use on job sites where mobility is key.

In terms of design, both models are user-friendly, with intuitive controls and a lightweight build that facilitates maneuverability. This ergonomic design is crucial when working on extended projects, as it reduces fatigue for the user.

Overall, the Graco 2560 and 2562 airless paint sprayers represent a blend of efficiency, flexibility, and durability. With advanced technologies and thoughtful features, they stand out as excellent choices for anyone in need of high-quality paint application tools. Whether for professional use or for ambitious home improvement projects, these sprayers deliver exceptional performance and reliability.